


Yesterday, we presented the parts we are going to use for the new custom center console we are building for our 1987 Buick Grand National.
We felt like we needed to mention the following before proceeding, as some of you may wonder why we chose the specific wood materials we did for the build.
(3/4″ MDF would be the preferred size to use when putting screws thru the core, meaning the side/width/thickness of the board, however, there were other conditions that existed, so we adapted)
Our initial thoughts were to use 3/4″ MDF for the base, boxes and braces, and Hardboard Tempered Panel (3/16″) for the top side pieces, to save some weight. However, after realizing how heavy this would actually be using the 3/4″, we changed our minds.
Then we thought about using 1/2″ instead of the 3/4″. Still kind of the same problem about the weight (not that we’re ALL that concerned about it, but still, why add more weight into your Turbo Regal when you don’t have to).
.

.
So now the new plan was to use 1/4″ MDF (Medium-Density Fibreboard) instead of 3/4″ or 1/2″ for the majority of the parts.
1/2″ MDF will be used for all cross braces, to add in some structural integrity to the center console.
Also, the hardboard tempered panel idea was totally eliminated, and the 1/4″ is being used in those areas instead.
The total weight of the (mostly) 1/4″ MDF console (complete unit) is: 32 lbs.
The 1/2″ MDF version would be significantly more (with the 3/4″ being still even more).
The stock OEM console weighs 9 lbs, (made out of plastic), for comparison purposes.
Also, the add-on riser cupholder we had (long version) weighs about 8 lbs, for reference.
[so overall, once this new unit is completed, we are adding in almost twice the weight of what the stock console is]
While this new (1/4″) console unit weighs more than its factory counterpart, we believe the extra weight is worth it, considering all of the new features that are included in the custom build that weren’t present within the stock piece.
(and there’s really no other way to make a rigid sturdy console, unless you have access to a custom plastics shop, or are really good with using fiberglass!)
(not to mention that it’s much cooler looking than the original stock console!)
The 1/2″ version would have probably been acceptable too, but why add the additional weight in the car, when this part doesn’t really need to be all that “heavy duty” for the purpose that it serves within the vehicle.
The 1/4″ version is definitely the better choice.
But be aware of some new challenges by choosing to use this thinner material.
.
The PROS for using 1/2″:
1). you can create each sidewall of the unit (total overall length) from 1 single solid piece of wood.
[1/4″ mdf is not available in a full sheet of 4×8]
2). easy to secure (via screws) 2 perpendicular pieces (corners/joints) together (thru the core of the mdf material).
The CONS:
it’s twice as heavy as the 1/4″.
The PROS for using 1/4″:
1). The weight is half that of the 1/2″.
2). It’s a bit easier to work with, and handle.
The CONS:
1). Each sidewall (of the console unit) needs to be created from 2 separate pieces of the 1/4″ MDF.
Which isn’t that bad, but does need to be “seamed” together (somehow).
“WHY” it needs to be made from 2 separate pieces, is because 1/4″ MDF does not come in a 4′ x 8′ sheet, like the 1/2″ mdf does.
(and Home Depot is the ONLY local place we found that carries 1/4″ MDF at all, in precut 2′ x 4′ sections, costing about $13 each, making the overall cost just a bit more than using 1/2″ mdf)
2). The section in the middle (on the sides of the unit) where the 2 pieces meet (to create the overall length required), needs to be “joined” somehow (to keep the overall strength of the unit intact).
[you can see what we did to solve this issue below]
3). it’s harder to insert a screw thru the ends (the core) of the 1/4″ (meaning the corners/joints, as in when you attach another piece perpendicular to the first, like creating the console boxes, and are trying to form / secure the corners together).
[one solution is by using staples in the places that need securing in these areas. The other being it has to be glued together, which is what we did, in addition to putting some duct tape around the corners for extra securing power. When we inserted the boxes into the console, they were glued in place as well to the sidewalls, so with all these bonding methods to hold them in, they aren’t likely to be moving around anywhere]
.
By using this thinner 1/4″ mdf, we totally eliminated using the hardboard panel that was mentioned previously. It’s replaced with the 1/4″ MDF. This makes one less material that needs to be acquired and used (and the weight difference between the hardboard and the 1/4″ mdf isn’t really too much more).
.
Since we know all of the sizes of the pieces that are needed, we took our sidewall template and placed it on the 1/4″ mdf, then traced it out.
Outlines onto the mdf board were done for the 2 “sidewall joining” pieces (to keep the front and back sections of the sidewall together, into 1 piece), 1 sidewall (for the rear console box, on the passenger side, for extra support the lid hinge) piece, 4 sides for each console box plus the bottoms, 2 console lids, the front gauge panel, and the front face for the console box.
Pretty much all the required components are ready to be cut out.
[tomorrows post will reveal all needed pieces that can be premade, and ready for assembly when they are needed]
.
MODS NEEDED WHEN USING 1/4″ MDF:
Using the 1/4″ MDF (instead of the 1/2″ or 3/4″) requires some extra steps to be done because of the constraints of that choice. These won’t really be explained in detail when we show you the actual build how to, so we wanted to explain them briefly now (since this is a pretty short post today).
1). the total length needed for the sidewalls of the console is 68.5″.
We did NOT just make the 2 separate pieces equal in length, the front part is 36″ and the rear part is 32.5″.
This was done purposely to put the seam roughly in the center of where the front console box sits. Since the box has (attached) tabs on both the front and the rear (for holding it to the sidewalls), and they will be secured to the sides (via matching tab brackets), these tabs will aid in securing the 2 sidewall pieces together.
.

.
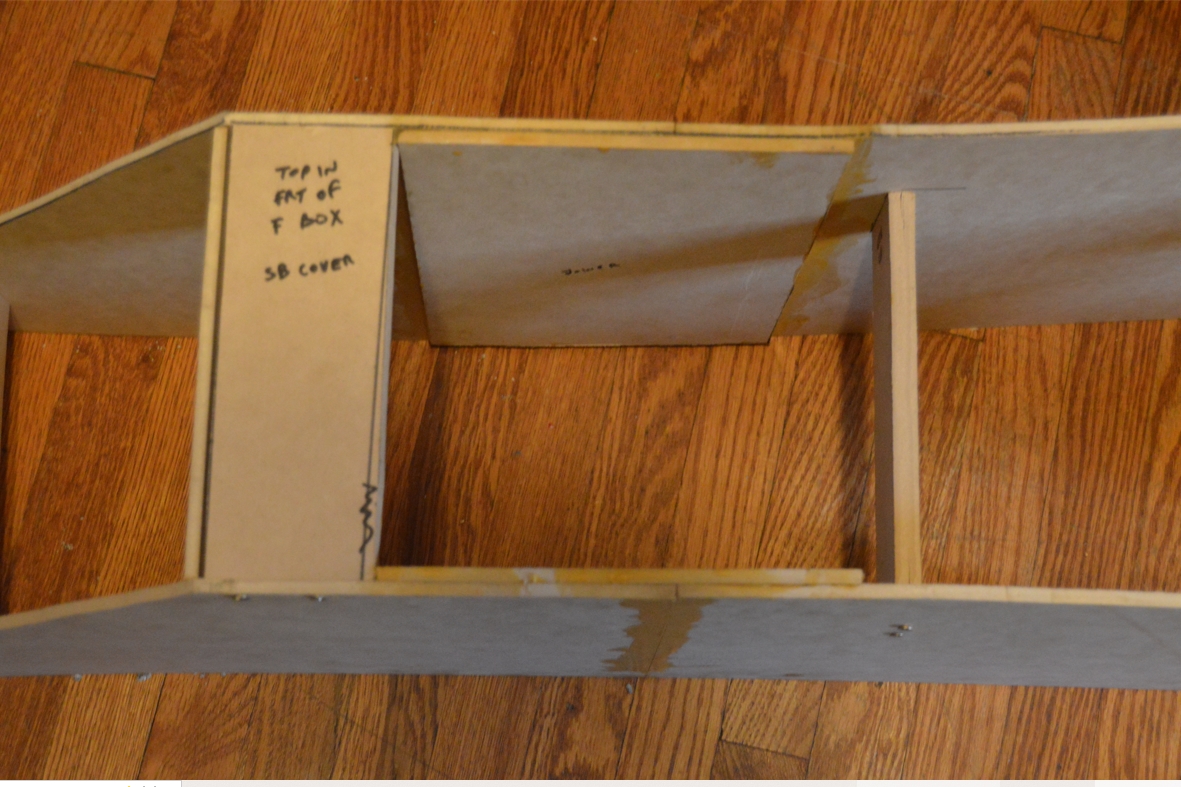
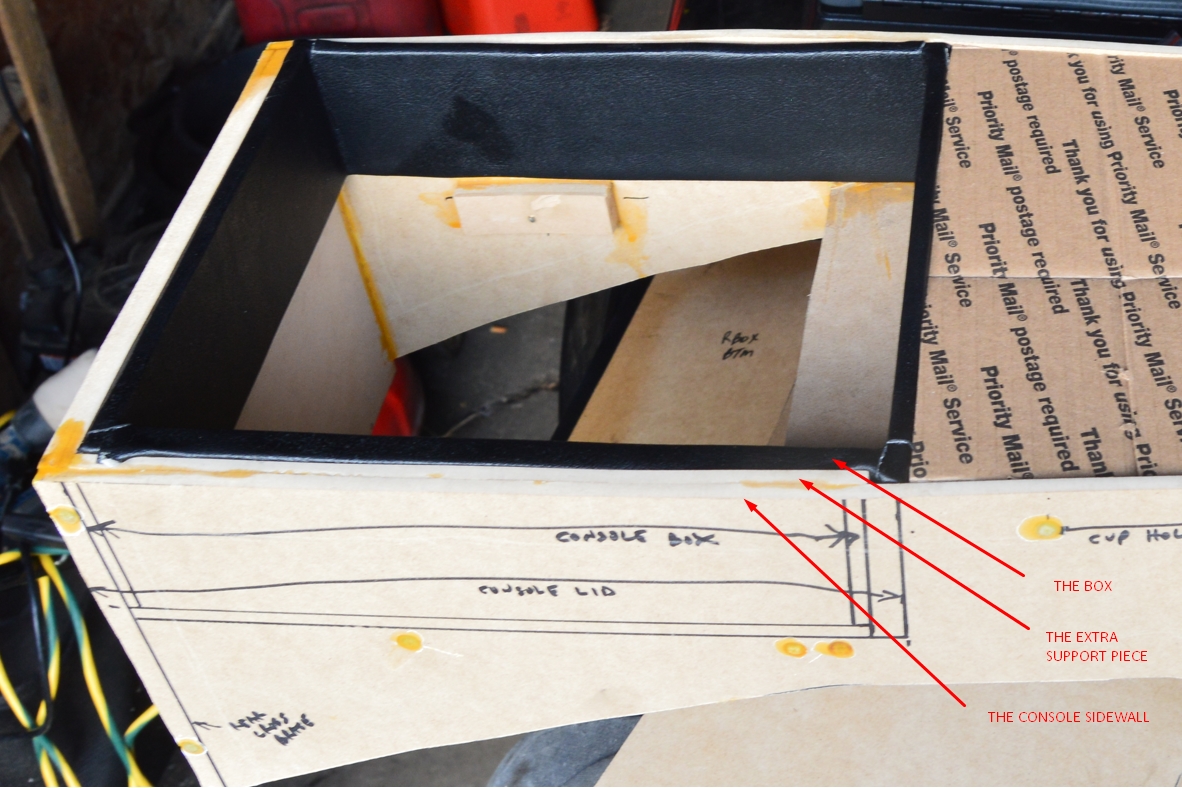
2). we also added another 8.5″ wide x 14″ piece (1/4″ mdf) onto the INSIDE of the console (on both sidewalls), where the seams meet.
The sizes of these support pieces match the size (length and depth) of the front console box, which aids in supporting the console box, as well as the sides of the console.
These extra pieces are also useful as another brace to be able screw down the hinges for the console boxes.
(so with these “joiner pieces” there’s no worries about it splitting or falling apart in the middle where the 2 sidewall pieces meet)
.
The front console box is made up of all 1/4″ pieces, EXCEPT FOR the passenger side, which is a 1/2″ thick piece.
The 1/2″ piece serves as an extra brace for the console side (the box is glued to the sides, as well as screwed as stated above).
This piece also is useful as a place to screw down the hinge for the console box lid.
3). The rear console box, when assembled, gets a 1/2″ piece used on the passenger side as well, instead of 1/4″ like the rest of the box is made out of (to again, mainly aid in securing the box lid).
There is also an extra 1/4″ piece that is glued to the passenger side of the console box sidewall.
[1/4″ sidewall + extra 1/4″ piece + 1/2″ box side = 1″ thick on passenger side, which is needed for the hinge to have somewhere to mount to]
.
.
The 4 main (vertical) support cross braces, as well as the 2 (horizontal) braces are made from 1/2″ MDF, since they provide structural support for the entire unit.
.
This is an ongoing series about creating a new custom center console unit for a Buick Grand National.
See the steps taken below to create (they will be linked after publication).
Find the first part (thoughts, plans) here:
Custom Center Console for Buick Grand National (1 of 7)
Find the second part (specs, parts, building template mockup) here:
Custom Center Console for Buick Grand National (2 of 7)
Find the third part (wood size choices & the weight differences) here:
Custom Center Console Buick Grand National (3 of 7)
Find the fourth part (prep work, cut out parts) here:
Custom Center Console Buick Grand National (4 of 7)
Find the fifth part (building the console) here:
Custom Center Console for Buick Grand National (5 of 7)
Find the sixth part (wiring up all the lights) here:
Custom Center Console for Buick Grand National (6 of 7)
Find the seventh part (installing the console) here:
Custom Center Console for Buick Grand National (7 of 7)
.


