


OK, so we thought we were done with everything regarding the fuel system in the 1987 Buick Grand National that we’re working on.
While working on doing the fuel feed line installation, we noticed the fuel pump hotwire kit that was on it was wigging out.
Was it the relay, the wiring, or something else?
Whatever the case may have been, it got ripped out.
Start, mostly, from scratch.
The old “hotwire” seemed to be a #14, maybe #16 gauge wire…
That seems a little small.
Perhaps not, but since we ARE starting over, we’re installing a 10 gauge feed wire!
That’ll make sure full power makes it to the fuel pump without any voltage drop!
The hotwire kit isn’t really all that complicated to make yourself.
If you have all the items required, takes less than 30 minutes altogether.
Here’s what you’ll need:
~ 18 feet of 10 gauge wire (red)
~ a 16″ piece of 10 gauge wire (red)
~ a 16″ piece of 10 gauge wire (black)
~ a 6″ piece of 14 gauge wire (black)
~ 2 6″ pieces of 14 or 16 gauge wire (whatever you have is ok, for step #10)
~ a fuseholder with a 20 amp fuse (a sealed unit is better, but whatever)
~ a 30/40 amp relay (a sealed unit is better, but whatever)
~ asst 3/8″ ring terminals
~ asst butt connectors
~ asst spade connectors
~ 20 feet of engine loom
~ a good handful of zip ties
(if the relay you bought has the wire terminals base/plug, you’ll need the butt connectors to connect the wires. If not, then use spade terminals to connect to relay. Our relay had the base connector)
We cheated, sort of, and reused the fuseholder & wire connector (plug & play section) from the original kit.
The relay we trashed, since we wanted most everything to be new.
Here’s how you can DIY (Do It Yourself) and save yourself 50 bucks from buying one.
(of course, a DIY version might not look as clean and professional as getting one from one of the Buick Vendors, so the choice is yours…).
Step 1. Take the 16″ piece of red #10 wire and attach it to one end of the fuseholder.
(this wire can be shorter if you wish, you just have to figure out where you will be mounting this. somewhere near the alternator is preferable. the shorter the wire, the better.)
{solder it or use butt connectors, etc.
shrink wrap or electrical tape the exposed connecting section.
Do that on ALL of the connections you make!}
Step 2. Attach a 3/8″ ring terminal on the other end of the wire.
(this will attach to the alternator output stud).
Step 3. attach the 18′ piece of red #10 wire to the other end of the fuseholder.
Step 4. cover all of the new wire with the engine loom.
It should look like this right now:
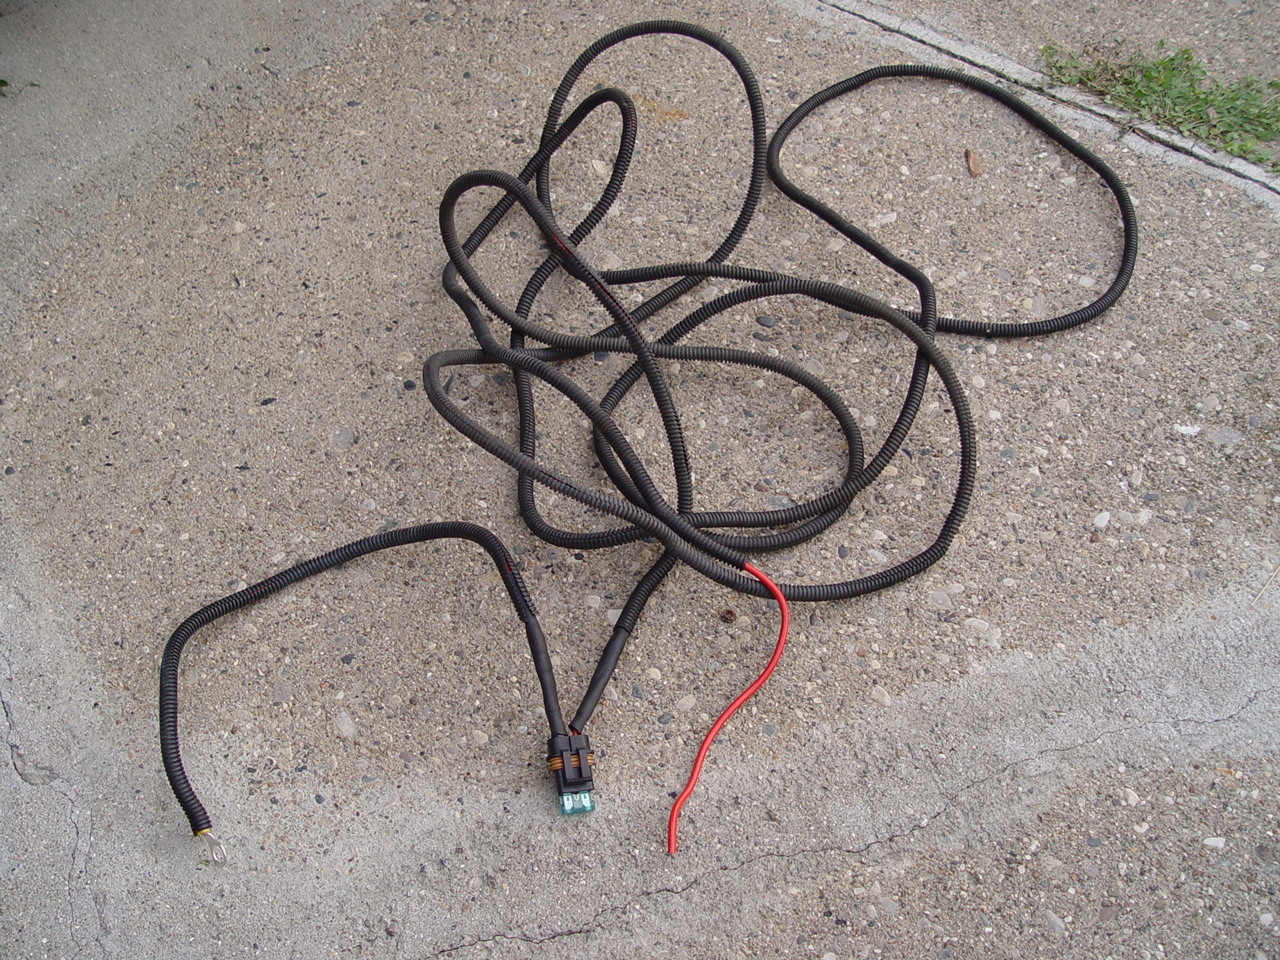
Step 5. remove the fuse, mount the fuseholder, and then attach the ring terminal to the alternator.
Step 6. run the wiring out of the way of everything you can, all the way to the back of the car.
(we followed the fuel line routing on the drivers side of the car).
Zip tie it down every so often where needed to keep the wire from dangling.
Step 7. If you had bought a hotwire kit from one of the vendors, the advantage is that it’s “plug and play,” whilst doing it yourself, you will have to splice into the factory wires.
(I’ve seen so many TR’s with hotwire kits, I’m trying to remember how stock ones are actually connected up!
I believe the 3 wire connector coming from the gas tank just gets plugged into the main harness wire that drops down from above. In the aftermarket kits, they come with 2 plugs, one plugs into the main harness, the other plugs into the tank harness. Regardless, you should be able to figure out the wiring from the descriptions stated below).
The main stock harness for the fuel pump comes down from where the tail lights are on the drivers side, and connects to the fuel pump harness that is attached to the top of the gas tank.
It is a 3 wire connector:
The first wire on the left: gray = power, in terminal C on the gas tank connector.
The wire in the middle: light blue = sender (fuel level), in terminal B on the gas tank connector.
The wire on the right: black = ground, in terminal A on the gas tank connector.
(if you already upgraded your fuel pump, or the wiring harness, to a kit like racetronix offers, the wire colors are: red, purple, black).
the relay connections (marked on the relay):
30 = new power supply (from alternator)
87 = new feed line powering up the fuel pump
85 = ground
86 = old power wire from stock harness
Think about the relay connection this way, when the old factory power wire (gray, from the connector) energizes the relay (86), then (black wire) goes to ground (85) to complete the circuit, the relay THEN gets its power (new red 10 ga wire) from (30) and sends it out via (87) {the old gray wire TO the tank}.
There is NO power coming out of (87, the new power feed TO the fuel pump) if there is NO power coming into (86, the old power supply).
(some relays have 5 terminals; an extra one labeled 87a; this wire will not be used in this application, so you can either remove it, or cover the end so its not exposed).
{it would be better if we could run the 10 ga wire all the way to the fuel pump, but thats not really possible since we’re using a relay. But don’t worry, at least getting the new (full voltage) power to the back of the car is a huge improvement. The volts won’t drop from the back of the car (the end of the 10 gauge wire) since it doesn’t travel too far from there to get to the pump}
[don’t pay attention to the wire colors that are on the relay in these pictures (it’s a generic relay), they’re kinda goofy, and don’t really correspond to what anyone who is familiar with electrical wires & colors would recognize, just follow what the #’s on the relay represent, as stated above. The #’s work the same on ALL relays]
Step 8. start with the ground, terminal 85 on the relay. take this wire & connect it to the black wire on the fuel pump harness (splice into it) AND attach the 6″ piece of black #14 wire that runs from this new connection to the gas tank strap bolt. use a 3/8″ ring terminal on the end of the wire. this will ground the tank via the sender & the factory harness to the chassis.
[so you will have, starting at the gas tank strap bolt: a wire bolted to the strap bolt that goes into a connection that splits off, one side to relay terminal #85, the other side to the black wire on gas tank harness]
(if it’s easier, {but will also create more wires}: attach a wire from terminal 85 to the gas strap bolt. then cut the black wire on the gas tank side of the connector. extend both of these wire ends & attach them both to the gas tank strap. that accomplishes the same thing that the above instructions does)
{make sure you have a good ground connection at the gas tank strap bolt. use sandpaper to get to bare metal, then attach ground wires, then put bolt on. you can always hit this spot afterwards with a little paint to keep it from rusting}
(the #85 terminal on the relay in the pics is a dark blue colored wire)
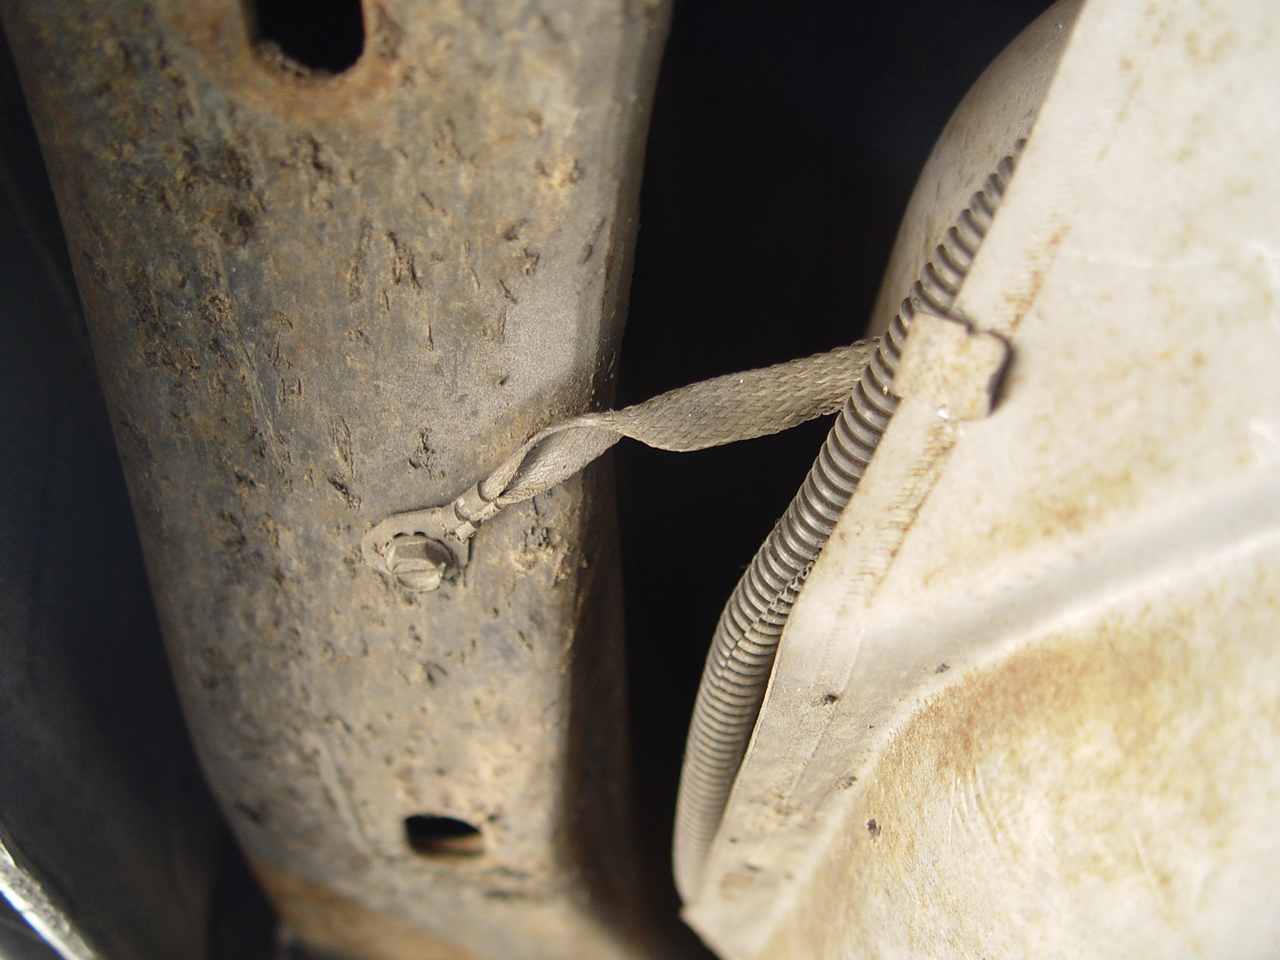
Step 9. make a new wire. from the point of the gas tank strap bolt, use the 16″ piece of black 10 ga wire (with a 3/8″ ring terminal attached on both ends) and run it over to the frame. this is a redundant type of ground, but it couldn’t hurt to add it on.
shown in the photo is an extra ground strap that was included with the original hotwire kit that was on this car.
If you already have this strap on your car, leave it there & use the new wire you are making & connect it here as well (on the frame).
If you don’t have this strap, use any convenient hole in the frame or drill a new one.
(you could also make this wire longer & bolt it up where the bumper goes)
Step 10. (leave yourself some room here, figure out how much you need BEFORE you cut!).
cut the gray wire on the gas tank side of where the 2 harness connectors join.
this is the old power feed wire (to the fuel pump).
(you may need to add some short pieces of wire to each side of this gray wire after you cut it, so you are able to connect them to the relay, that’s what the 2-6″ pieces of 14/16 ga wire was for in the parts list)
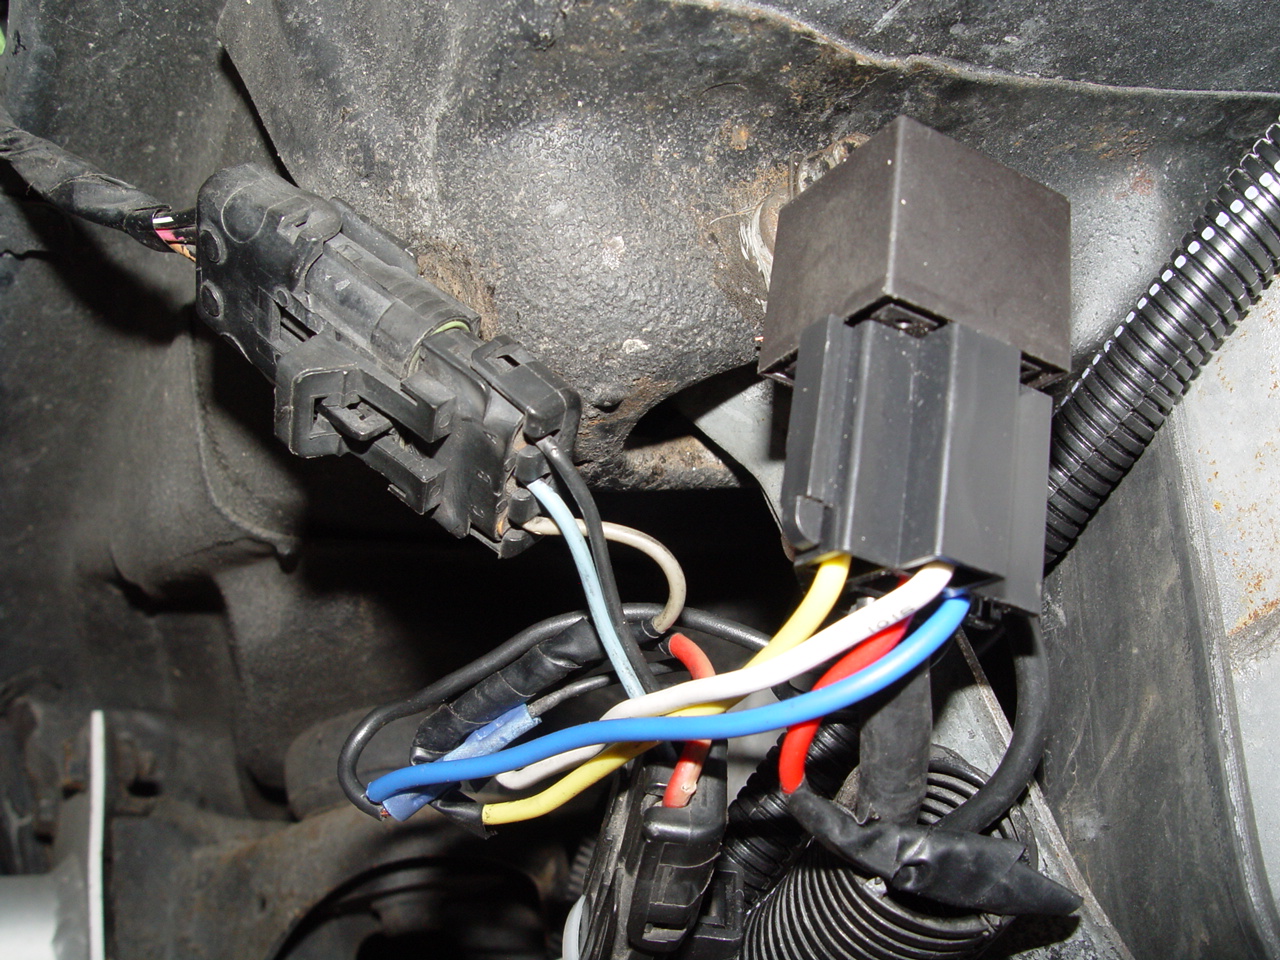
the section of the gray wire that goes TO the gas tank should be connected to terminal #87 on the relay.
this becomes the new feed wire going to the fuel pump.
(the relay in the picture: terminal #87 is a white colored wire)
the other side of the gray wire you cut (the part that’s left on the connector), gets connected to terminal #86 on the relay.
this is what turns the relay on to send the new power to the pump from the relay.
(the relay in the picture: terminal #86 is a yellow colored wire)
Step 11. attach the new 10 ga red power wire to terminal #30 on the relay.
(the relay in the picture: terminal #30 is a black colored wire)
(the red wire ON the relay is an extra terminal ON the relay {#87a} that is not used in this application, so its been taped closed with electrical tape)
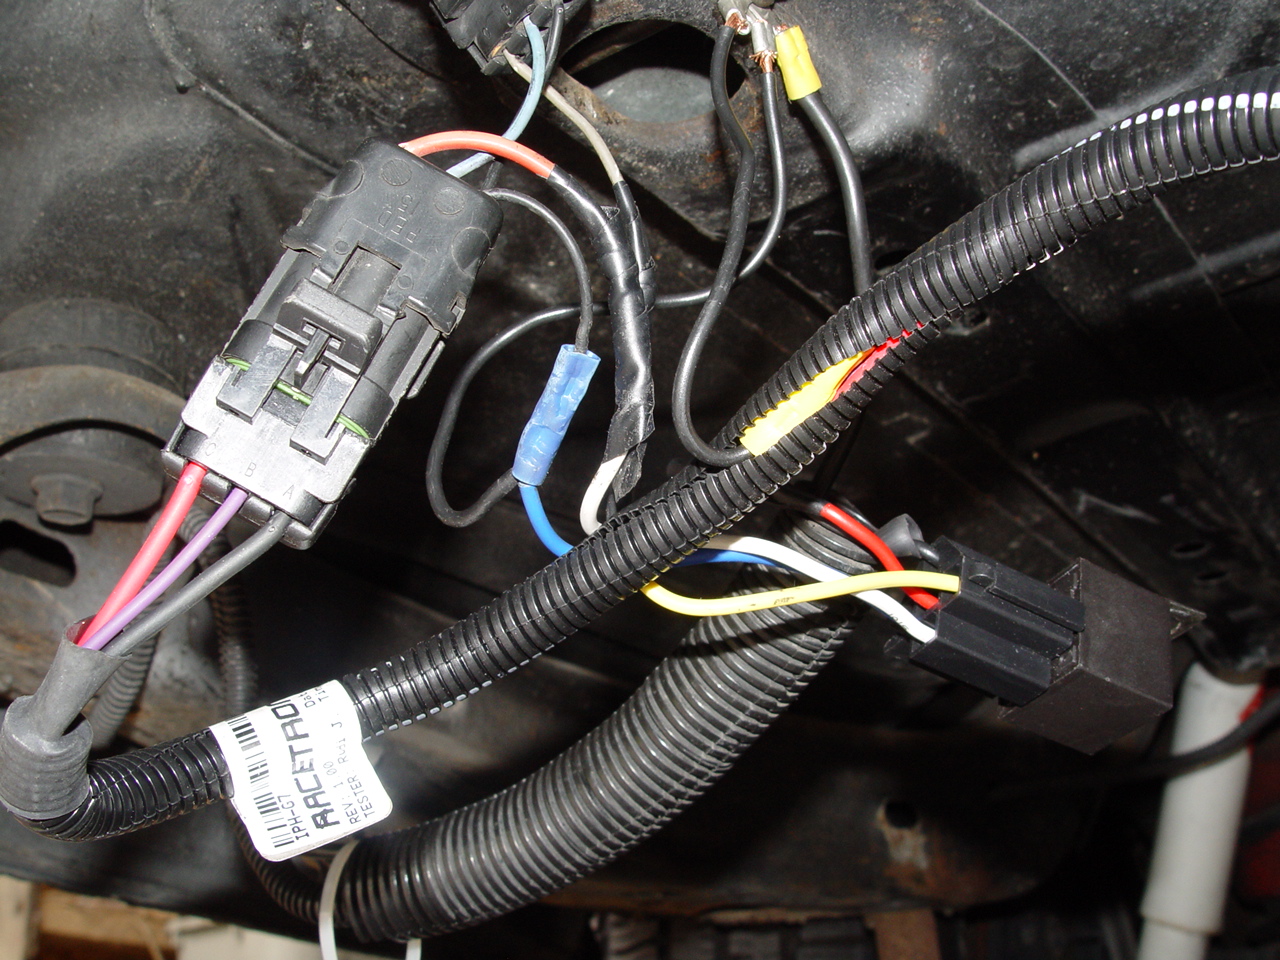
After all the connections have been made (are done), I then attached the relay onto the gas tank strap bolt, then added another nut to hold it on.

Step 12. use a small piece of wire loom to cover up the wires so they are not dangling down.
zip tie it all into place so it doesn’t move around.
Step 13. start the car, check voltage output on the gray wire that goes to the gas tank. should be 12+ volts.
If not, check your connections.
If volts are low, you might have a bad alternator.
If you have NO volts, the wires are probably not connected up right.
As your RPM’s go up, your voltage here should go up (especially if you have a voltbooster installed).
All good? You’re done.
.


