


It’s always exciting to get new shoes for your Buick Grand National.
But sometimes getting to the finish line is a struggle!
It’s always something, if it’s not one thing, it’s another….
After searching a year for “just the right rims” (I wasn’t in a hurry for them), I finally decided on a set.
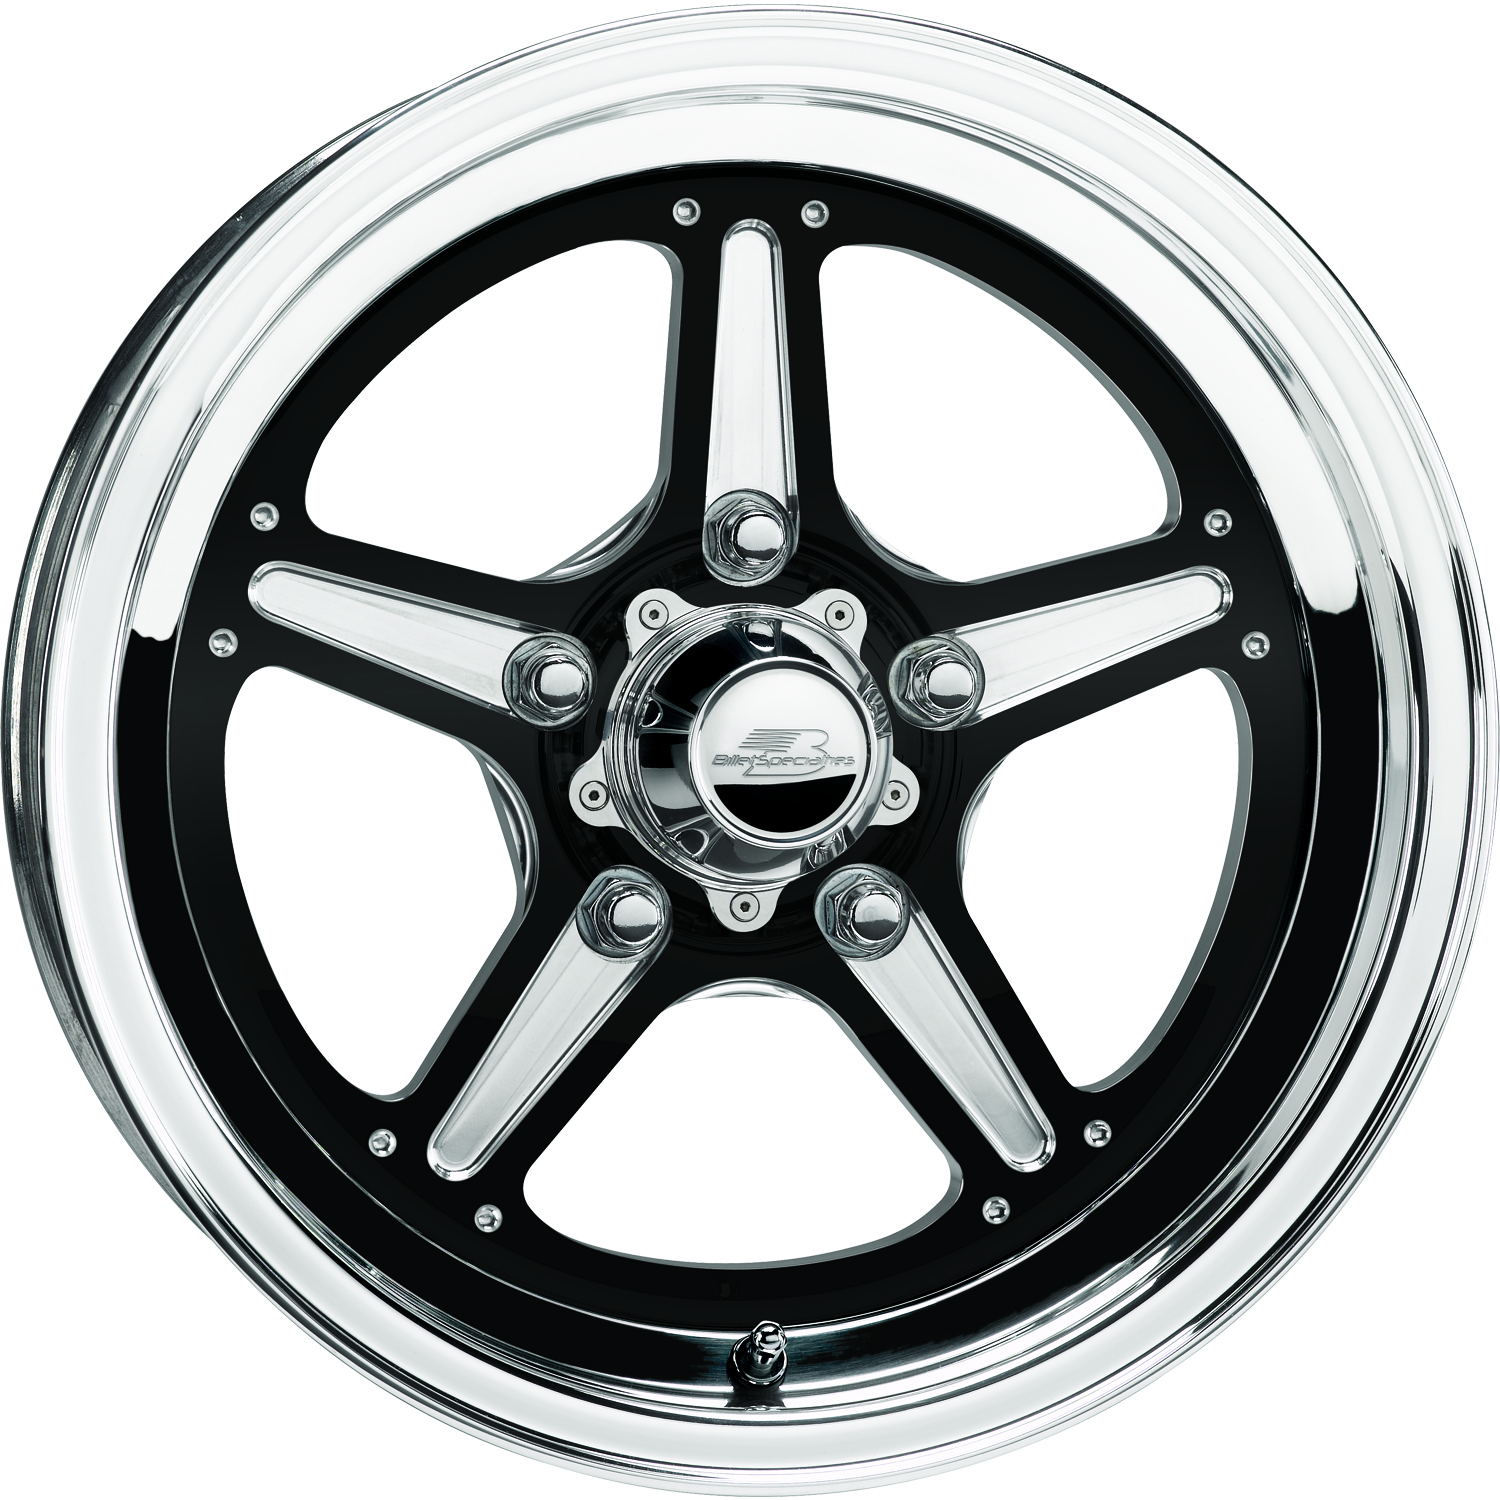 I initially was looking at the Billet Specialties Streetlite Black 5 star rims (about $2200).
A nicely designed rim that looks great on the Turbo Regal cars.
However, the more I looked around at this “race style” wheel, the more I realize that there are actually a lot of G-body Regals with these wheels on them out there already.
Not good, because I like being different and not being like everyone else.
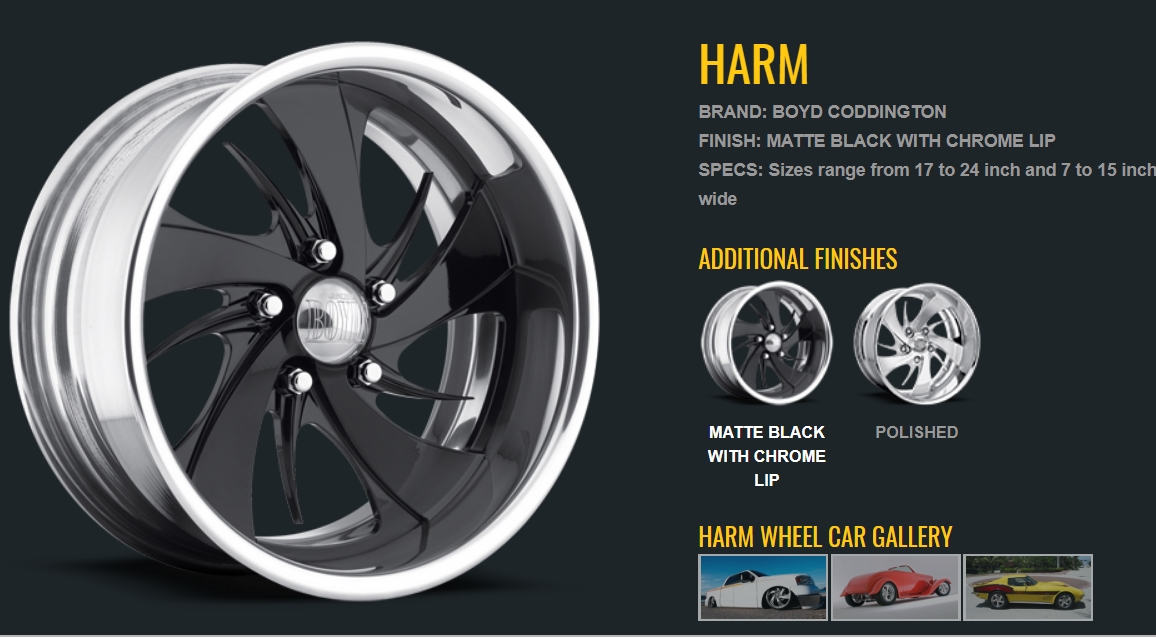
Then I find a Boyd Coddington creation named “Harm” done in polished billet aluminum.
The centers have an optional black powdercoating on them (for $150 extra, per rim), which I liked.
$3500 a set (not powdercoated) for 17″ x 8″ and 17″ x 10″.
(which was problem #1, didn’t want to spend that much).
[for comparisons sake, the Boyd’s have a chrome lip (when you order the black center option), whereas the Intro’s below are polished aluminum. Not that one is better than the other, just depends on which style you prefer]
.
.
The search continues.
Another wheel producer, Intro Wheels, makes a set that looks nearly identical, and (comparatively) named “Dangerous”, except in the sample picture they provide, the “spikes” (in the center) point in the opposite direction from the picture provided by Boyd.
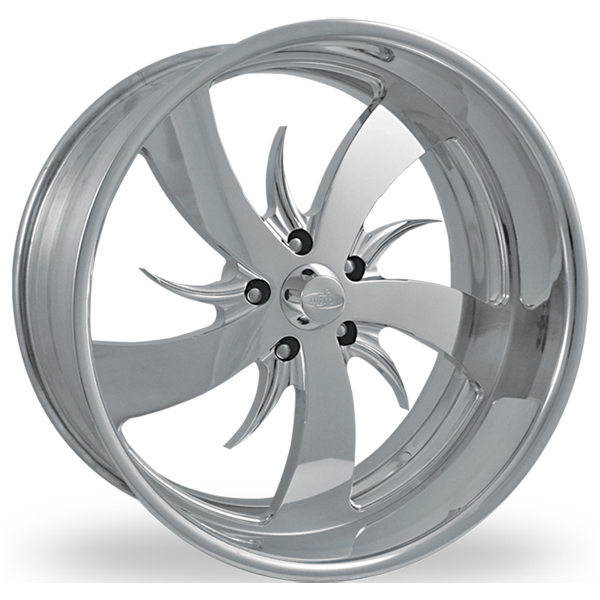 No biggie, I can live with that.
I settle on these.
I found a dealer (in California) for them, and with a special online coupon code, scored them for $2000 (shipped).
Of course, they also wanted $150 per rim (added to the above) for powdercoating the centers.
.
After contacting a few local powdercoating places, I could get them done for $85/rim, so I order them without the optional black powdercoating, in the polished aluminum finish.
(which would turn out to be problem #2, details later…)
OK, cool, they quoted me a 3-4 month build time.
I have no problem with waiting (it’s the beginning of January), but they arrive in 6 weeks, which was great!
Previous to actually ordering the rims, you’ll need to decide on backspacing.
After numerous times of measuring & thinking about how I wanted them to look (how much frontspace there would be), as well as reading what sizes everyone else was using, I came up with 4″ on the front (for a 8″ rim) and 4.5″ for the rear (on a 10″ rim).
Since I have GNX flares on this Buick GN, and I’m not seeking the “tucked in” look, I was trying to get the outer edge of the tire to be as close to the outer edge of the flare as I could (for the rear) – meaning I could fit a big tire on back.
[and now that it’s finally done, just FYI, I could have went with a 10.5″ rim on the back]
[without the flares, a 9.5″ rim can be done, but it’s tight, and you’ll need to roll the quarter panel lips]
[as a side note, if you have bigger wheel studs, be sure to mention that when ordering, as rims normally come with holes to fit the OEM dimensions. Luckily, I told them about having bigger rear studs, so they enlarged the lug nut holes to fit]
For the fronts, a 4″ backspace on a 8″ rim is pretty common, so that’s what I went with.
[a 3.5″ backspace is also pretty common too, which now that my fronts are on the car, I wish I would have gone with this backspacing, to bring the tire outwards a little bit more]
Back to info about the finished rims.
The polished aluminum rims look great as-is, but I really wanted a two-tone looking effect, with the centers black and the outer section remaining the polished aluminum look.
I take them into the local powdercoating shop and they tell me they can’t do the 2-tone deal like I wanted (I should have been real specific about what I wanted when I got a quote previous to ordering the rims).
Grrrrr……
The owner does suggest I go to a different powdercoating shop & see what they say.
No go. 🙁
They’re not willing to do it either.
Double grrrr….
I hit up a third shop, same thing. WTF.
(this is problem #2)
So now my decision was, either leave the entire rim polished, or get it all black powdercoat.
I choose the black, figuring at some time later on down the road I can always remove the outer edge of the black if I want.
I take them back to the first powdercoating place & get them done for $380.
[$85/rim PLUS $10 for each center cap, which they didn’t mention on the initial quote. problem #3]
It’s a 3-day turnaround time.
 OK, tire time (I bought them 1 month after ordering the wheels, figuring I wanted to have everything all ready to go without waiting once the rims came in).
I knew the exact tires I wanted, and ordered them thru Jeg’s (on sale + online coupon code = deal!).
The fronts would get BF Goodrich g-Force Comp-2 A/S 235 55 17 ($227 shipped).
The rears would get Mickey Thompson ET Street S/S 305 45 17 ($525 shipped).
These were delivered 2 days after I purchased them online.
When you acquire brand new wheels for your ride, you’ll also need to get your own valve stems. Plus new lug nuts if they aren’t the same type that your old rims used.
(which in my case, means I need to get all of that).
I buy metal, bolt-in, black in color, long valve stems, about $10 off ebay.
I also need to get conical seat lug nuts.
But I want them in the color blue (to match all the other blue items on the GN).
Two different sizes are needed, the fronts get the stock 12mm 1.5 type.
The rears need 1/2-20 (bigger studs than stock in the aftermarket axles).
Both sets of lug nuts I found are only sold in sets of 20 (even though I only need 10 of each size).
Both sets are open-ended lugs (for easy race track inspections).
The total cost for both was about $50.
Both of the above arrived in about a week.
Ok, now I have in hand everything I think I need.
I install the valve stems, and find out that the hole they go in, is directly underneath one of the spikes.
Uggg… the valve stems are too long, I won’t be able to put air in the tire.
(problem #4)
I go searching for a shorty-type valve stem (again, the all metal aluminum type, bolt-in), preferably in the color blue.
Nope, the only ones I can find are like 50 bucks! Next!
Black ones it is, $10 shipped.
A week later they show up.
(1st balancing job:)
It’s finally time to take the rims & tires in to get them mounted and balanced.
When you don’t buy either of those items from where you’re getting them done at, I think they charge you more. OK, not that big of an issue.
$100 to mount & balance the 4 (at Discount Tire).
It’s near the end of their day, so I have to leave them their overnight.
The next day I go to pick them up.
The fronts are done, the rears they tell me they couldn’t balance (without a HUGE amount of weight added to them).
(problem #5).
ok, they give me a $20 refund for not being able to balance the rears.
Either the tires are way out of balance (from the factory), or the tire shop just isn’t capable of performing this task.
(2nd balancing job:)
A friend suggested I go to a store that specializes in race tires (McCormack Racing in Lincoln Park, MI) to see if they can help.
Bingo! They are able to balance them. In 20 minutes. For 40 bucks.
(lesson learned) take your RACE tires to a RACE shop! $40 & done (static balance). Tires were fine, 3 ounces of weights on one, 6 oz on the other. Anything up to 9 oz is ok they said. They also told me chain stores have a problem balancing soft tire compounds (like the MT tires), and throw their machines out of whack (which it did). Good to go now! vroom vroom!
Cool! Time to install the new wheels on the vehicle!
Rears installed first, then the fronts.
Apparently, like a lot of Turbo Buicks, the rear axle isn’t quite centered (side to side).
Or, the entire body needs to be shifted over to the passenger side somewhat.
(problem #6)
Easy solution, just add a spacer on the drivers side to make it look mostly the same on both sides (as far as the tire gap between the outside of the tire and the outside of the GNX flare, being the same distance on both sides).
There’s about a 3/4″ difference between the sides (before I add the spacer), and not wanting to go too overboard (or unsafe), I decide on acquiring a 1/2″ spacer.
A set of 2 black billet aluminum 1/2″ spacers, $20 shipped from ebay.
And another week goes by.
In the meantime of waiting for them to arrive, I’m dealing with the fronts now.
I’m not comfortable with that.
(problem #7)
Longer wheel studs are needed.
ARP #100-7708 (2.5″ UHL) cure the issue, for $46 shipped.
They arrive on the same day that the spacer does.
Takes a few hours to beat out the old studs & replace with the longer ones.
(This car has the S10 Blazer spindle/brake upgrade).
The rears, I didn’t have a problem with the studs, as this G-body Regal already has aftermarket axles that use 1/2″ (3″ long) wheel studs.
Finally, I’m able to put all of the new wheels on and think I’m going to be good to go.
Nope.
(problem #8)
Remember in the beginning, when I said the difference between the 2 brands of rims was the direction of the way the spikes point?
Well, apparently there is no difference!
The Intro Wheels are “directional” rims!
[which means you can have (the spikes) pointing either way, depending on how you mount the tires]
But it sucks, because now that the rims are mounted on the car, I realize that the fronts (the spikes) are pointed towards the back of the car, and the rear rims are pointed towards the front of the car!
UGGGGG!!!!!!
[I’m not sure if the Boyd’s were directional rims as well or not]
So, to get the rims all pointed the same way (with the spikes pointing towards the rear of the vehicle), means I need to get the rear tires dismounted, switched sides, and rebalanced…
3rd round of balancing, here we come….
Back to McCormack. Another $40. Same day service however.
This time, 1 side takes 7 oz, the other 2.5 ounces.
Back onto the car they go.
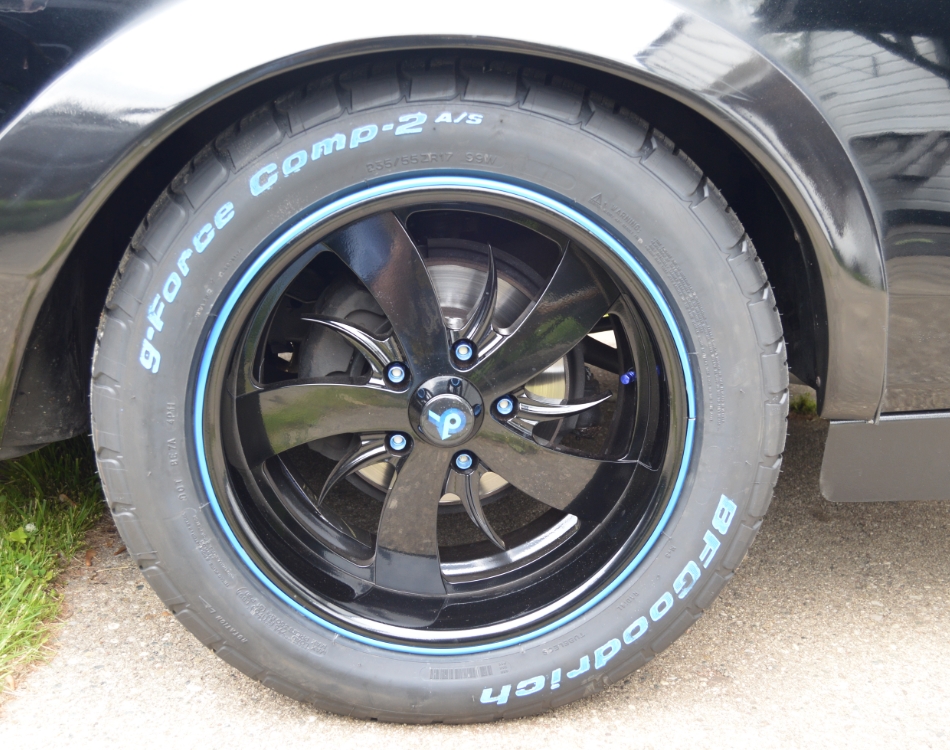
They look good, they fit good.
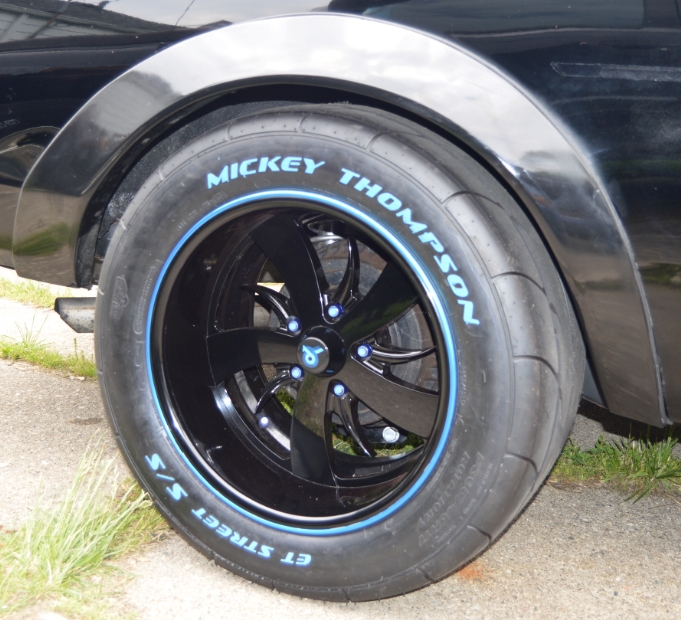
Now that they’re actually on the car, I’m not minding them being all black (instead of the two tone version I originally wanted).
The blue lug nuts help.
I also bought a blue paint pen ($1 off ebay) and painted the tire letters blue (1 pen was actually enough to do all 4 tires, with some paint still remaining, despite some people saying there isn’t much paint in the pens).
I had blue valve stem caps on order as well (less than $1 from ebay, but coming direct from China, lol, so it took a month for delivery).
For the center caps, there’s a guy on facebook (Ray Regal) who sells custom made decals (thick plastic stuff, pretty nice, but $20 each). I had a custom set made that feature the turbo 6 arrow, except it was custom designed using 2 different shades of blue!
The last item I purchased ($10 shipped), was an item called a rim ring (wheel ring). This is basically a “U” shaped piece of plastic that goes on the very outside of the rim lip and secures to it via a strip of double sided tape.
Of course, this item is blue as well.
(problem #9)
When they arrive, and after looking at the rim, I realize there isn’t a hard edged (outward-facing) lip on the wheel like some rims have (it’s just smooth & rolls over into where the tire seats on the rim). Which means they’re not going to fit exactly like they should.
Not too bad, I can just add another strip of 3M double sided tape ($6/roll) over the top of the existing tape, and that should give me enough grip to adhere to the rim (which it does).
All of these little items break up the rim being all black against the black paint on the Buick Grand National.
I think it looks fine.
Sometime in the future, this car will get a WH1 inspired paint job, so that should offset the all-black rims even more.
.

.
Yippee!
It’s finally done, it’s really all good to go now!
[until the second time I drive the G-body Regal… on the freeway… where I hit a bump… and one of the front blue rim rings flies off… 🙁 problem #10]
5 months and about $3500 later.
Just in time for car cruise season…
.
Moral of the story:
Prepare yourself with TONS of research and don’t expect to have new wheels on your car anytime soon if you’re in a rush.
Plus be aware that issues will come up that you aren’t anticipating at all.
Hopefully this information will save you some headaches, and/or provide you with details that you hadn’t thought about dealing with when you decide to acquire some new wheels for your own Buick Turbo Regal!
.
UPDATE (problem #11):
So after driving for a few weeks, I notice that bumpsteer is REALLY bad.
Not to mention that when the bump steer occurs, the front tires also rub on the GNX flares. Ugg.
The solutions are either purchase shorter tires (26″) or get taller ball joints.
And a different shock/spring combo to combat the rubbing issue.
Wanting to keep the tires required changing the other stuff.
Read about getting new taller ball joints & coil over setup.
.


