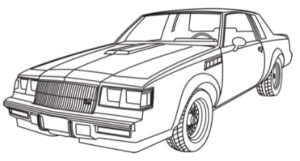

















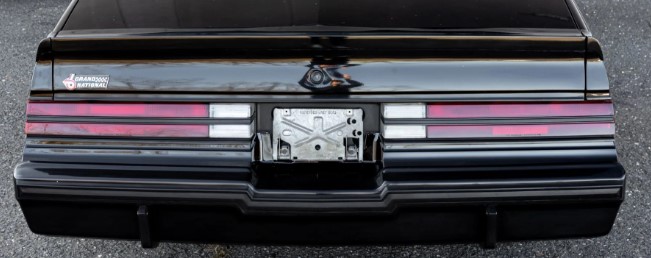
So the factory Buick Grand National (etc) rear spoiler sure looks cool on Turbo Regals.
It gives the rear end a racey look.
However, lots of assorted 1984-1987 Buick Regals did not come with an OEM type rear spoiler, but some Buick owners would like to add one onto their vehicles.
Acquiring an OEM, or reproduction unit, is pretty easy nowadays via online shopping.
That’s usually not the hard part of adding a new part onto whatever version of the Buick Regal you may have.
The actual mounting it onto your Turbo Buick (or other various Buick Regal) is a bit of a task.
You could try to figure out exactly where to drill some new holes based upon the location of the holes in the newly acquired spoiler (and hope you get it right and they line up).
.
This post should help those of you out there in need of some guidance.
Note that we believe even though factory parts have certain quality standards, not all parts are created equally, hence, variations (and slightly different measurements) do exist on parts.
(meaning that 1 specific car will not be a 100% match to a supposedly identical other car!)
(and the specs may differ slightly as well!)
We recently had an inquiry from a fellow Buick owner that wants to install a new factory type Grand National rear spoiler onto his GM G-body Regal that didn’t have one from the factory.
Previously, we removed the original rear spoiler from our 1987 Buick Grand National, and replaced it with a (repro) Dodge Challenger Demon rear spoiler.
[ you can see that transformation here: Dodge Challenger Spoiler on a Buick Grand National – this post shows you removal of the old OEM spoiler, including where the factory holes are located at, which may assist you when you install your new factory Buick spoiler ]
[ note the above post also shows you how to remove the extension pieces, so you can attach your new spoilers end caps onto them! ]
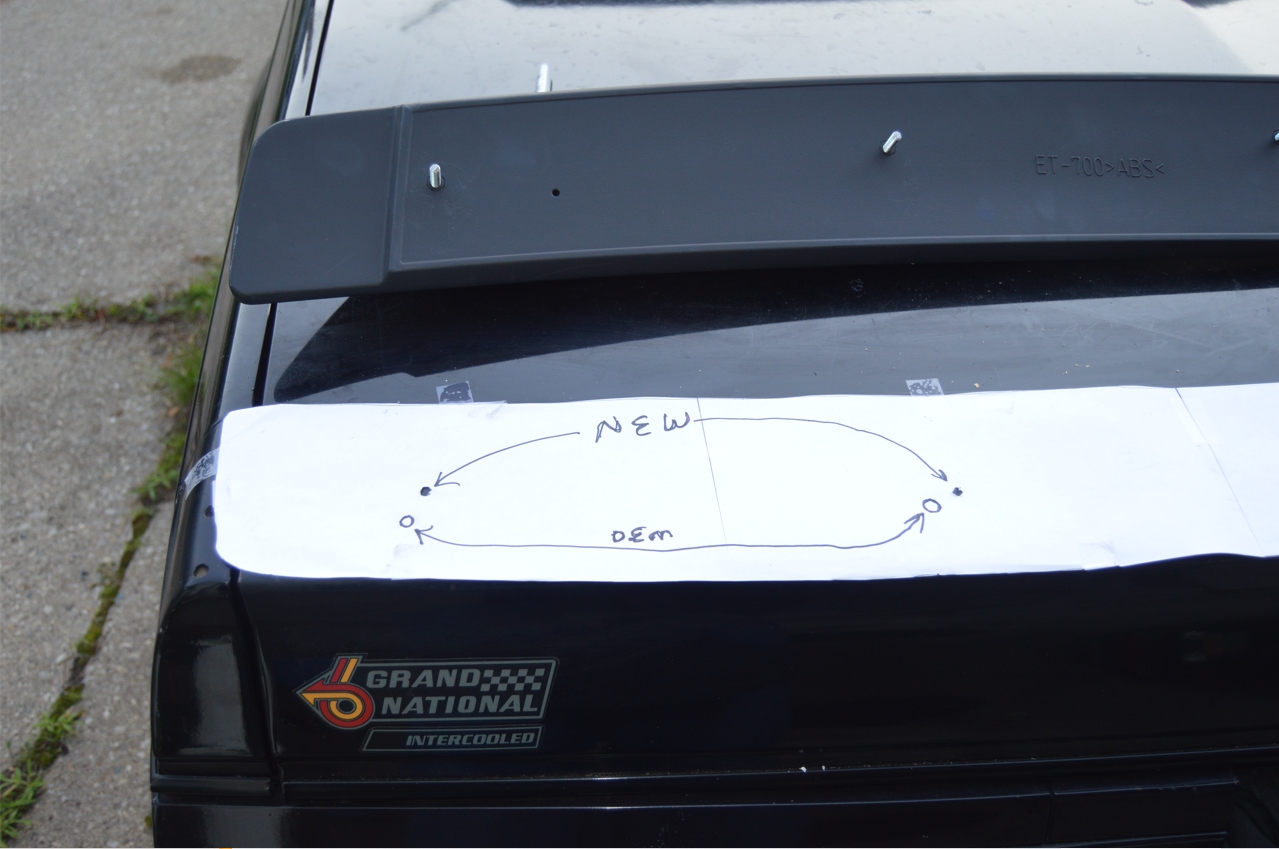
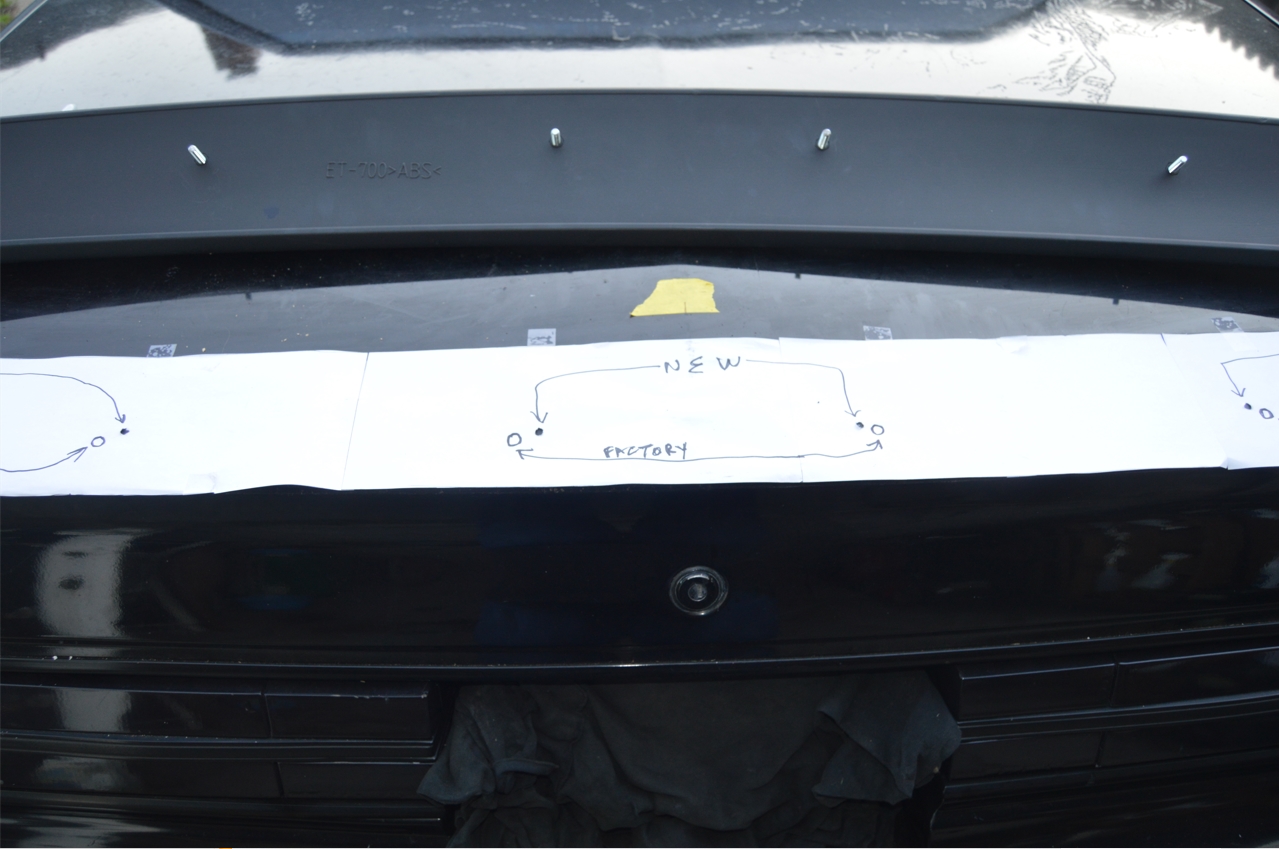
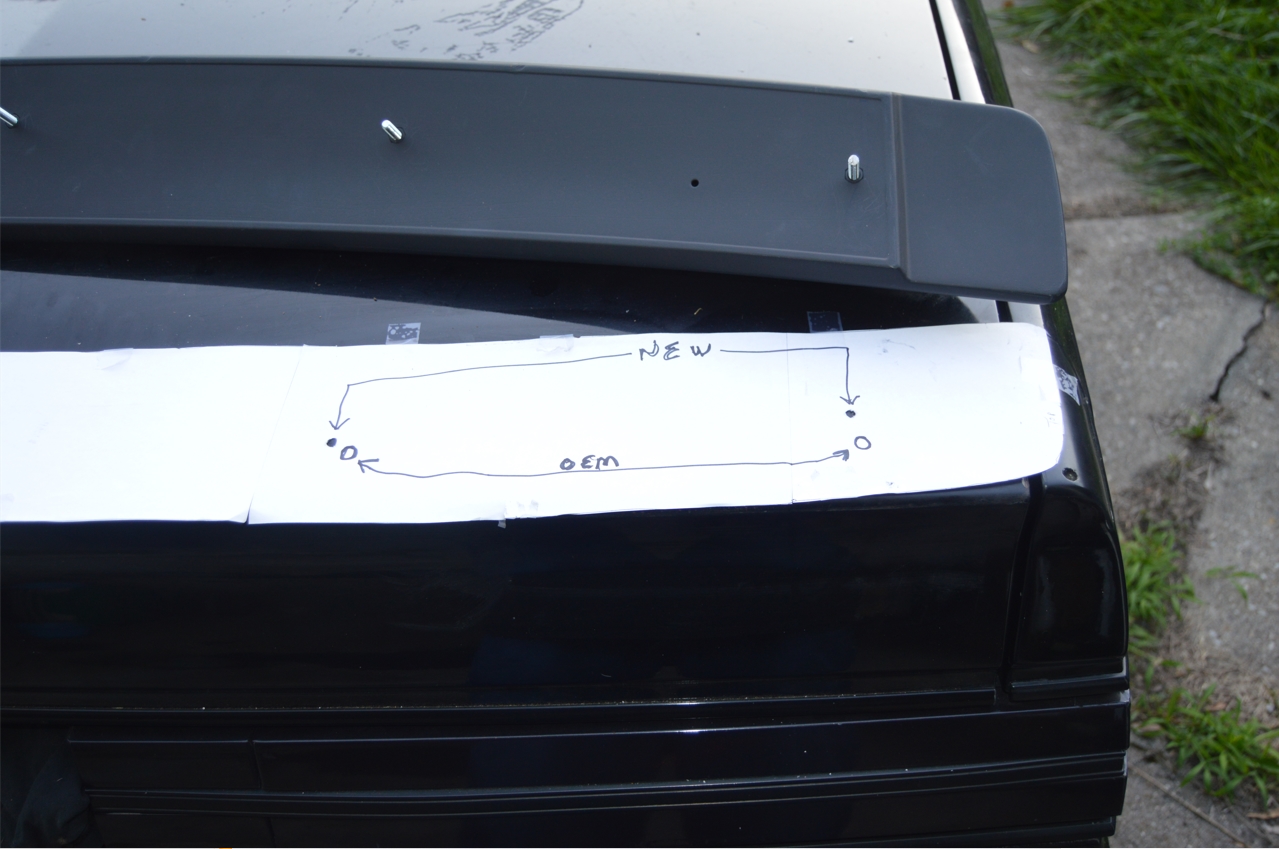
When we did the swap, we created a template as to where we needed to drill holes for the new spoiler we added.
BUT, we also marked up this template with where the existing (factory Buick) holes were located.
(we did that because we have the OEM spoiler for sale, and we wanted the buyer to be able to have a way to easily figure out where the factory holes would be needed to be located at to reinstall the factory spoiler)
Since we still have access to this info, we figured we’d share it on here, as others may find this information useful if they want to install an OEM-type rear spoiler onto their 1984-1987 Turbo Buick (or other Buick Regal) that didn’t have one originally.
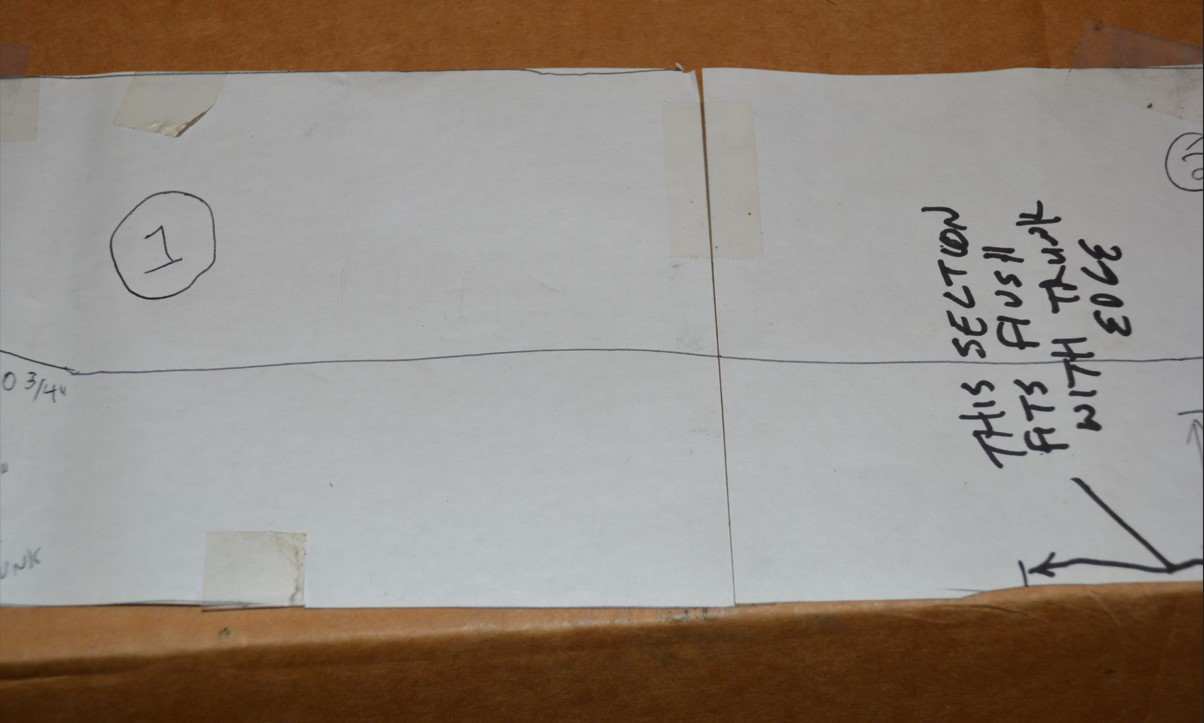
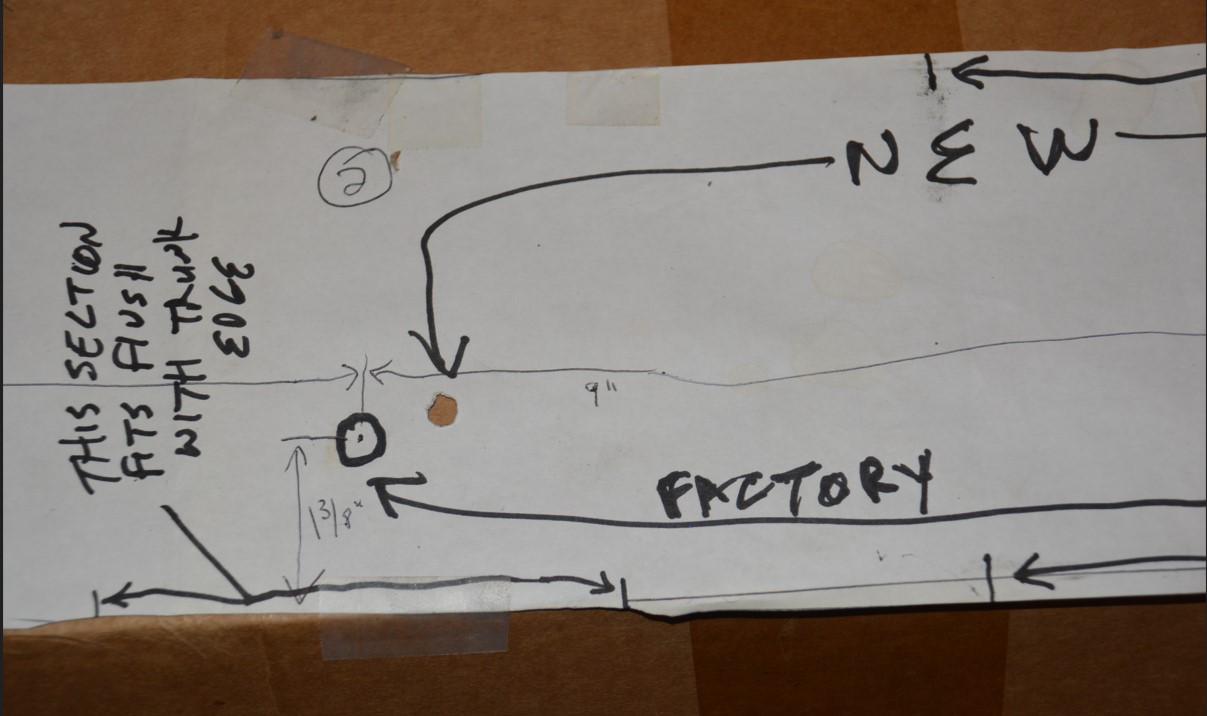
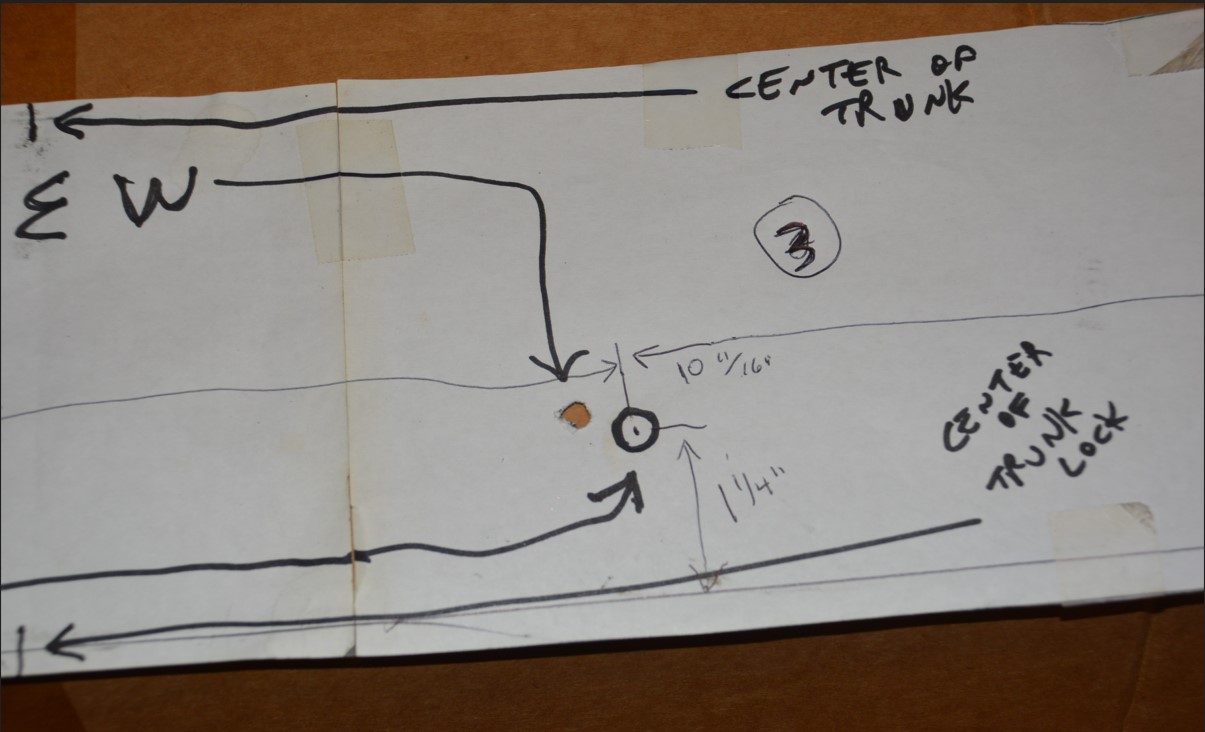
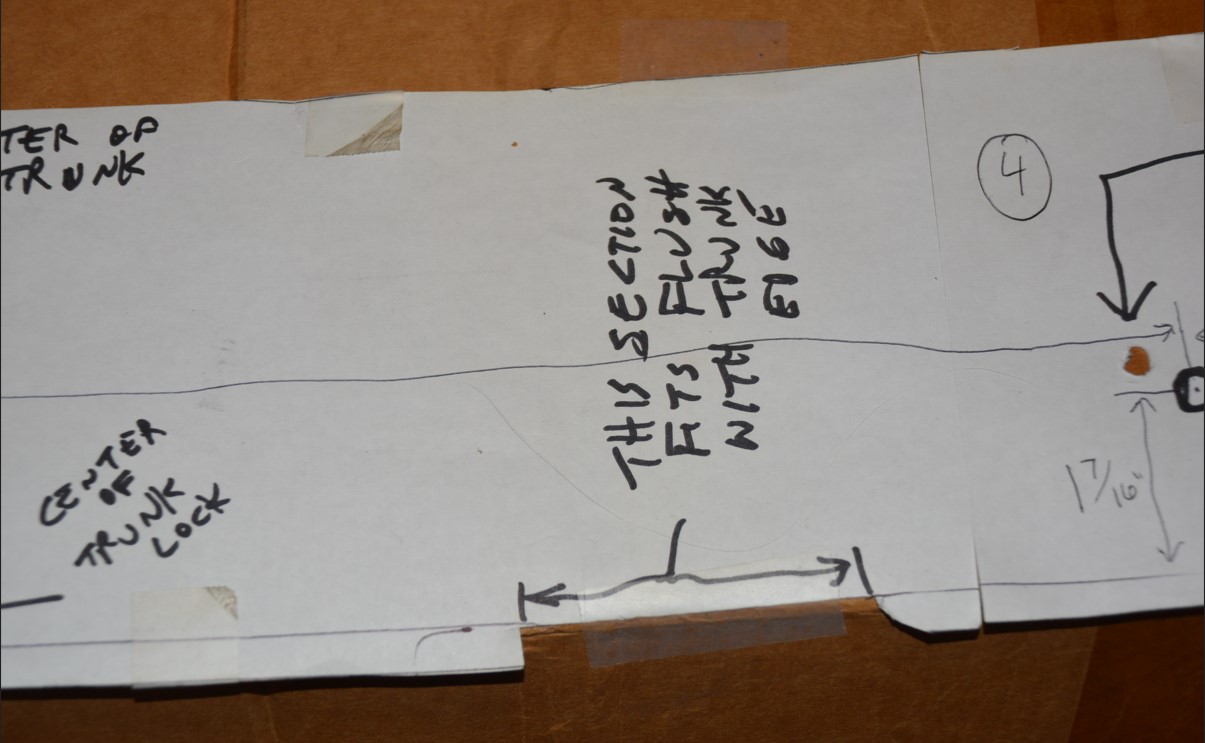
The below photos show you the templates for where to create the holes so you can mount your rear spoiler.
[ Note that these details are meant for an original Buick spoiler – where the factory placed the holes. Reproduction spoilers may, or may not, have the bolt locations in the exact same place! Keep that in mind when doing your project! Check, and check again! ]
[ and by the way, we still have our original rear spoiler from our 1987 Buick Grand National, for sale, and includes the templates shown in the below photos for easy install. $350 + shipping to your door if you’re interested. CONTACT US here if you’re interested in it and we’ll send you details! ]
.
DETAILS:
(follow along and READ, as this is kind of hard to describe where the holes exactly are!)
* The holes made for all of the bolts to go thru are 5/16″ each.
(and the factory used some type of rubber sealant / gasket / washer, in each hole [on the nut end], for weatherproofing material – which pretty much disintegrated when we removed the factory spoiler from our car)
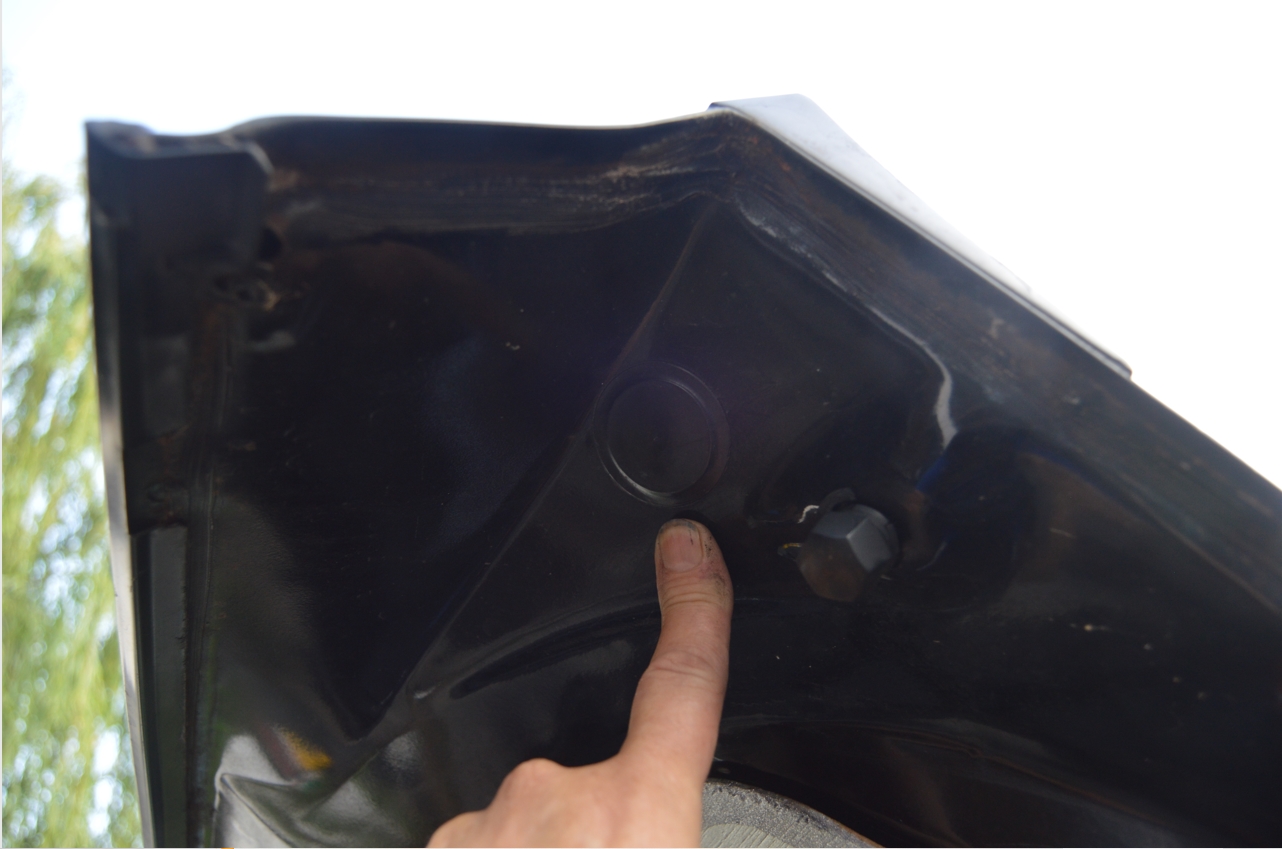
* Inside the trunk, you’ll see 2 black plugs, 1 on each end, 2 of the retaining bolts are located here beneath the plug covers.
(pry them off to access the nuts)
.
* Note that the Challenger spoiler didn’t sit quite flush with the Regal trunk edge (the Challenger’s is more curved on the ends- sitting more towards the front of the car than the center portion is), so we centered it as best we could.
The very center portion of the Challenger spoiler also hangs off the back (extends further out than the trunk lid edge), as this looked like the best compromise (visually) for mounting it.
So on the template, we put 2 reference cuts in it, to mark the position of the actual Regal trunk edge.
(1 is directly in the center of template, the other on the right side of car)
.
IMPORTANT!
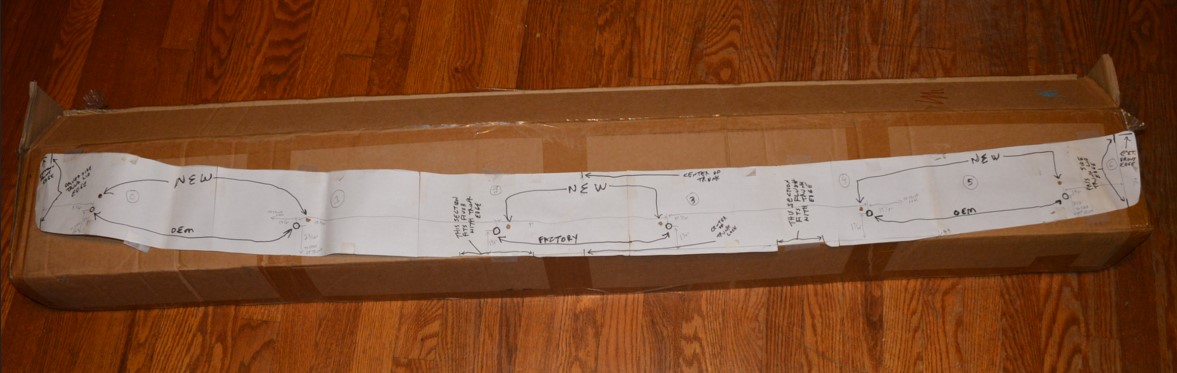
Now, since we’re not going to remove the spoiler on the car to get exact measurements, we took the template and taped it to a box, using the 2 reference points mentioned above and lined them up on the box’s edge (mimicking the Regal trunk edge).
We did notice that the left side (which would be the drivers side), is a litle more forward than the passengers side, SO BEAR THIS IN MIND when using these template holes locations.
(it may be right on, or it might be off a little when mounting your Buick spoiler)
[ Be smart! use this template as a guide, but check it against your actual spoilers bolt locations. You don’t want to create unnecessary holes in your trunk, or get the holes in the wrong spot! You could mark the bolt hole spots on your trunk lid, then insert threadall studs in the spoiler, then mock up where you’ll put the new spoiler, comparing the holes to the stud locations ]
[ on our Buick, we drilled 3/8″ holes to give us some wiggle room in moving the spoiler around to get it into the best looking position on the GN. The nuts (with washers) secures it into the perfect position after they’re tightened down. ]
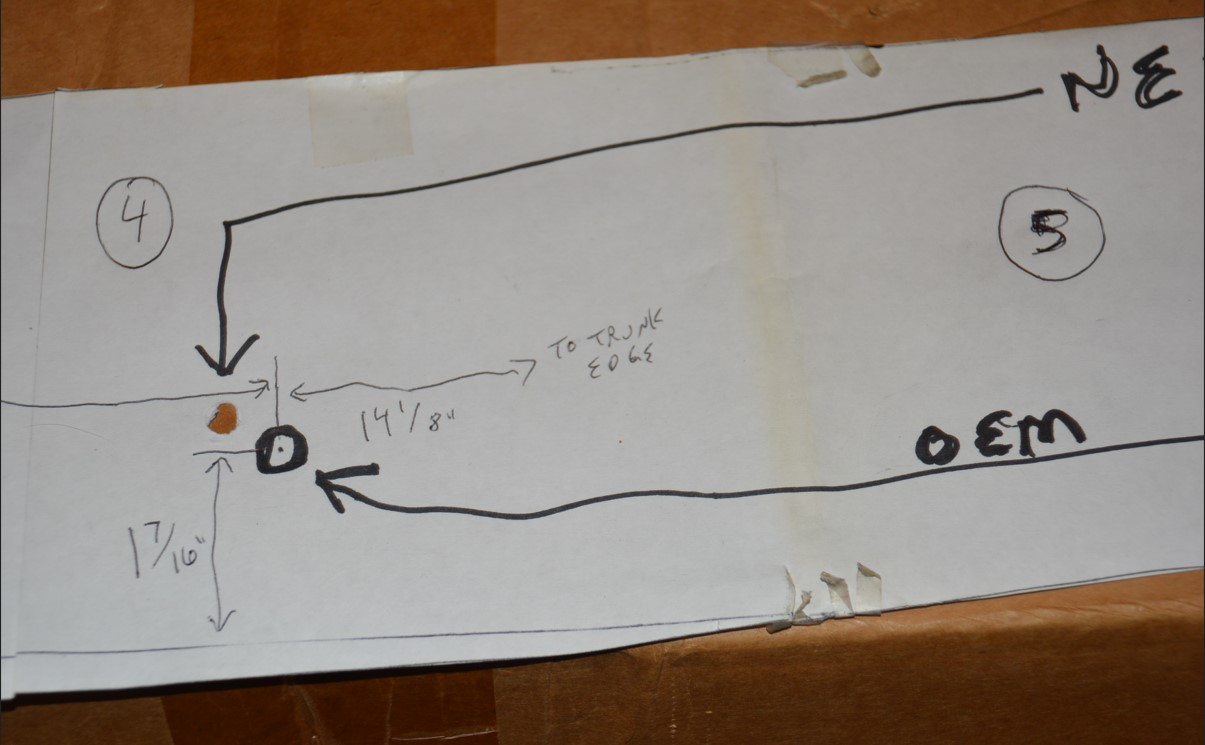
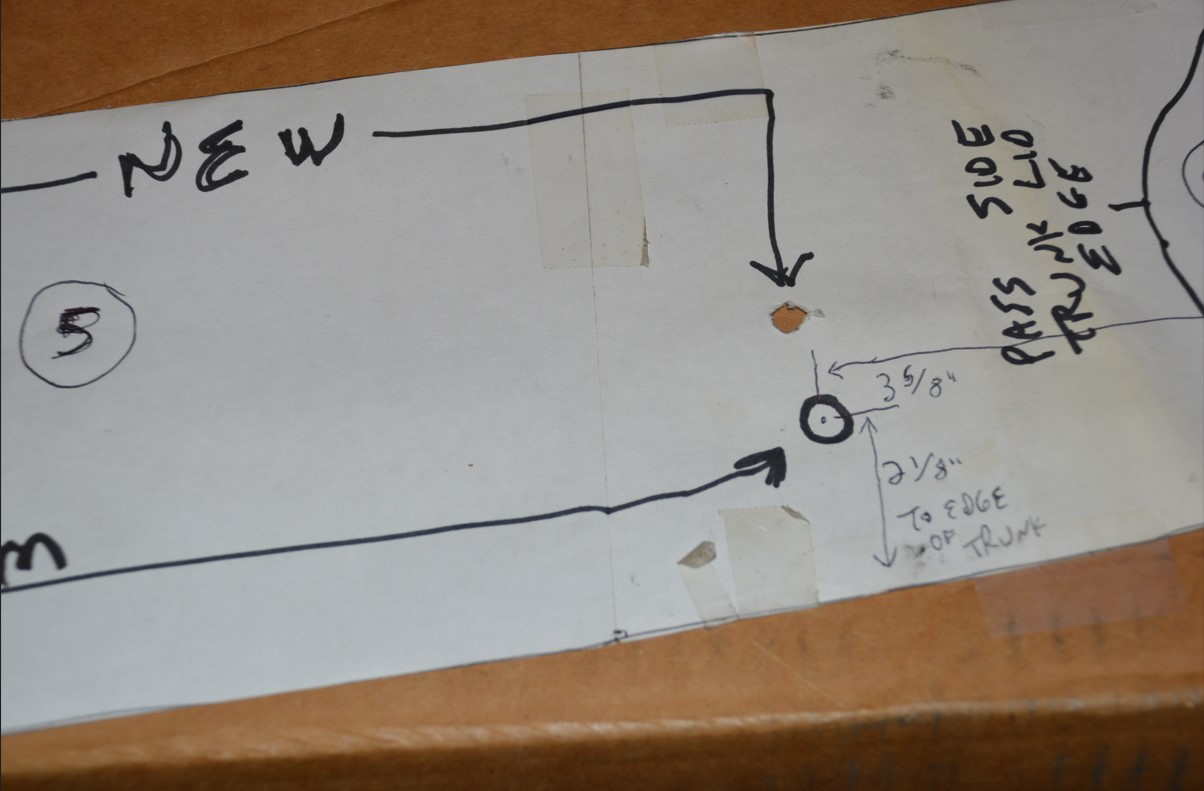
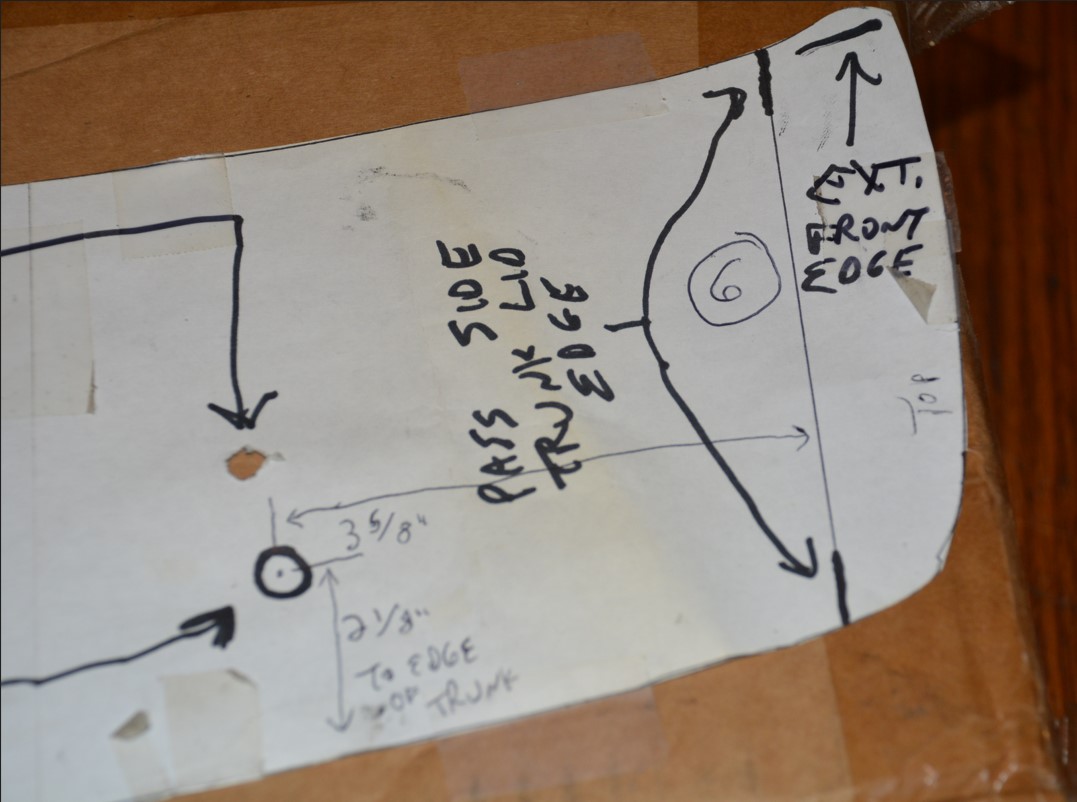
For the photos herein, the first shot is a wide angle of the complete template.
Followed by individual pics, from left to right (as you would be standing in the back of the car looking forward).
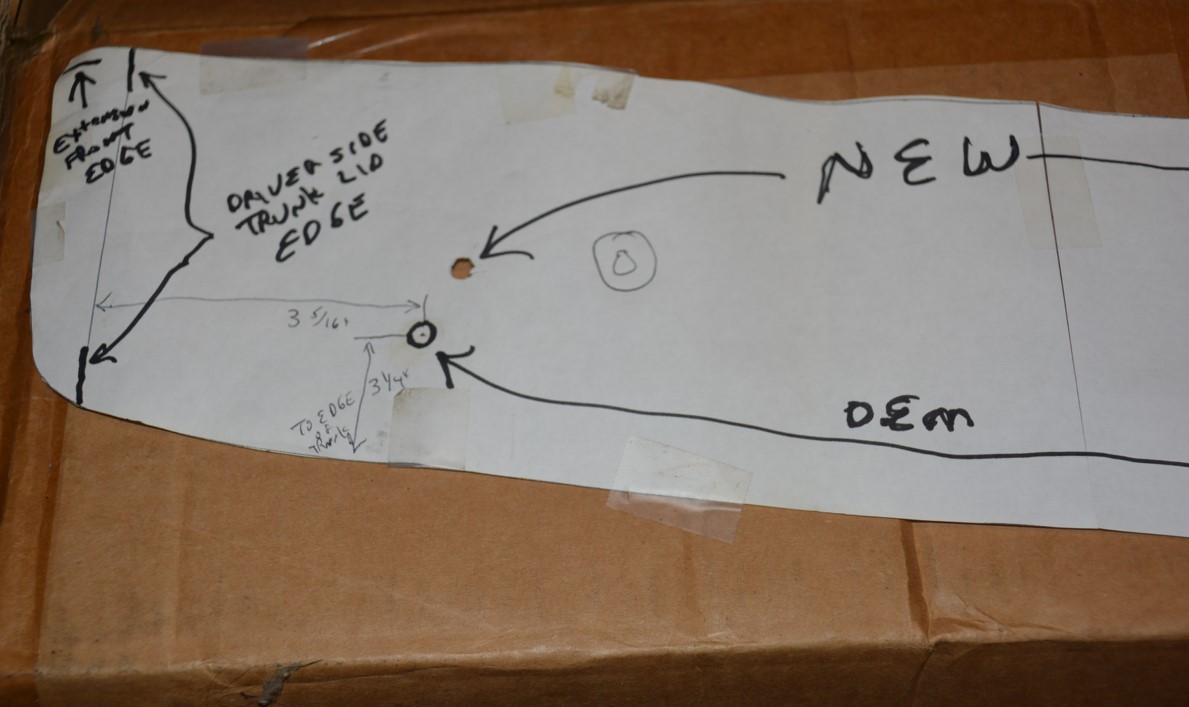
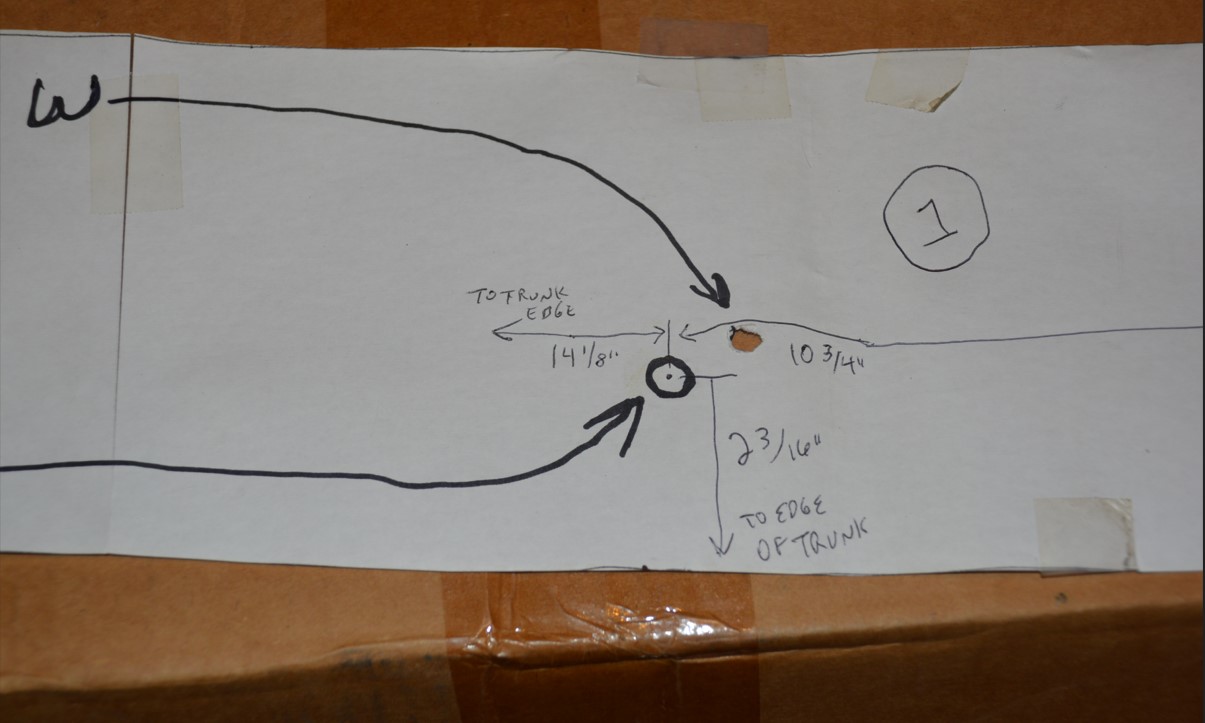
You can use the numbering system we wrote on the template (“0-6” inside of a circle) to see each section in comparison to the wide angle photo of the entire template.
.
* YOU SHOULD ASSUME THESE ARE “ROUGH” GUIDELINES AND NOT ABSOLUTES!
MARK THE SPOTS ON YOUR CAR FOR THE HOLES – BUT, THEN CHECK THEM AGAINST YOUR ACTUAL SPOILER BOLT POSITIONS TO BE SURE THAT THE HOLES MATCH UP! *
[ remember the old adage, check twice, cut once ? ! ]
.
FOR THE SPOILER END CAPS:
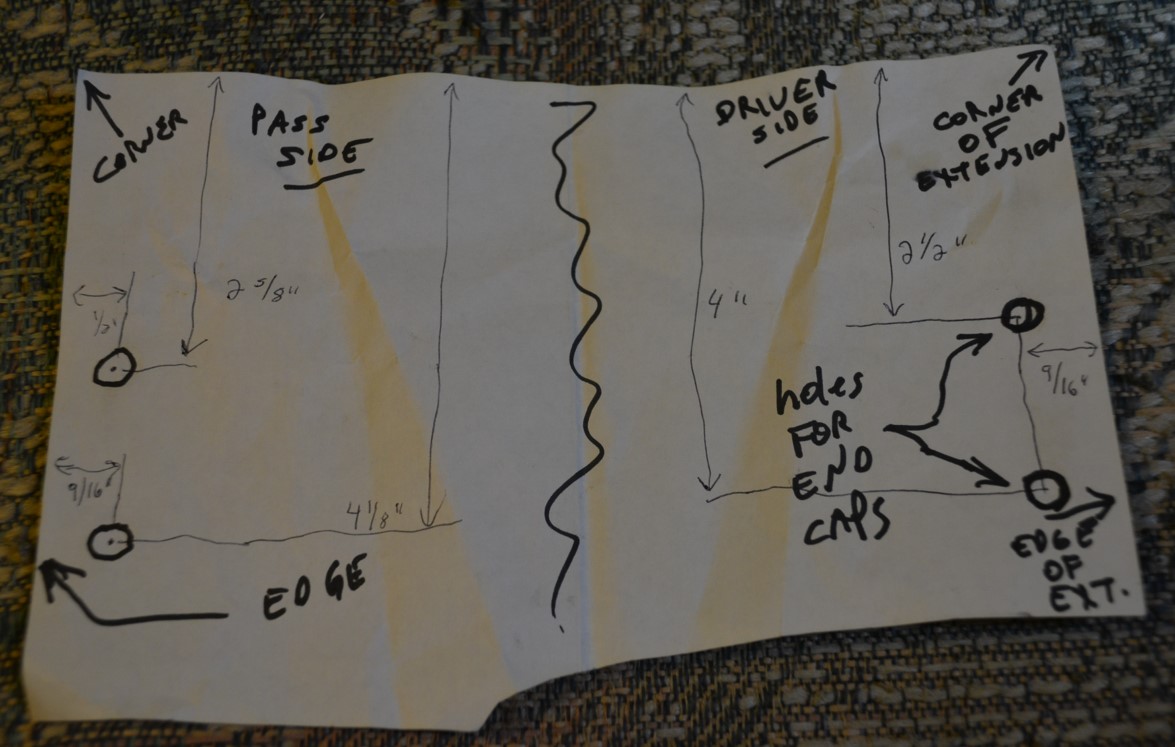
(Note on the photo, the DRIVERS side measurements/locations in the template photo is on the RIGHT side of the dual template – as it was easier to make the template this way. The PASSENGER side is shown on the LEFT side on the template pic. We used the corner points of the extensions as to where the template should be positioned when marking the locations of the holes)
For the pic of the drivers side extension piece (ON the car) – the white arrow represents the “corner of extension” point that is marked on the template pic.

.
MEASUREMENTS FOR THE END CAPS:
(Note that they are not in the same location on both sides! Perhaps this was a slight manufacturing spec difference)
(but since the holes are slightly bigger than the bolts that run thru them, you should have enough play in them to be able to secure the spoiler caps down, and position them onto the extensions so the 2 pieces look flush, as they should)
DRIVERS SIDE:
(again, these notes are assuming you are standing behind the car looking forward)
– 1st hole (nearest rear window): From the top of the extension, 2 1/2″ down, and 9/16″ from the right edge of the extension.
– 2nd hole: 4″ down, and 9/16″ from the right edge of the extension.
PASSENGER SIDE:
– 1st hole: From the top of the extension, 2 5/8″ down, and 1/2″ from the left edge of the extension.
– 2nd hole: 4 1/8″ down, and 9/16″ from the left edge of the extension.
.
MEASUREMENTS FOR MAIN SPOILER (CENTER SECTION):
(there’s 6 factory holes)
(starting on the very left [drivers side] is the #1 hole mentioned below, working across [ left to right ] to the passenger side. #6 is the hole closest to passenger side)
MEASURE FROM THE REAR EDGE OF TRUNK (the closest part to you when you’re standing in the back of the car).
(you should be able to clip the end of a tape measure on the edge, even though the trunk edge is sort of rounded over)
Also, MEASURE FROM THE LEFT EDGE OF TRUNK (the drivers side edge of trunk).
– 1st hole: 3 5/16″ from left edge. 3 1/4″ up from rear edge.
(in section “0” on photo)
– 2nd hole: 14 1/8″ from left edge. 2 3/16″ up from rear edge.
(in section “1” on photo)
– 3rd hole: 10 3/4″ over from CENTER of hole #2, 1 3/8″ up from rear edge.
(in section “2” on photo)
– 4th hole: 9″ over from CENTER of hole #3, 1 1/4″ up from rear edge.
(in section “3” on photo)
– 5th hole: 10 1/16″ over from CENTER of hole #4, 1 7/16″ up from rear edge.
(this hole should also measure 14 1/8″ from right edge of trunk)
(in section “4” on photo)
– 6th hole: FROM RIGHT EDGE OF TRUNK, 3 5/8″ over, and 2 1/8″ up from rear edge.
(in section “6” on photo)
.
.
AGAIN! DO NOT TAKE THIS AS THE GOSPEL!
THEY MAY BE 100% ACCURATE, BUT MAY BE NOT!
USE AS A BASIC REFERENCE GUIDELINE ONLY!
(because we don’t want you to complain & tell us we were way wrong on the measurements!)
(but if you do find them off, let us know what measurements your car has, and we will update this post with any additional info you’d like to share!)
.
Now that you have some cool Buick Grand National parts on your Turbo Regal, you should really think about acquiring some other neat stuff for it…
Like these…
(so YOU can see, and others can SEE you!)

.