


If you own any type of newer vehicle, especially an SUV or pickup truck, I’m sure you notice a big difference in mirror size when you switch cars and start driving your turbo regal.
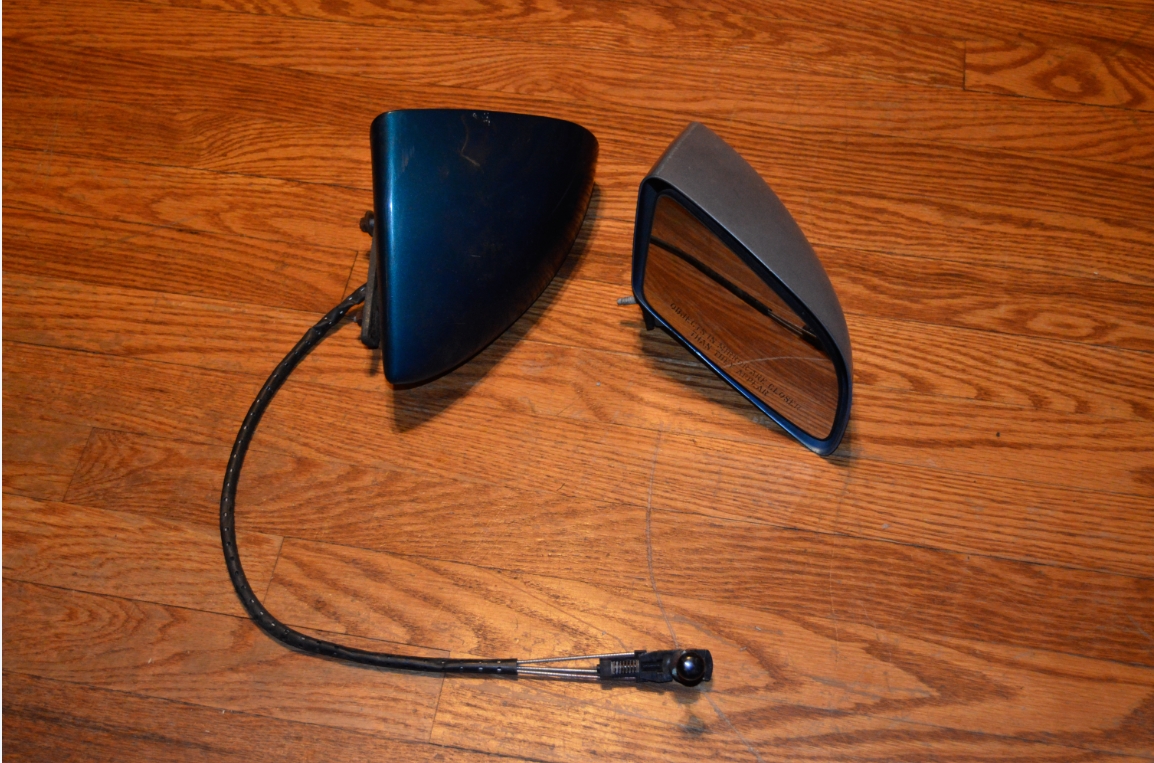
The factory standard bullet mirrors on the Buick GN are rather small, making things hard to see in them (comparatively).
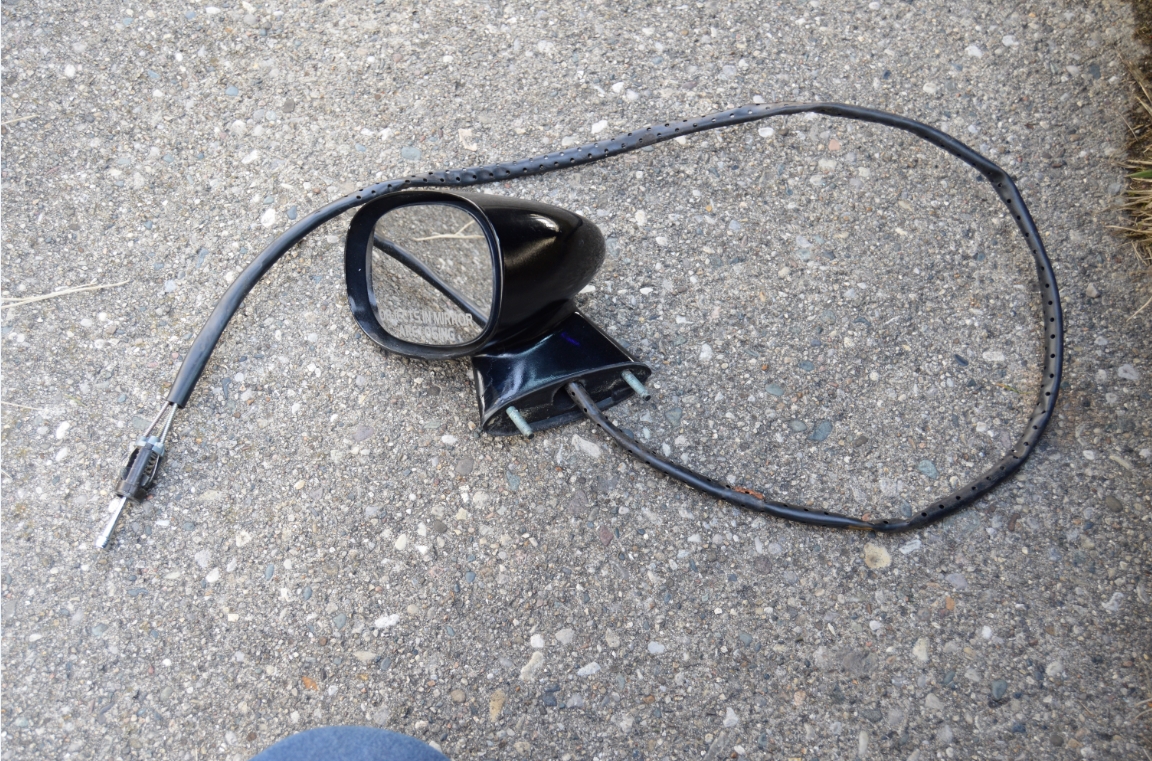
So when you want to get more visuals on what’s going on around you, there’s an easy upgrade. Namely just replacing the side mirrors with mirrors from a Monte Carlo SS. They are a direct bolt-in for the existing OEM Buick Regal mirrors.
[NOTE: the Monte Carlo SS side mirrors are the same exact “sport model” mirrors from a Chevrolet Corvette, Camaro, Monte Carlo or Pontiac Firebird from about 1982-1992 depending on vehicle]
[the mirrors we acquired were actually from a Camaro, so even though the “side mirror” is the same looking, the adjustment rod (for the drivers side) I believe may be different lengths, hence having to leave the knob dangling inside the door, as well as trimming the handle base. No biggie though, how often do you ever adjust the mirror? Personally, I set it once, & then good to go from that point forward!]
[NOTE: the drivers side mirror is slightly more expensive than the passenger side! Probably because the drivers side has the adjustment cable & the passenger side is a manual mirror]
[NOTE: In the 1992 Camaro, electric adjustment mirrors were offered. You’ll have to figure out how to wire them up & where to put the control switches if you want to go that route]
[NOTE: the OEM Turbo Regal bullet mirrors are oval shaped and measure 3.25″ tall x 5.25″ wide at the largest section; the MCSS mirrors are (slanted) rectangular and measure 3.125″ tall x 6″ wide]
[NOTE: purists probably won’t be admiring this modification to the Turbo Buick!]
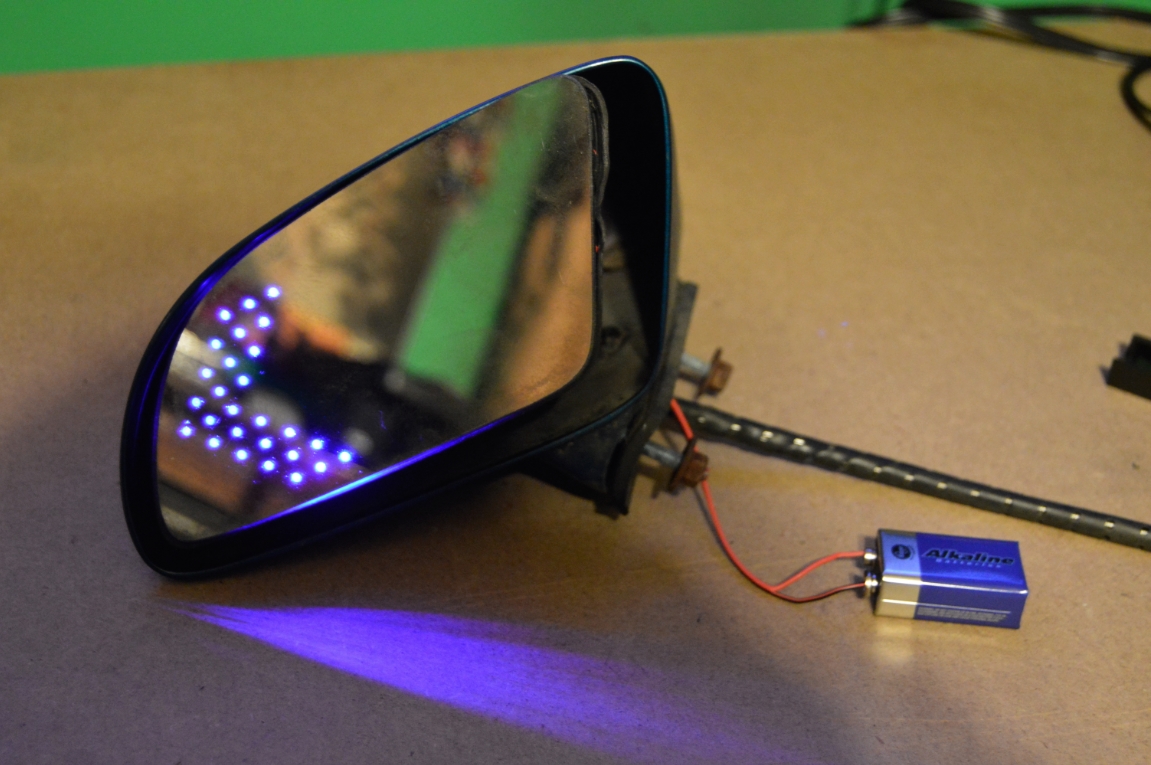
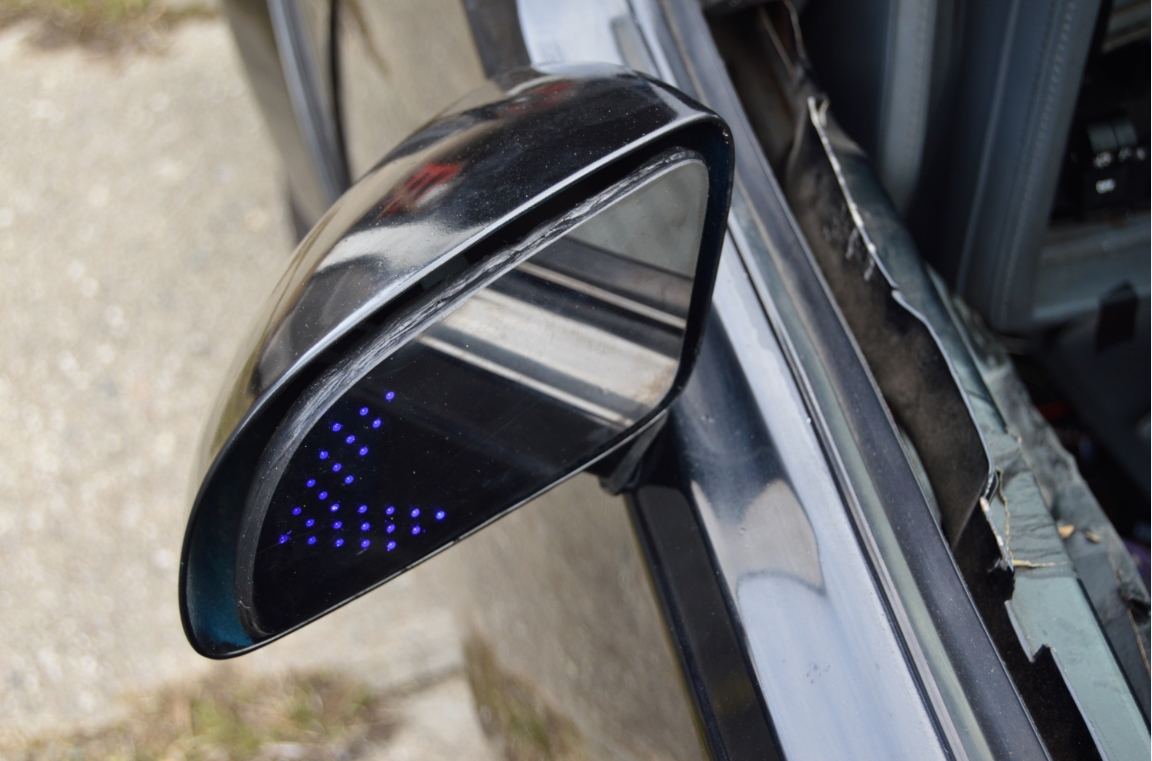
Being as this specific Buick Grand National already has a bunch of blue colored LED lights installed on it, we saw this neat item on ebay & decided it was an appropriate inclusion for installing on this ’87 turbo regal.
Not only can you consider it a safety feature (like the newer cars have to let other drivers know you’re turning), but it just simply looks awesome, and fits well into the blue lighting scheme that’s already occuring on this Regal G-body.
Having come direct from Hong Kong (yeah, I know…) it didn’t really take long to arrive (less than 10 days). And the price was right, about five bucks shipped!
If you haven’t experienced the joys of installing any LED lights on your turbo buick, you really don’t know what you’re missing. They take less power to function, are usually way brighter than factory OEM bulbs, plus they last longer than a standard light bulb. Mostly though, they just look cool…
By replacing the mirrors and adding the lights at the same time, it was a relatively easy process of adding in the turn signal lights since the (newly acquired) parts are already off the car.
It shouldn’t be too much of a hassle for doing a lights only project if that’s the route you want to do, just unbolt the mirror, remove them or make sure you have enough room to work (especially with the mirror adjustment rod that’s attached).
[since there’s always people looking for OEM Buick parts, you should have no trouble selling off your original factory mirrors, making this upgrade virtually cost-free. Heck, you may even make a slight profit from getting rid of the stock Buick GN mirrors!]
.

.
PARTS:
* driver mirror ($55 ebay)
* passenger mirror ($45 ebay)
* LED indicators ($5 ebay)
* 2-way tape
* wire (whatever small gage you have laying around will work (preferably 2 different colors), you’ll need about 12′ of each color)
INSTALLATION TIME: about 3 hours (although paint may take a bit longer to dry)
TOOLS:
* phillips screwdriver
* 8 & 10mm sockets
* allen wrench
* heat gun
* glass cleaner
.

.
HOW-TO:
If you have acquired MCSS mirrors, and you do this upgrade on a hot day (with rattle can paint), you should be able to complete it all on the same day. The steps below assume that after you remove the mirror glass you prep & paint the mirror housings (which isn’t specified below), then right after painting you remove the old mirrors & do the turn signal install. Once that’s done, you reassemble & reinstall on your Turbo Buick (since the paint should be dry by then).
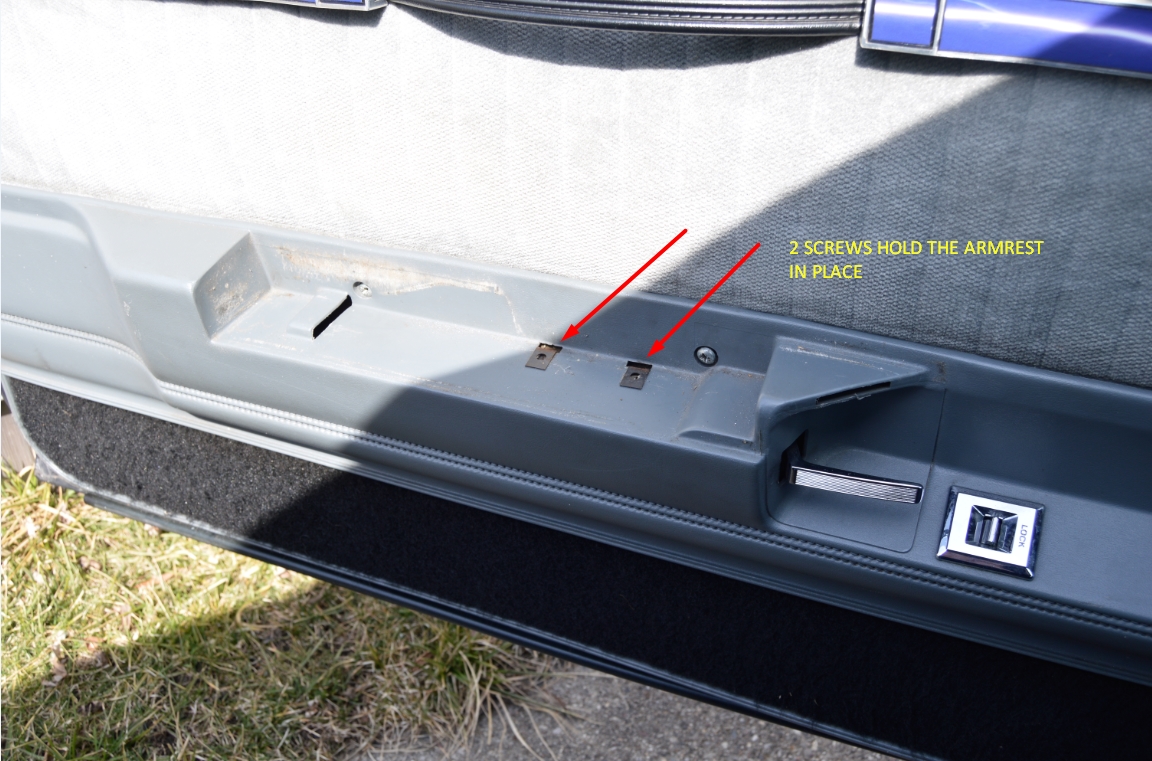
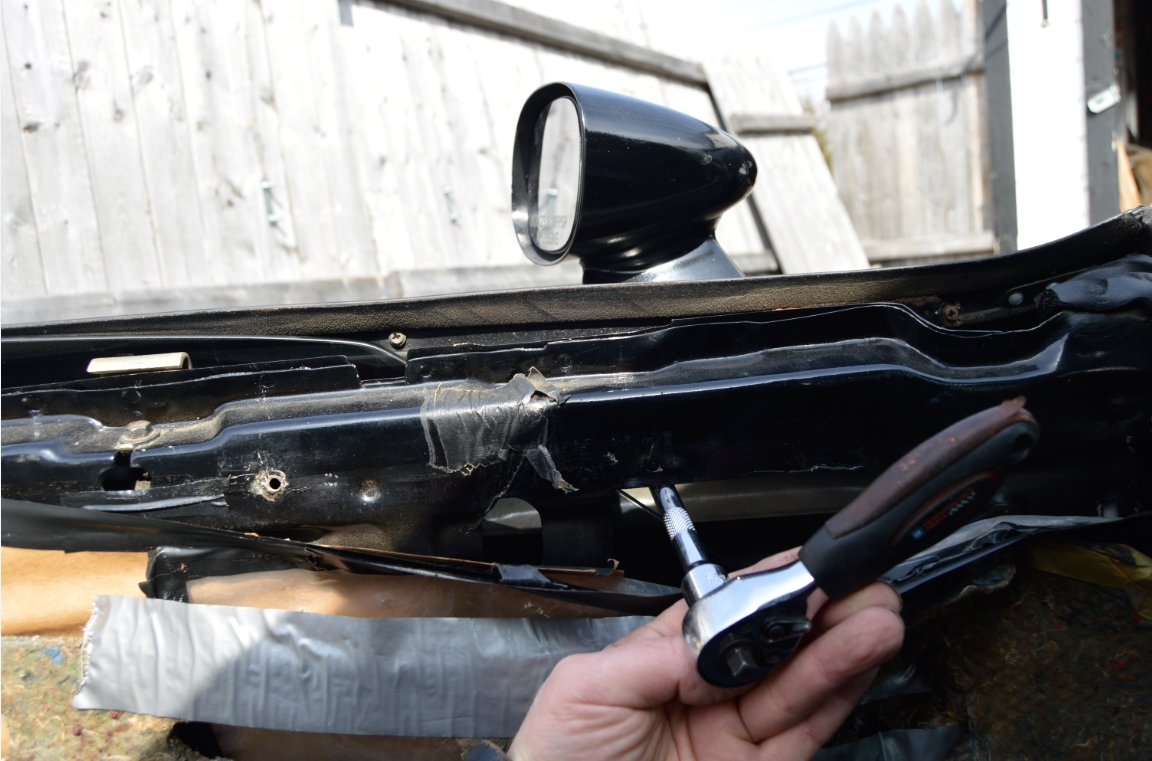
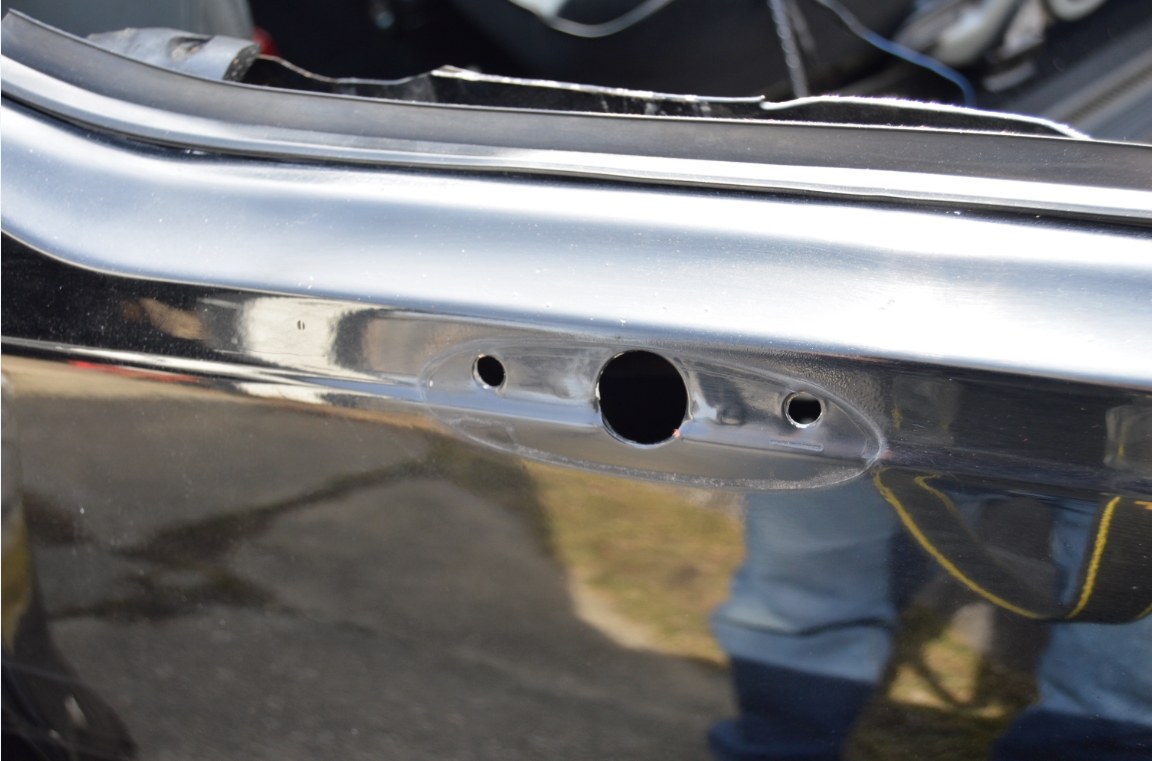
1. Remove the OEM side mirrors by using a 10mm socket. Access the 2 bolts from behind the door panel.
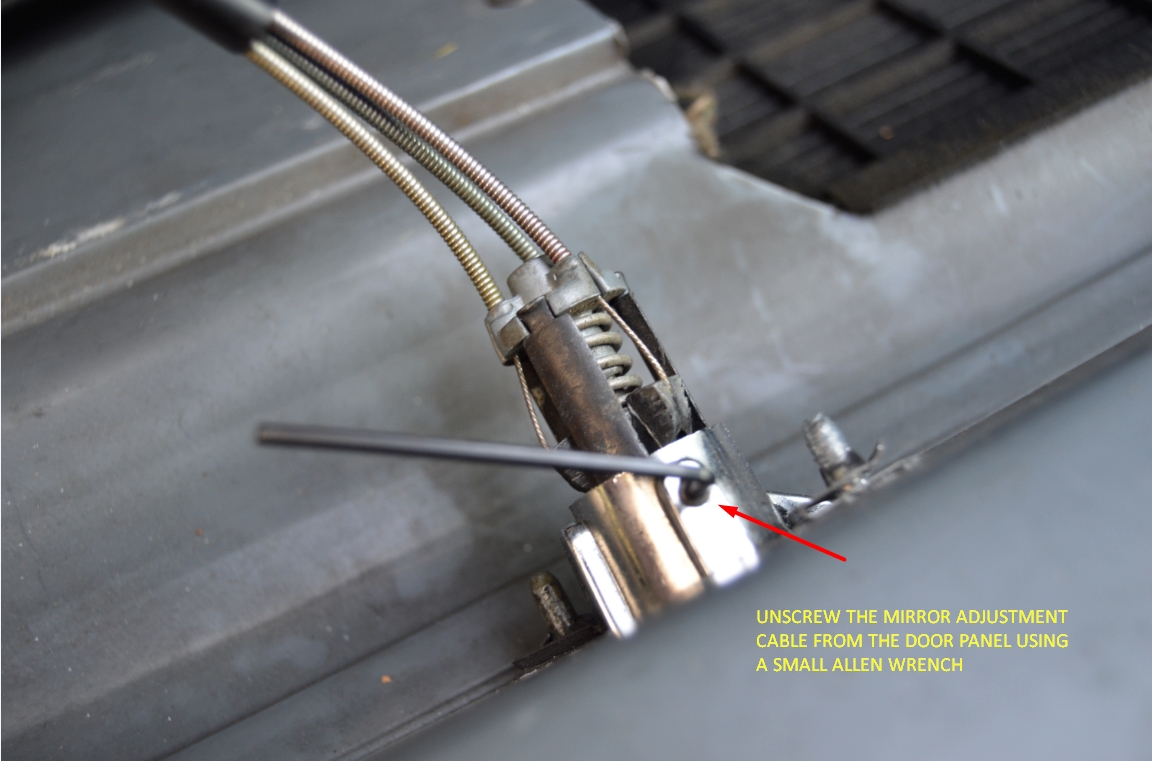
You will have to tug & wiggle out the mirror adjustment rod.
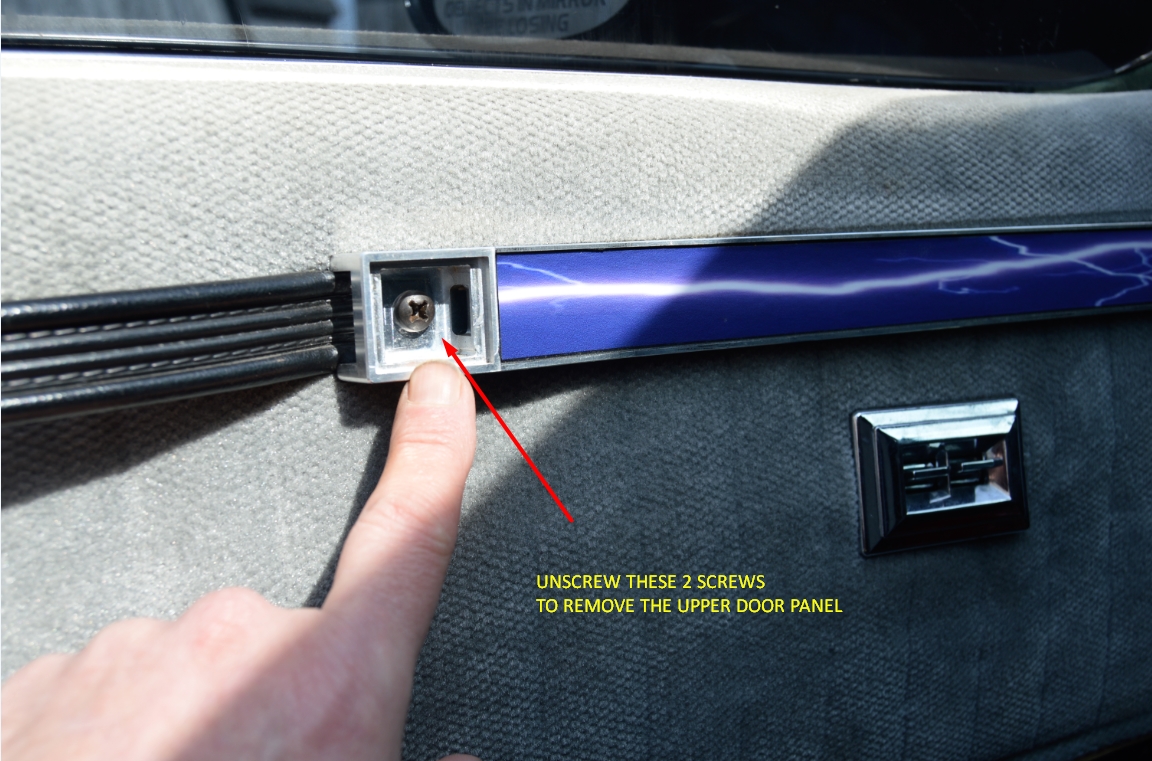
[you’ll have to remove your door panels & under dash panels to access everything]
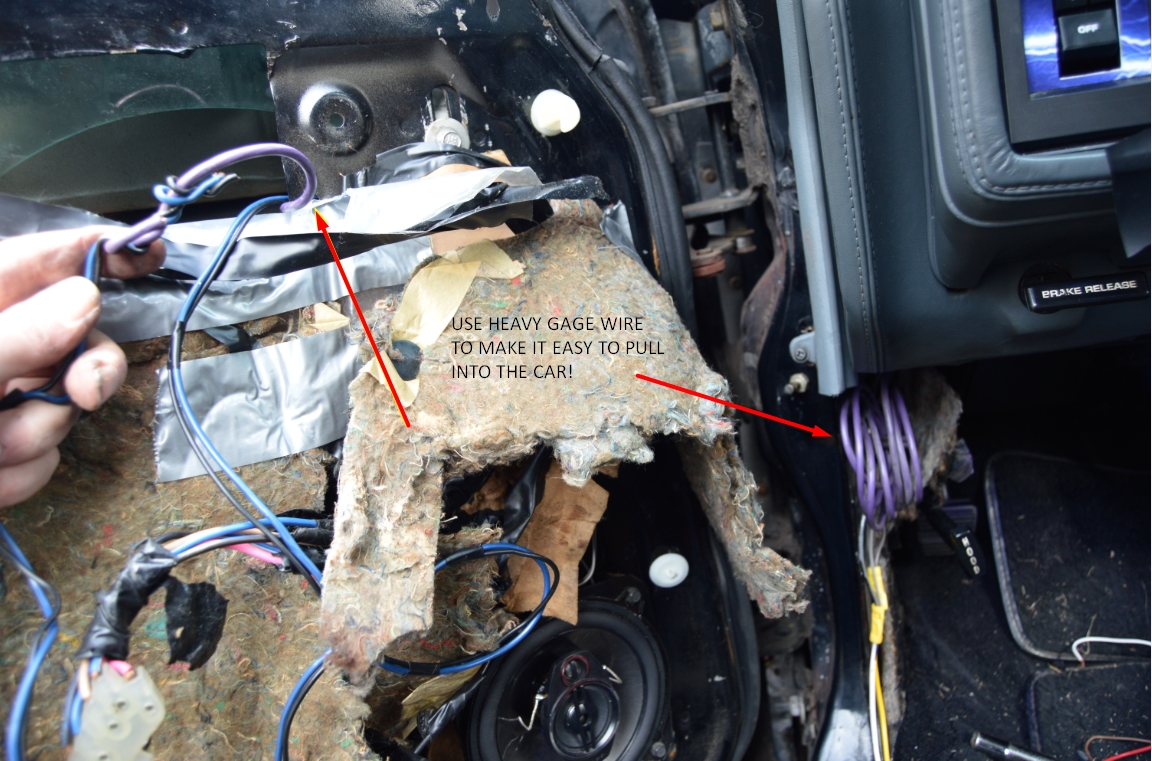
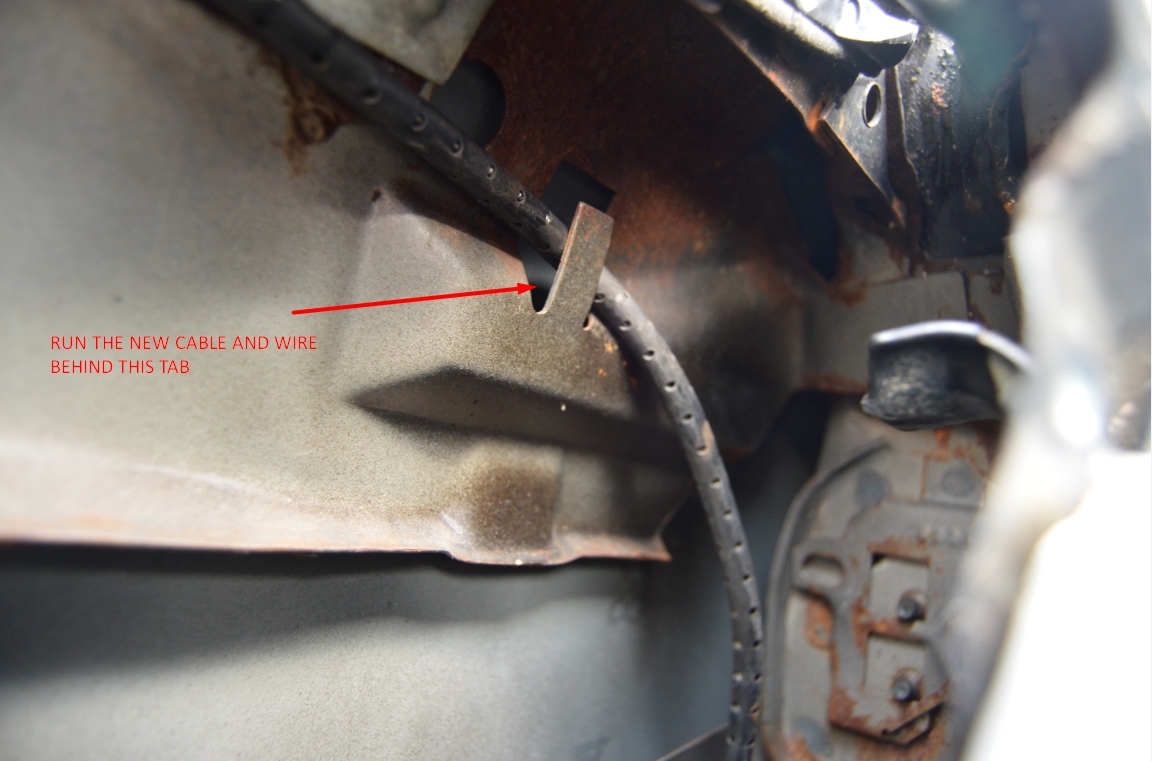
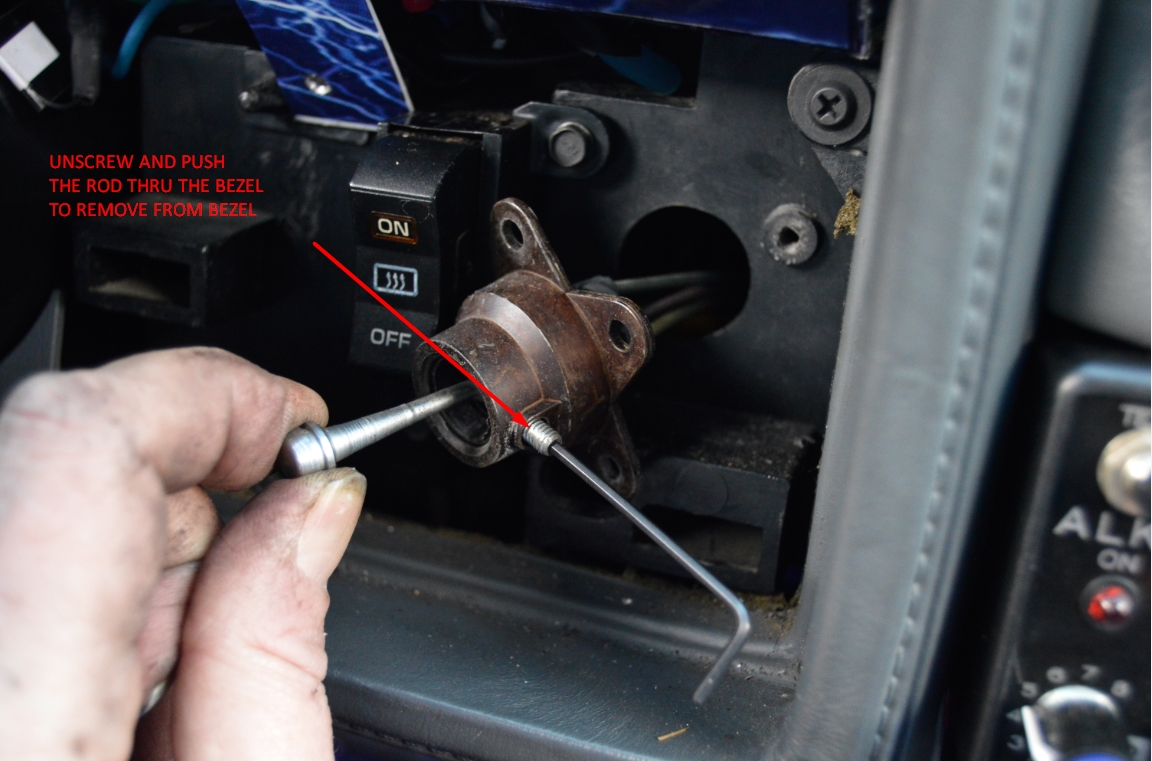
[drivers side cable is attached at 2 points; 1st behind a metal tab, then it runs thru a plastic clip. You also have to unscrew the mirror adjustment knob from the bezel (on the door panel) using a small allen wrench]
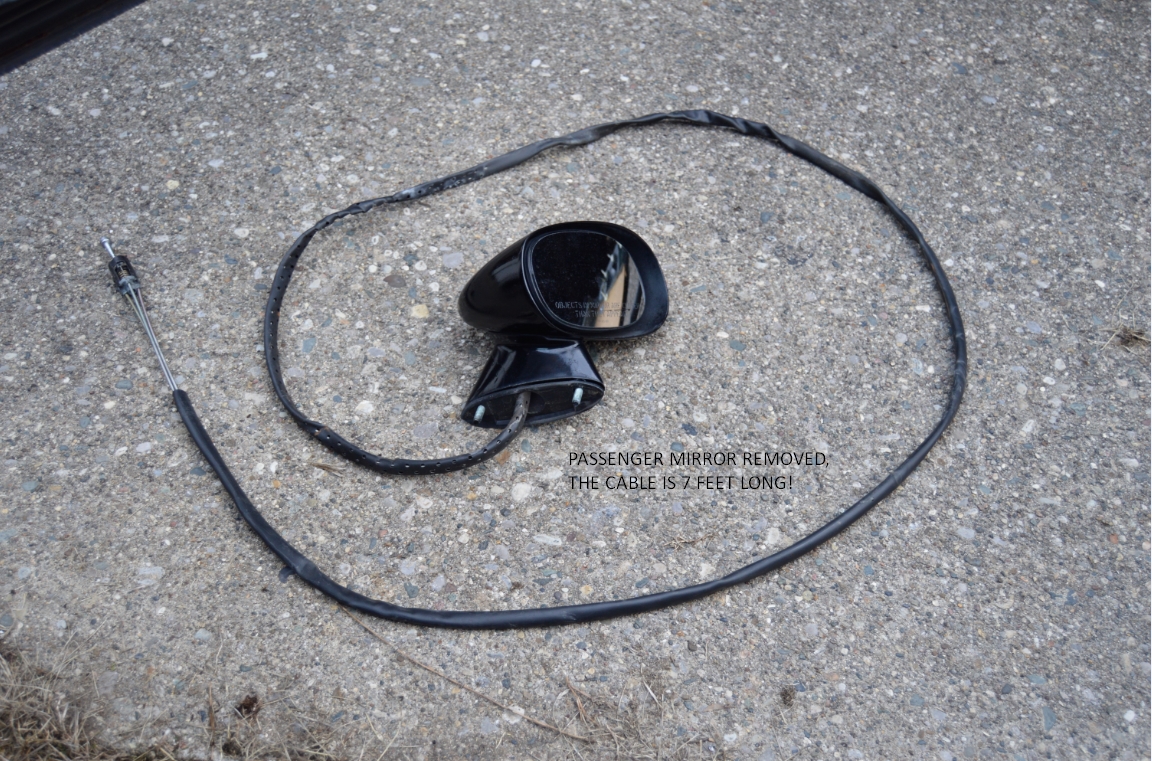
[passenger side cable is time-consuming! the cable not only attaches inside the door the same way as the drivers side, but inside the car it runs along the firewall (where it’s held in by a metal tab) on the passenger floor, then it snakes up behind the radio and into the dash area (to the right of the steering wheel). You’ll have to use that same allen wrench to unsecure it from the bezel it’s attached to, which means you’ll need to take the dash cluster bezel off to access this area]
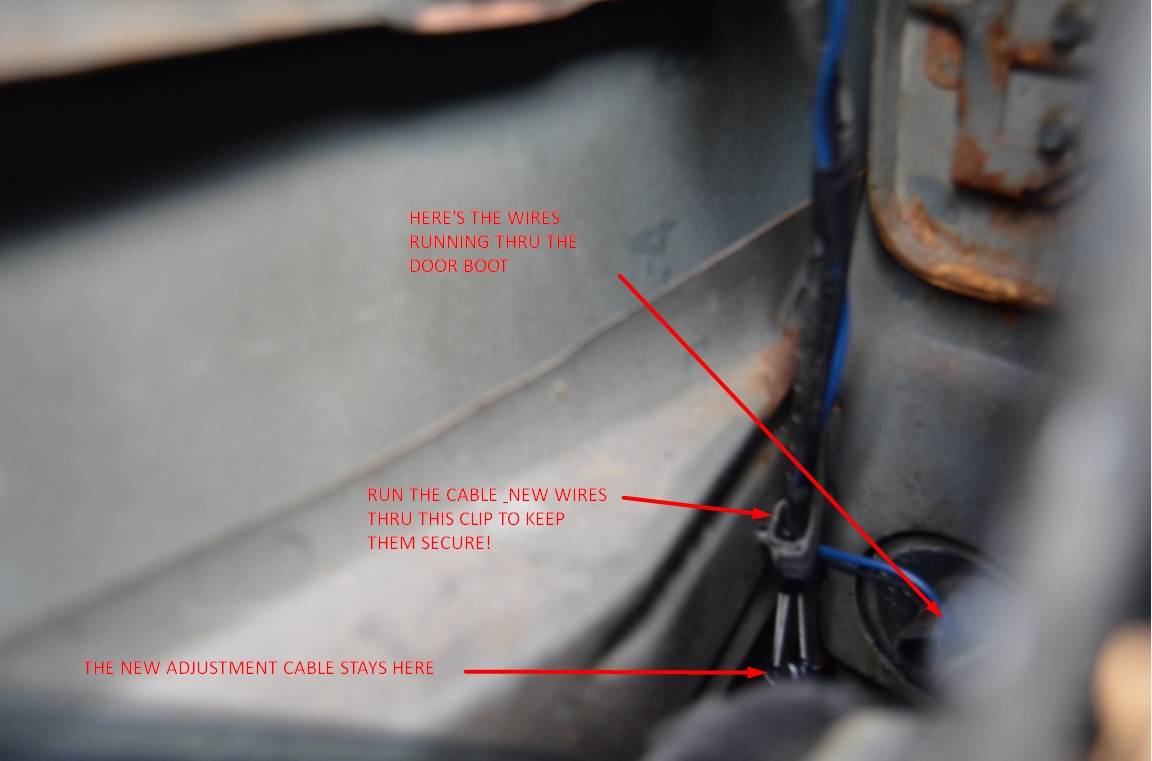
[on the door jam boots, if you pull them off from the door side somewhat, it makes it easier to run the new wires thru]
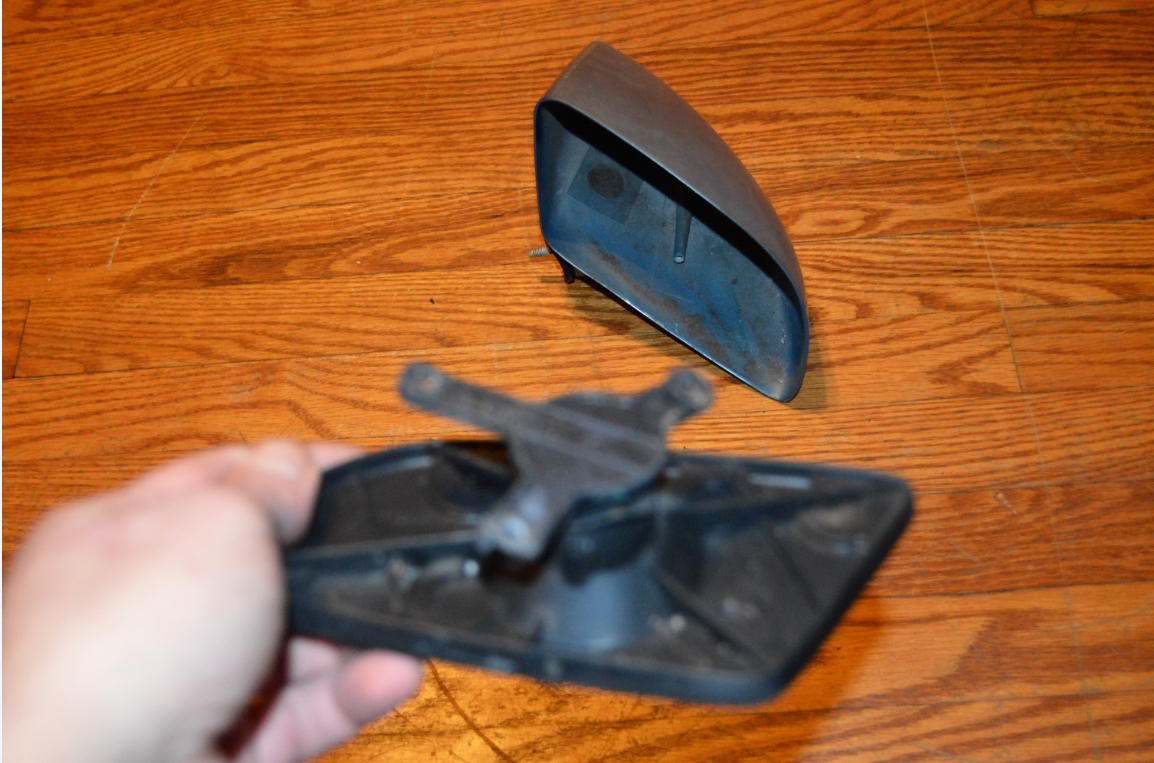
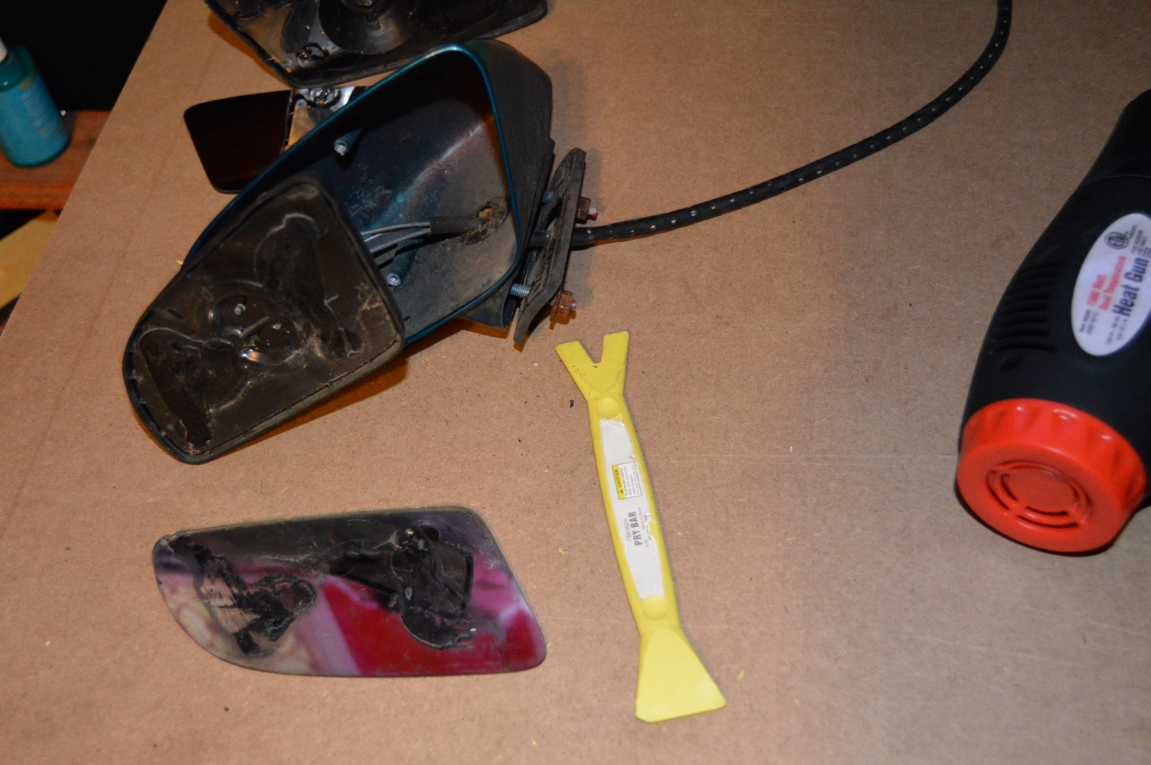
2. (on the MCSS mirrors) there’s 3 screws behind the mirror glass that attach it to the housing. remove them.
3. take a heat gun & heat up the face of the mirror glass (which also heats up the glue on back that’s holding the glass onto the plastic base). while the glass is still hot, using a PLASTIC removal tool, pry the glass off.
[be careful not to melt the plastic base! keep the heat gun moving around and not in one specific place. it only takes about 30 seconds of waving the heat gun over the glass to warm it up enough to remove the glass]
.

.
4. use alcohol or glass cleaner to remove all the old glue (& etc.) that’s on the backside of the mirror, and the plastic base (a razor blade works ok on the base).
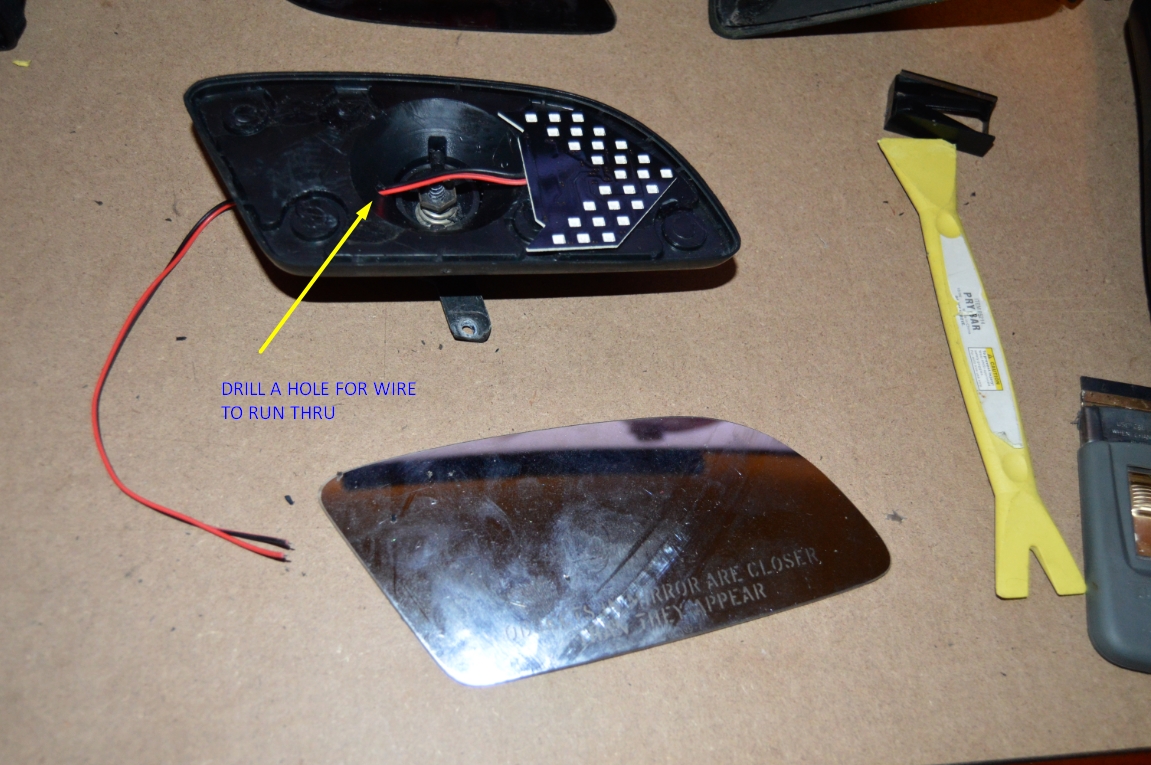
5. place the turn signal on the base for a test fit. also to figure out where to drill a small hole for the wires on the turn signal to run thru (on the plastic base).
6. drill the hole, run the wires thru it, place the turn signal on the base. secure it in place with a dab of glue, silicone, etc.
7. attach 2-way tape to the plastic base (you might need to layer it up 2-3 times), then affix the mirror glass on it.
[if the mirror sticks out away from the base a bit it’s ok, you can always run a small bead of silicone behind the glass to keep the moisture out]
.


.
8. run the wires thru the housing & out towards the door (in the same direction the adjustment cable runs).
9. screw the plastic base (& mirror) back onto the housing (with the 3 screws you took out earlier).
10. it’s a good idea right now to check to make sure the LED light works.
[you can hookup the wires up to a 9-volt battery to see if the blinkers light up]
.

.

.
11. attach some additional wire to the existing ends of each of the LED turn signals.
[about 4.5′ on the drivers side, 7′ on the passengers side]
12. push the LED wires thru the center hole on the door, as well as the adjustment rod (if applicable). Then reattach the mirror housing to the door (using the 2 10mm bolts).
.
.
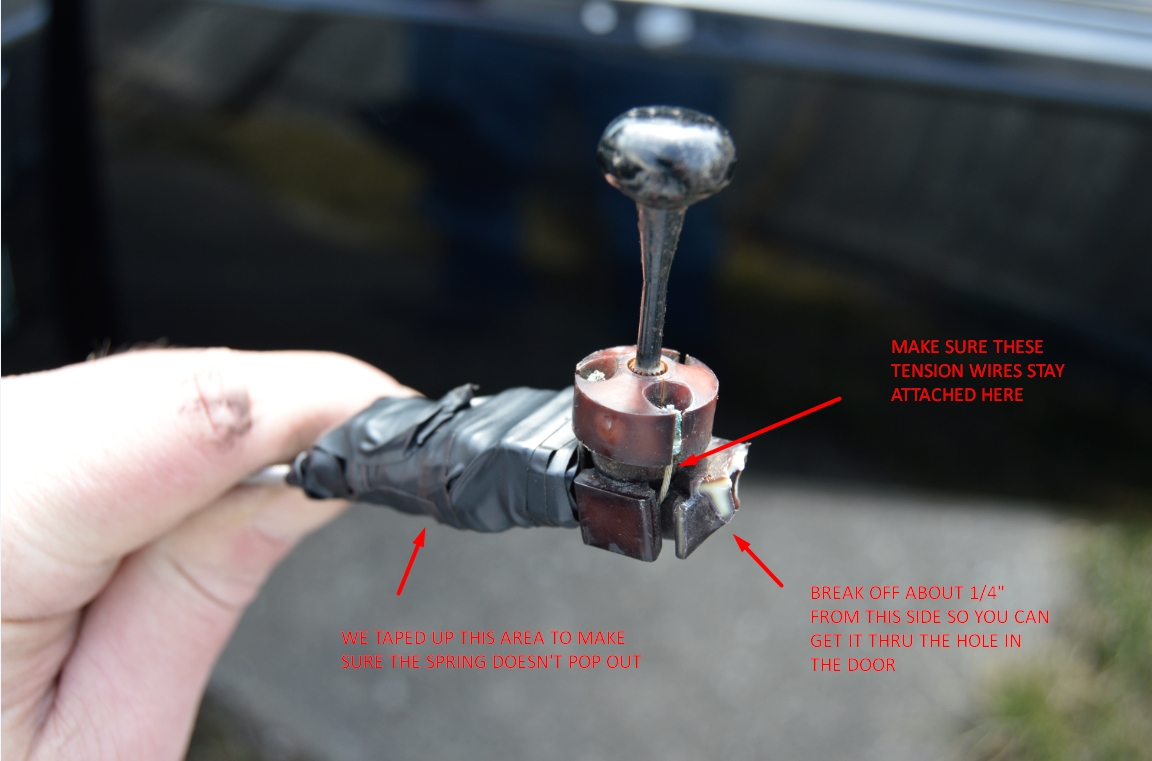
[NOTE: for the drivers side, the knob part of the cable will need to be trimmed slightly to fit thru the hole in the regal door. look at the pic to see how much we trimmed off. Also note that you will NOT be using the adjustment cable from the new mirror, as for one, the cable is too short to reach the original point on the door, and 2, even if did, it would not fit in the GN bezel since it’s shaped different]
[again, if you acquire actual mirrors from a Monte Carlo SS, which is another G-body vehicle, you may not need to do the above step. However, finding MCSS mirrors is harder than just finding Camaro versions]
[IMPORTANT to note: even though you will not be using the adjustment cable, DO NOT cut it off! This cable is what keeps the tension on the mirror, and if you remove it, the mirror glass will flop around & probably eventually fall out!]
.
.
[just leave the drivers side adjustment cable dangling inside the door. But DO secure it to the 2 attachment points like the original one used as to keep it away from the window!]
[secure the new wires inside the door using the 2 attachment points that the old adjustment cable used]
.
.
[the below method of how we wired these new mirror turn signals to function may not work for your vehicle (there’s aftermarket gauges & turn signals on this Buick GN). you can always take the ground wire from the LED & ground it somewhere appropriate, then take the positive wire and run it to the appropriate blinker circuit and splice it in]
.
.
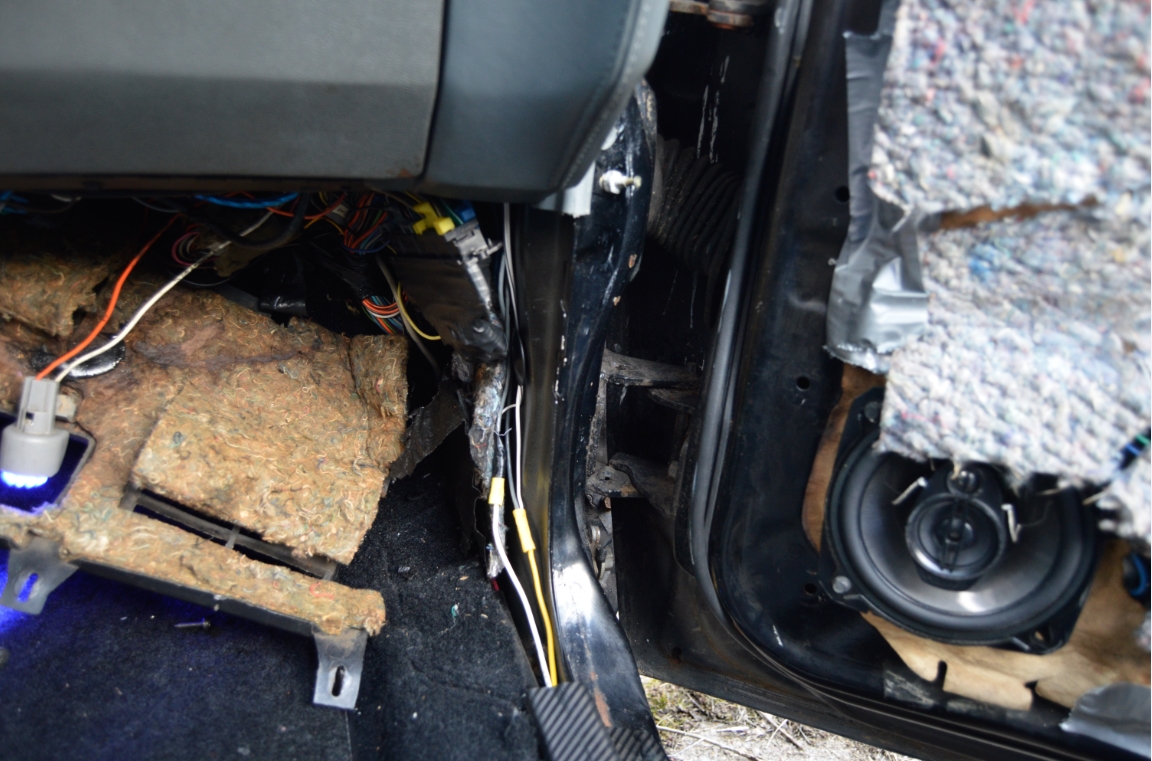
13. we ran the LED wires thru the door, and the boot in door jam, then up under the dash, and connected them both, inline, with the dash cluster turn signal indicator (splicing it into the existing wires; cut the original wire, attach one side of the new wire, then connect the other LED wire to the other side of the original wire. The new LED doesn’t need a ground wire since it utilizes the existing ground from the original blinker wiring setup).
14. before you put your dash back together, check to make sure the new LED blinkers actually blink!
.
.
15. repeat steps for the other side.
16. put interior, door panels, & everything else back together.
16. TA-DA! Finished. Now go admire how cool these actually look!
Pretty neat, huh?
.
.
Note that the LED’s aren’t super bright during the day. If it’s a real sunny day out, you probably won’t even see them when they light up. During night time however, wow! bright!
.


