


This is going to be a 7-part series on how to do a rear disc brake swap on a Buick Grand National (but same as any 1984-1987 Buick Regal):
1st, overview on rear disc brake setup, prepare axles.
2nd, paint brackets and calipers & add turbo 6 arrows on them! (same like we did to the front calipers).
3rd, removal & installing the new rear disc brakes setup.
4th, installing stainless steel braided caliper hoses on rear calipers.
5th, installing the main rear tee connecting braided hose (chassis to axle, with Tee).
6th, installing all new stainless steel brake lines from Inline Tube, complete, from the master cylinder to the proportioning valve to the calipers in front, and master cylinder to prop valve to the Tee on the rear axle housing to the rear calipers.
7th, remove & replace OEM proportioning valve with 4-wheel disc prop valve (also from Inline Tube).
YOU ARE ON PART 1 HERE.
.
This entire job was actually completed over 2 (long) days, however, to make understanding it all a bit easier, and to make the how to story simpler, we are breaking it down into 7 steps for easy digestion. The 7 posts will detail all of the steps involved in the rear disc brake swap.
.
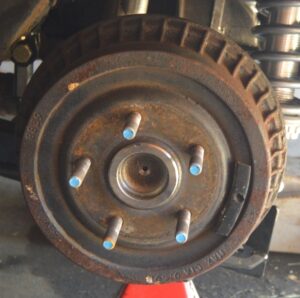 The debate on drum vs disc has always been that drum brakes hold boost better at the line.
Disc brakes stop a Turbo Regal better, and look prettier on the vehicle.
So it’s a matter of choice really, depending on what you want to do with your Turbo Buick.
We bought this G-body Regal disc brake conversion setup as a complete kit a few years back, off ebay no less, at a dirt cheap price ($225 shipped) from some other Buick GN owner who changed their mind about using it.
As always, things come up and you don’t always have time to do what you want to do.
Well, this past year-ish or so has been different with a lack of car shows to attend due to covid, and finally having some extra free time to complete a lot of the jobs that were on the “to do” list.
That’s one of the (only) good things about 2020 and the beginning of 2021, we managed to finish installing a bunch of things on the 1987 Buick Grand National that we’ve been wanting to do.
(check out all the stuff we’ve done here: projects for a Turbo Regal)
We ourselves were considering actually using this kit or not. It’s more of a “want” really than an actual “need,” but considering that we upgraded to new wheels and tires it’s probably time to make the backside of the rims look pretty too (which they will since we intend on painting the calipers blue, matching the front ones, and to match the scheme going on with the rest of the car).
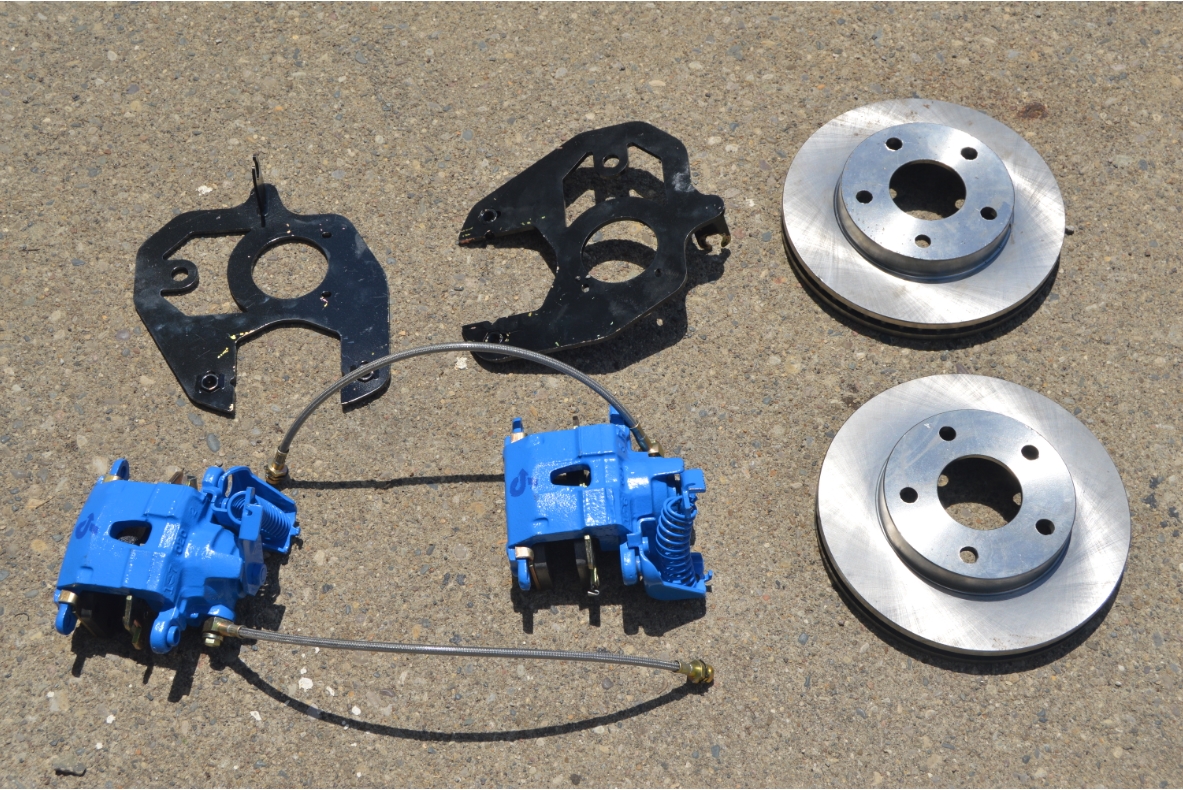
This “kit” we have, is not what we would really consider a standard kit, since it’s kind of a mash-up between the parts you use to make everything work (the parts come from 3 different cars!). But it is sold in kit form by many vendors, so I suppose it could be considered a (ready to bolt-on) type of kit.
For what we’re using:
The backing plates are sold separately (scarebird brand).
The calipers (single 50mm piston) and brake pads are from a 1979-85 Cadillac Eldorado.
The (rubber) flex hoses are off a 1979-81 Camaro front (but we are using stainless braided hoses instead).
The rotors are 1983-98 S10 4WD fronts (11″).
Luckily for us, when we purchased it, it was complete with everything needed.
,
.
There’s similar kits available that utilize all of these exact same components.
(inline tube, SSBC, PST, and others to name a few)
Some kits utilize calipers with and without an emergency brake attached.
The ones we have does feature an e-brake, but we’ll probably never be able to use it since we have kickpanel speaker pods, and that mostly disables the function of the e-brake pedal since they are in the way of pushing it down!
Some kits have optional cross-drilled and slotted rotors. Ours has plain jane flat rotors, but that’s fine for now.
(perhaps we will upgrade to those sometime in the future)
The first thing I wondered, was how well these would actually work considering how very small the calipers look. From the people I asked who were using similar setups, I was told very well! LOTS of the G-bodies I have seen at local car shows have these same type setups on them, so they must be decent. OK then.
Most of the kits are designed to fit GM 10 bolt rear ends (7.5, 8.5), which is what is in the Buick Turbo Regals, so there shouldn’t be too much issues with installing it.
After looking at several of these kits, it seems that the scarebird backing plates are the only style available that is a simple 1-piece backing plate. The other kits have adapters and spacer plates that are attached to the axle as well as the actual plate that is used to mount up the calipers.
(not sure if one style is better or worse than the others, just stating a fact)
For the Scarebird setup, their description says:
The axle shafts must have the flanges turned down to fit inside the rotors (as GM had to do…).
We have a hose retainer welded to the bracket itself, so no welding or cheap zip ties to retain the hard lines.
.
Small details:
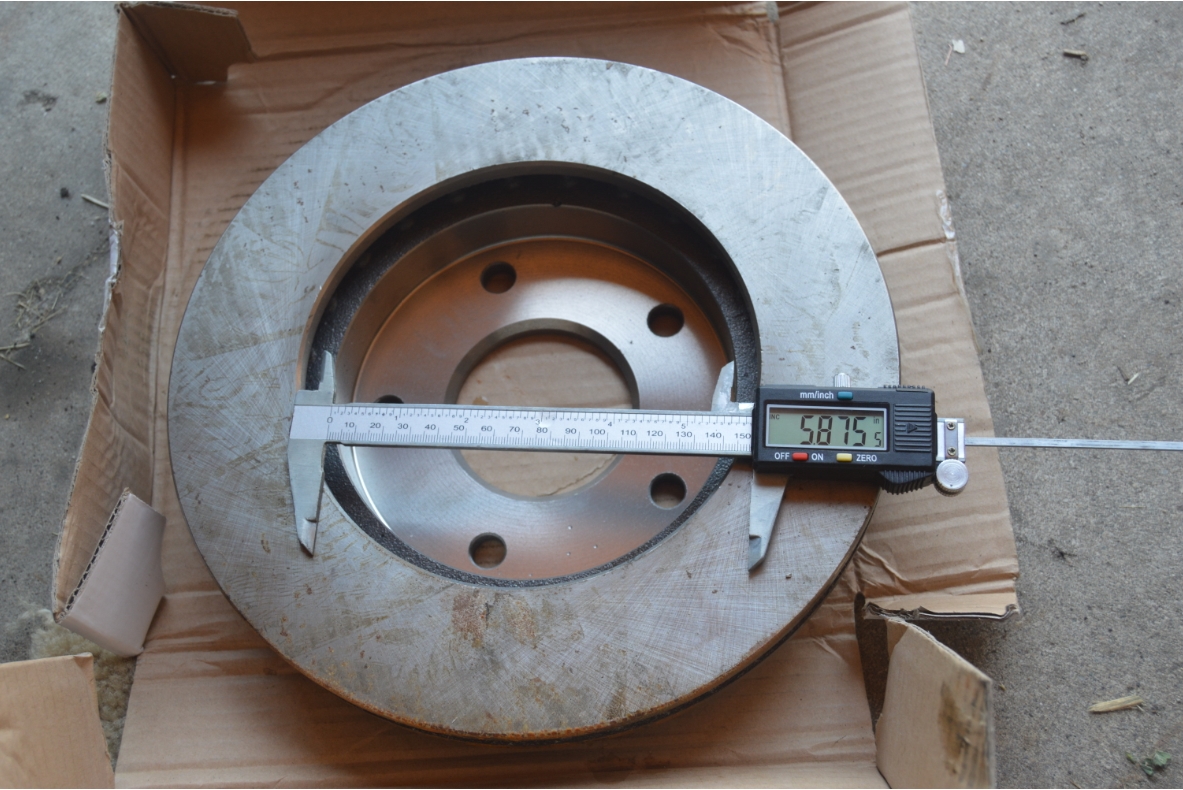
The rotors we have, have an inside (back side of rotor, that the axle flange rests on) hat measurement of 5 7/8″.
The hole in the (center part of the) rotor, where the axle comes thru measures about 2 3/4″.
The wheel stud holes were manufactured for (OEM size) 7/16″ studs.
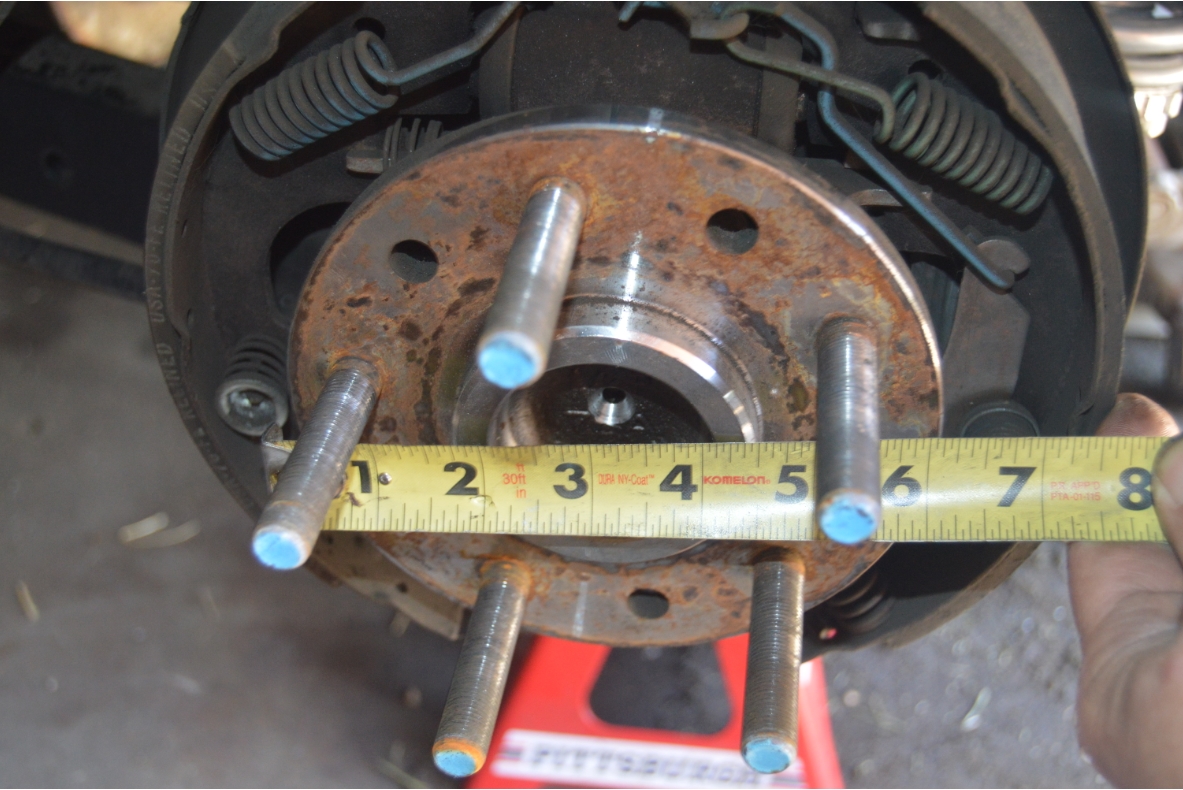
Our axles are aftermarket (Moser) units, and their outer flange diameter is 6 1/8″.
The center (raised portion on axle) diameter measures a little under 2 3/4″.
So the center part is ok, but the outer flange needs to be machined down 1/4″ (overall, to fit inside the rotor).
,
.
The (aftermarket) wheel studs on these axles are 1/2″, and 3 out of the 5 of them fit thru the rotor (sort of), but the other 2 are slightly off, so we’ll have to drill out the holes a little bit (from 1/2″ to 9/16″) to get the rotor to go onto all of the studs.
(something to remember the next time you replace rotors!)
(you should drill out all 5 holes to the same size to keep things balanced and uniform, not just the 2 that don’t fit the studs!)
Keep in mind if you have to have all this machining performed, you’ll need to pull your axles out, and your Turbo Buick will be down until the machine shop finishes the job, which could be a day or a week or more, depending on how busy they are!
(we will show you how to pull out the axles on Part 3, and this needs to be done first thing if you’re installing a setup like this, since you can’t put it all back together until you get your axles back from the machine shop. Although you CAN do all of the rest of the prepwork and install some things while you wait for that to happen)
(we got lucky as our local machine shop wasn’t too busy and was able to finish the job in about an hour! same day service, nice, that doesn’t happen to often!)
.
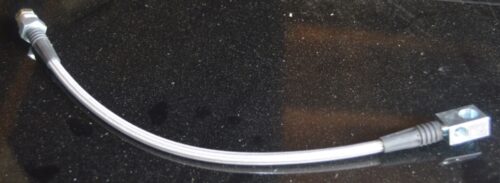
The factory brake lines are all inverted flare, and the new braided caliper hoses also require an inverted (37*) flare fitting (an otherwise normal brake line nut), so you’re all set with that.
If you’re changing or modifying your lines, you may need to either reflare the lines, or buy brake line adapters, or install new brake lines made specifically for disc brake rear ends (Inline tube has these).
We eliminated the need to do any re-flaring by installing all brand new brake line (completely, see Part 6 of this story), which is already an inverted flare when you buy it.
The rear disc brake kit we acquired included 2 rubber hoses, but we opted to swap them out with new stainless braided lines, which gives your brakes more stopping power by eliminating the common flex issue with rubber lines.
We also are going to replace the stock rubber line that runs from the chassis to the Tee on the rear end with a braided hose as well (that’s Part 5).
,
.
We initially intended on bypassing the stock proportioning valve, (but keeping it for the front brakes, so we were going to put a plug in the incoming/outgoing lines for the rear portion), and install a baer brakes rear adjustable brake proportioning valve (which is installed on a conveniently mounted black powdercoated bracket underneath the master cylinder). But then we saw that Inline Tube offers a brand new prop valve made for 4 wheel discs, so we just acquired that instead (that makes plumbing a lot easier and cleaner, and makes this area of the Gbody Regal pretty with the new parts!).
We’re also replacing the entire factory brake line all the way from the master cylinder to both the front & rear calipers.
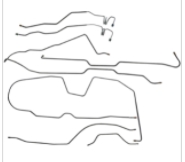 A 1/4″ solid tube runs from the MC to a proportioning valve, then a 1/4″ solid tube to the braided line that includes a Tee attached, then two 3/16″ lines that run out towards the calipers, attached to the braided line that connects the actual calipers.
(the current brake lines are most likely OEM, so since they are 30+ years old, we just decided to go ahead and replace them all)
(we are using the complete stainless brake line kit from Inline Tube)
.
One advantage of a (total bolt-in) rear disc brake kit like this versus using 98-02 Camaro disc brakes (or other donor cars) is that you don’t have to cut the axle housing. This means that you could always restore this area back to completely stock in the future if you wanted to.
.
PARTS for entire job:
– complete rear disc conversion kit ($350-700 depending on where and what brand you get)
– the scarebird backing plates (only) are currently $105.99
(https://scarebird.com/index.php?route=product/product&path=59&product_id=129)
(but these aren’t needed when you buy a kit from some places, since they supply their own bracket versions)
– 2 braided lines (for rear calipers, $15/set ebay)
– 1 braided line (including the Tee built-in, $15 ebay)
– can of brake fluid (32oz, about $10 autozone)
– new brake lines from Inline Tube (stainless steel, complete, #SBKB8101, $179) – (OE steel is a bit cheaper if you prefer that version)
– new brass proportioning valve (4 wheel disc, Inline Tube, #PR101, $75)
– machining of axles/rotors (varies by location)
– leftover black/blue paint from previous use (when we painted the front brake calipers)
.
We also initially bought these too, which we aren’t going to use now since we just got a new 4 wheel disc prop valve:
– rear adjustable brake proportioning valve (baer brakes, $15 ebay special)
– powdercoated black bracket to hold prop valve ($10 ebay)
(you could also piece together new brake line, buying a bunch of smaller sections from a place like autozone, but it’s regular steel, and you have to make the bends yourself, not to mention you might have to utilize a few couplers to achieve the proper length needed, and that creates potential leak spots)
.
Be sure to come back starting tomorrow to see the progression on this Buick GN!
(you can always subscribe so you don’t miss anything important!)
.


