


We decided since we were upgrading the brake system with rear disc brakes, we should probably replace the original 3-decade old brake lines too.
If you’re like us, you probably think “it’s ONLY brake lines, how hard could it be?”
Well, let us tell you, this is quite a job replacing all of the brake lines!
This job is best performed when the chassis is off the frame (since you have easy access to everything), but it can be done, as you will see we did it on the 1987 Buick Grand National that we’ve been working on.
.
Inline Tube offers a super nice complete setup made specifically for our Turbo Buicks.
Available in OEM steel, or stainless steel ($155 vs $179).
For those converting to rear disc brakes, Inline also makes 2 special pieces that go from the TEE to the caliper hoses (they are a bit shorter than the stock ones, to be able to connect to a new caliper hose tab welded to the axle, some brake kits may need this, part #SCMB78RC1, $40).
We chose to go with the stainless steel line version (#SBKB8101).
.
.
Inline tube says about their brake line kits:
This is the complete 7 piece brake hard line set. It comes with every hard line in the system. 2 master cylinder to valve lines, right and left front out to the brake hoses, front to rear from the valve to the rear hose and the rear axle housing lines from the hose to the rear drum brake wheel cylinders.
All Lines are preformed and ready to bolt into place. Identical to the originals, with all the correct fittings and wrap.
Made in the USA by Inline tube and AMERICAN Manufacturing Company. These are all preformed ready to install.
You can check out Inline’s brake line kit by clicking on the banner below.
.

.
[Inline offers other things too: fuel lines, trans lines, engine lines, nylon lines, brake parts, etc.]
.
This is an ongoing 7-part series:
1st, overview on rear disc brake setup, prepare axles.
2nd, paint brackets and calipers & add turbo 6 arrows on them! (same like we did up front).
3rd, removal & installing the new rear disc brakes setup.
4th, installing stainless steel braided caliper hoses on rear calipers.
5th, installing the main rear tee connecting braided hose (chassis to axle, with Tee).
6th, installing all new stainless steel brake lines from Inline Tube, complete, from the master cylinder to the proportioning valve to the calipers in front, and master cylinder to prop valve to the Tee on the rear axle housing to the rear calipers.
7th, remove & replace OEM proportioning valve with 4-wheel disc prop valve (also from Inline Tube).
YOU ARE ON PART 6 HERE.
.
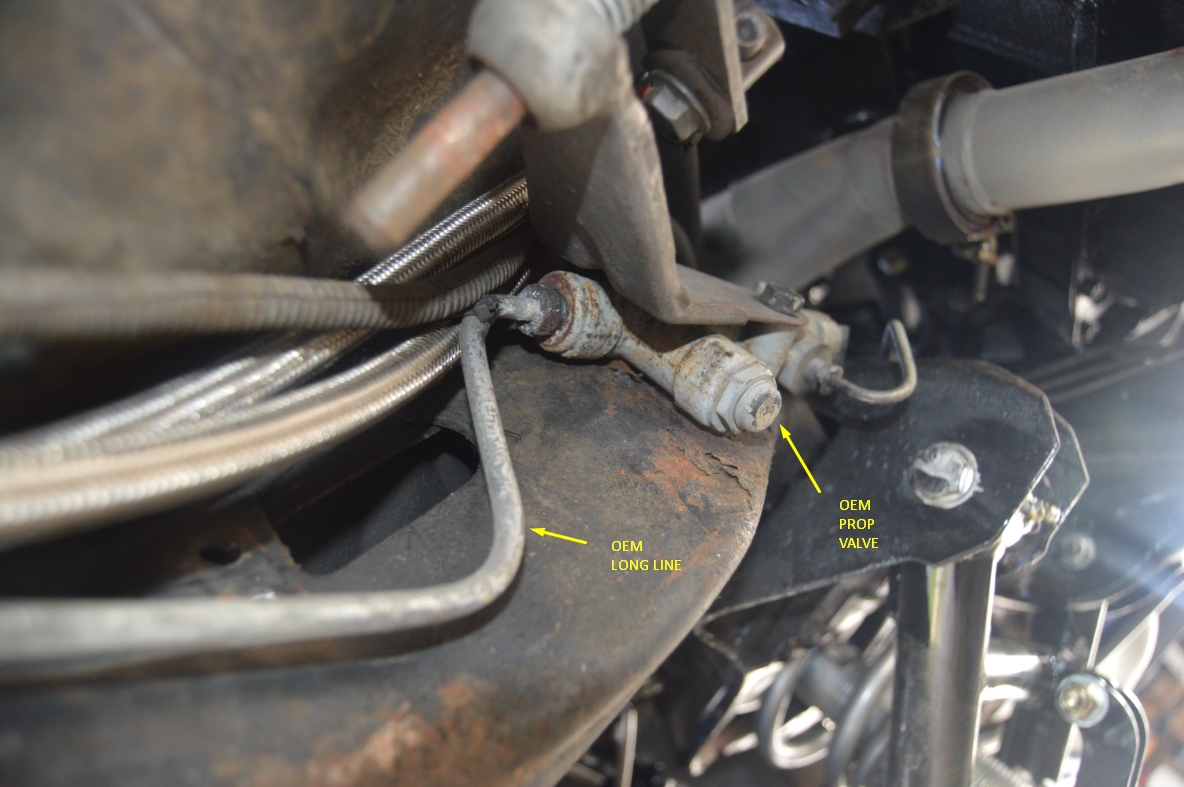
COMPARISON SHOTS OLD OEM LINES VS NEW BRAKE LINES:
.


.
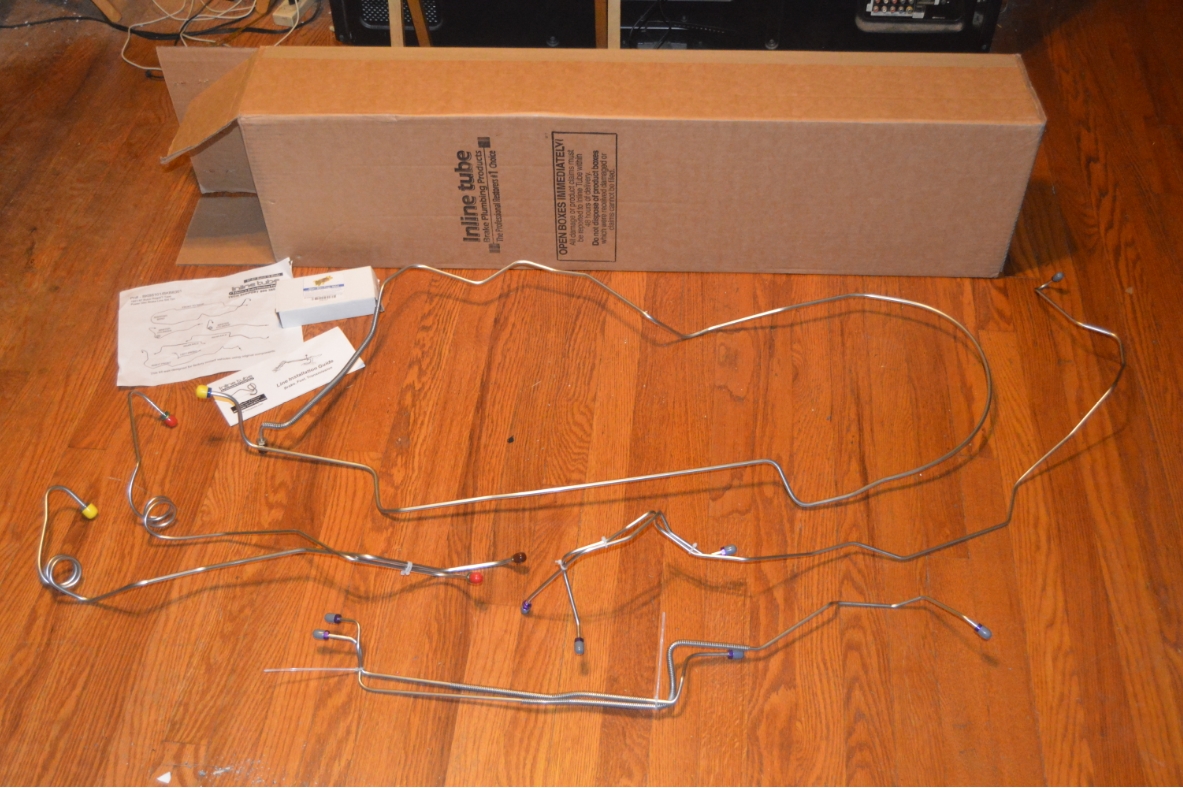
There’s 7 pieces in the brake line kit:
– 2 pieces with a coiled up section (near the tops) on them (these go from master cylinder to top of prop valve) – (they are zip tied together)
– 2 pieces (these go from front side [1 on top, 1 on bottom] of prop valve to front brakes) – (they are zip tied together) – (the shorter piece goes to the driver side caliper hose)
– 1 long piece (that goes from the rear of prop valve to the rear chassis line TEE hose)
(this has a shipping bend in it, see video way below on how to “unbend it” properly)
– 2 pieces with an extra wound coil wrap around them (these go from the TEE hose to each rear brake) – (they are zip tied together) – (the shorter piece goes to the driver side brake)
.
You can see complete details here about: brake line thread pitch & sizes if you need this type of info for some reason.
.
Note: since you probably aren’t going to save any of your old brake lines, you might want to make it easier on yourself and just cut off as much as you can, trying to unbend it or twist it around all the frame areas to remove it takes a lot of time.
.
COMPLETION TIME:
* expect 6 hours total (with removing/installing that longest line being the toughest & taking the longest time!)
(most of the time is spent removing all of the old lines)
.
TOOLS:
* 1 or more drip pans (to catch the old brake fluid)
* 3/8″ 7/16″ 1/2″ 9/16″ line wrenches (brake line fittings)
* 13mm socket (prop valve bolts)
* cutoff tool (for those hard to remove brake lines!)
.
PARTS:
* stainless steel brake line kit (Inline Tube #SBKB8101, $179)
* 4 wheel disc GM style prop valve (Inline Tube #PR101, $75)
.
Be prepared to have your old brake fluid leak out from all of the lines that you disconnect (or cut off).
A drip pan (or several) under each fitting end you remove is helpful.
We put one under the proportioning valve & disconnected the 2 main brake lines (on the top, in the center) and let the majority of the fluid come out from there.
While that area was draining, we started replacing the lines from the rear and worked our way forward thru the G body Regal.
.
HOW TO:
It’s easier & faster to do both the removing of the old lines & replacing with the new ones in each section you work at, before proceeding to the next section.
1. use 4 jackstands and put the entire Turbo Regal up to give you lots of room to work underneath.
(put the stands on the chassis, in front and back of the doors, so the suspension can droop down, makes it easier to reach the lines)
2. place a drip pan under the prop valve. Disconnect and separate ALL of the lines that are attached (5 lines). Let this drain while you work elsewhere. (7/16″ for front 2 lines, 7/16″ & 9/16″ for top 2 center lines, 9/16″ for rear line)
3. disconnect & remove the brake fittings from the rear brakes (7/16″).
(there’s clips that hold the line onto the axle that you must pry apart to remove old line)
.
.
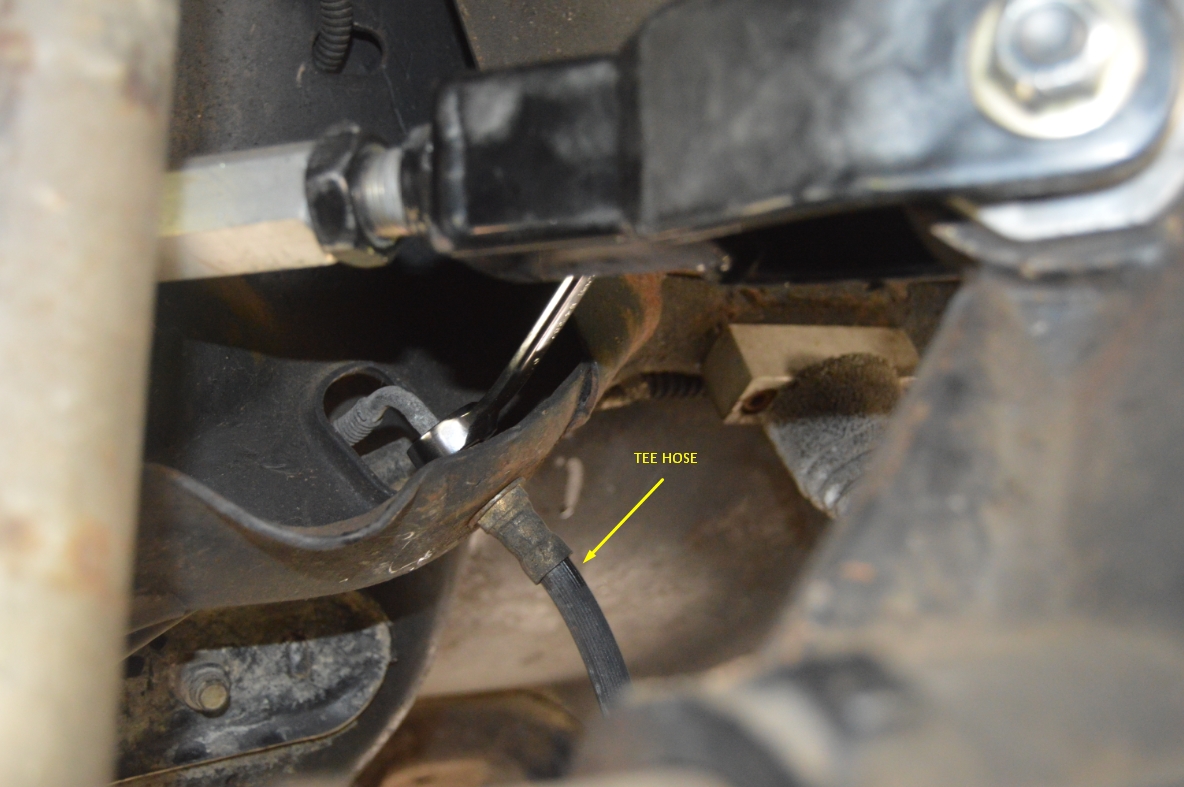
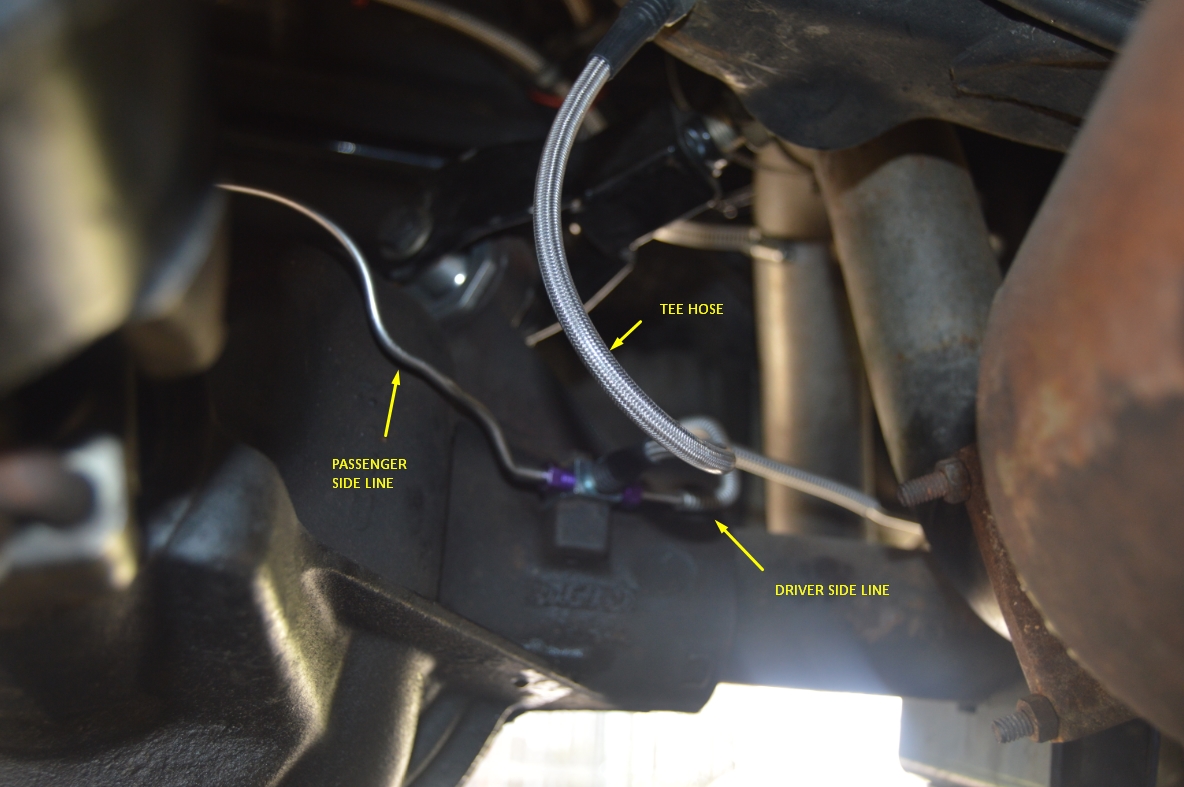
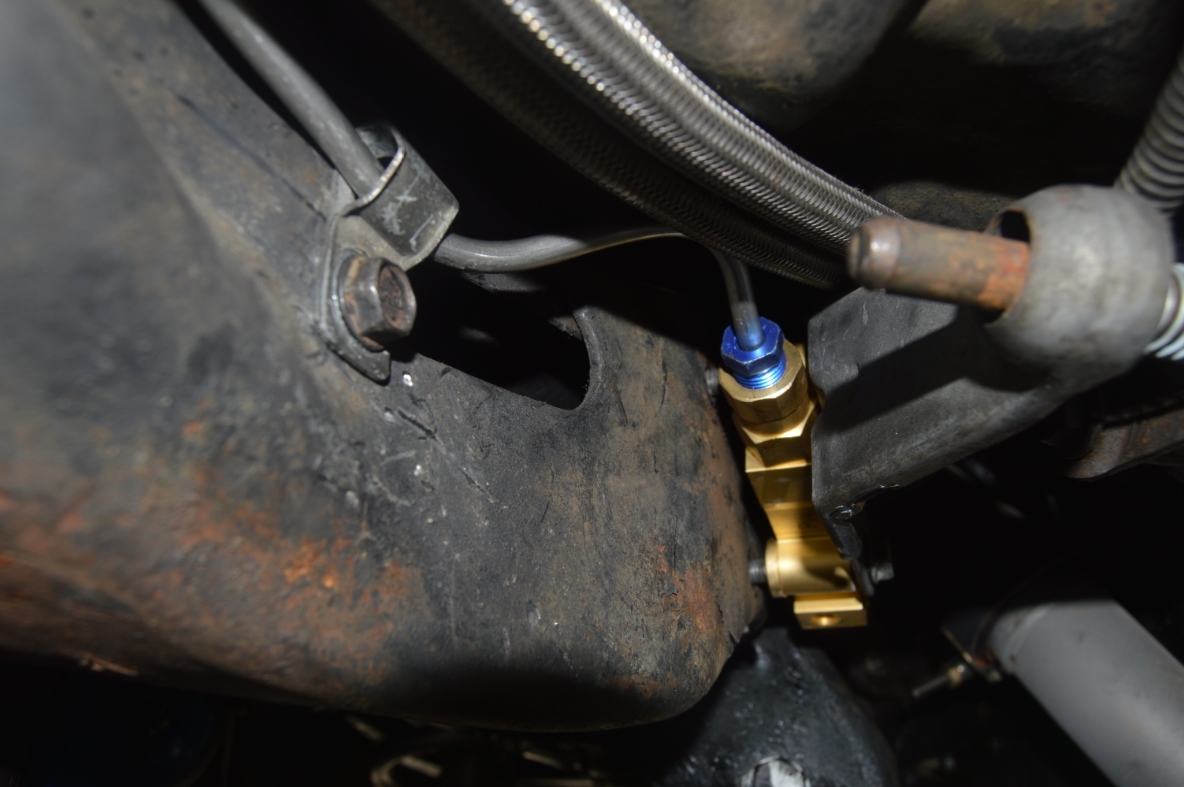
4. disconnect & remove the brake fittings from the rear TEE hose (7/16″).
(we replaced the chassis TEE hose with a new one. If you are utilizing your old TEE line, skip step 5 & 8)
5. disconnect & remove the other end of this TEE hose (9/16″ on hard line, 11/16″ on hose end. Plus a u-clip holds this end to the chassis).
.

.
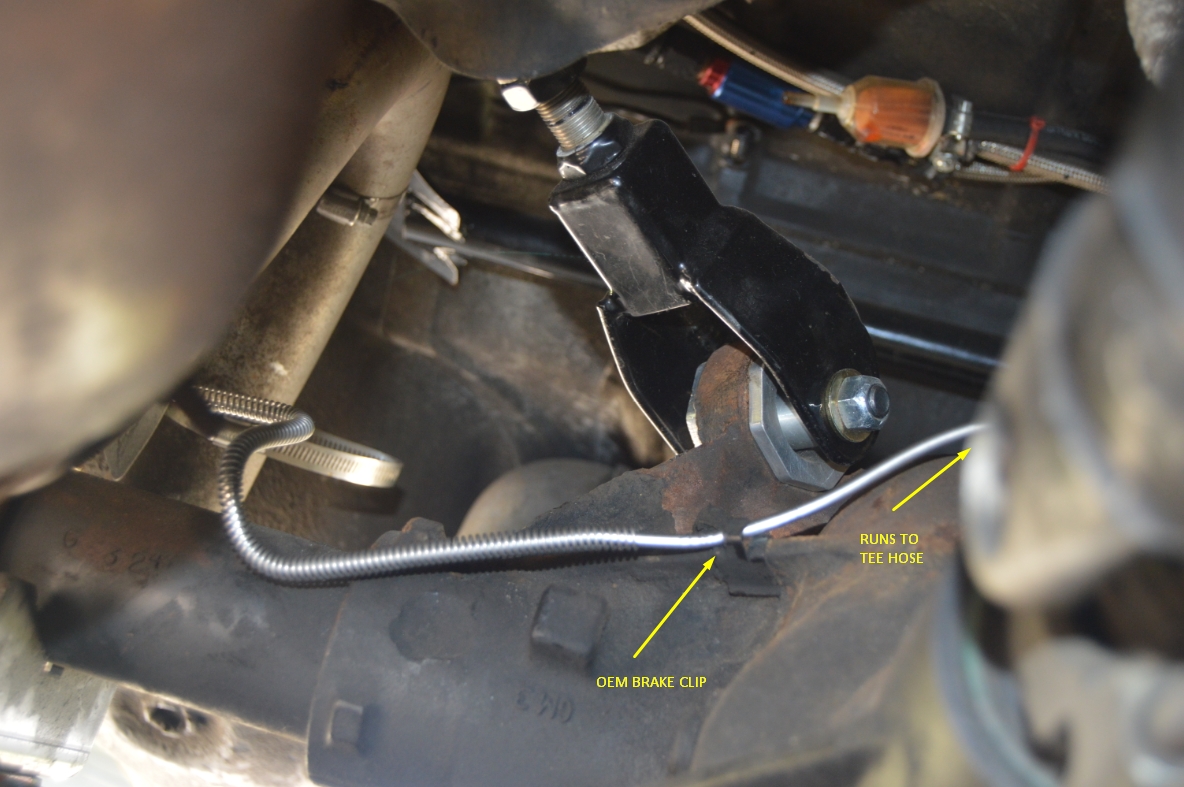
The main brake line running to the rear of the car is on the drivers side, inside the frame rail.
.
6. disconnect & remove the hard line that attaches to the TEE hose (9/16″).
(this hard line is the long brake line that runs from the TEE hose to the rear of the proportioning valve)
(it twists and turns thru the frame, might be easier to cut this line at various points to remove it all)
(It’s a weird angle to try to undo this fitting where it is at. We ended up just cutting off the hard line (at the bend, right near the end where it connects to the TEE line), and then pulling out the TEE hose (from the bottom).
We also cut the hard line near where the OEM fuel filter is located at, and pulled it out from there.)
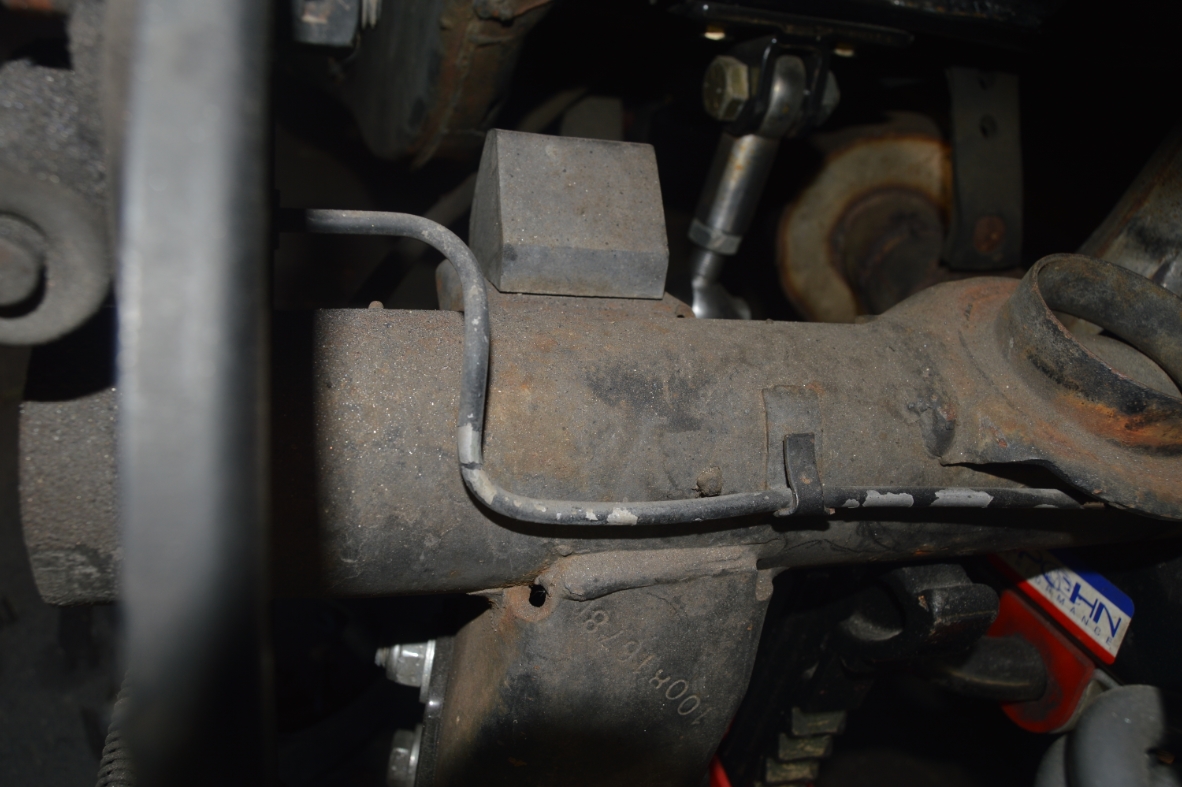
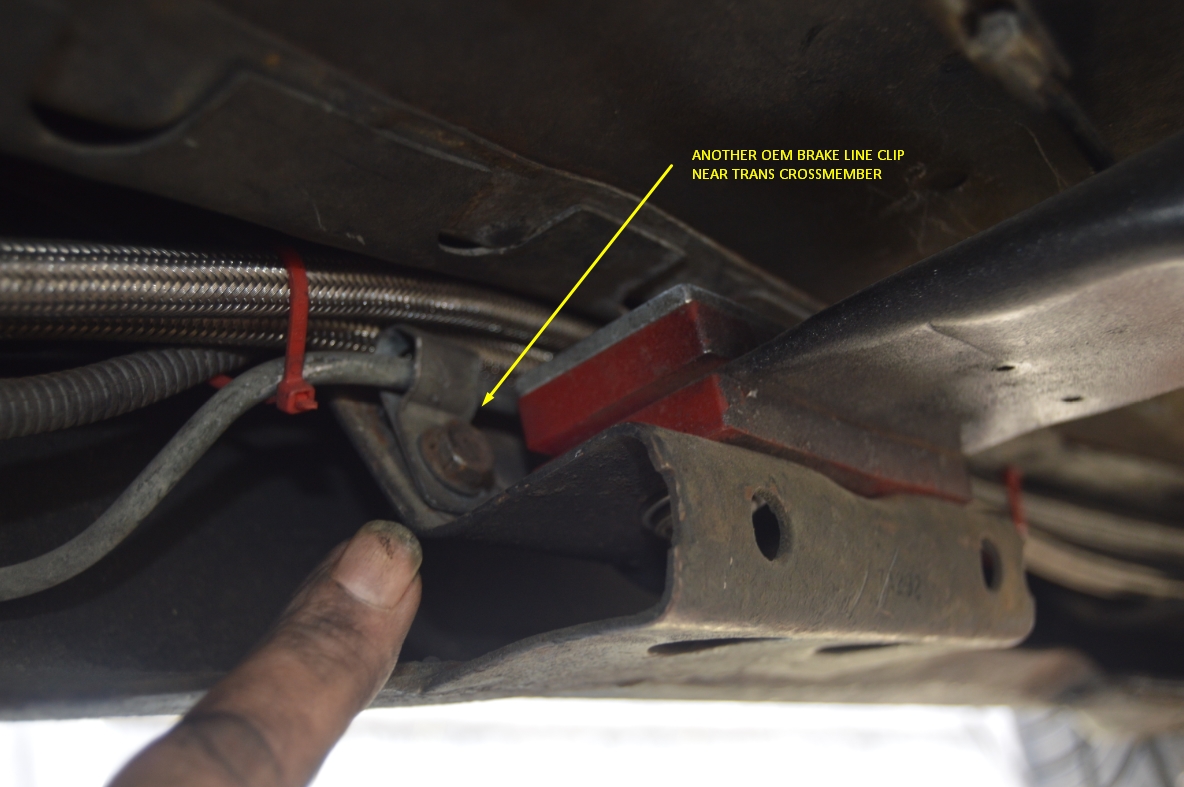
(this long line is clipped onto the frame at 5 points)
THE BRAKE LINE CLIPS:
1 is right near the TEE hose, on the other side of chassis where the line comes thru the hole in chassis; 1 is near where the OEM fuel filter is located at; 1 about a foot forward from there, 1 next to the trans crossmember mount, 1 near the proportion valve.
.


.
7. disconnect & remove this line from the prop valve (9/16″).
8. If you are replacing the TEE, install it now (1/2″ bolt holds it to axle, 11/16″ on chassis side that connects to the long main rear hard line).
(we found it easier to push the hard line thru the hole first, then secure it to the tee hose, push it back thru the hole, then secure it down to the chassis with the u-clip)
.
New brake lines / fittings NEED to be seated properly to ensure no leaks – watch the video way below to see the proper procedure to accomplish this! Seating EACH and EVERY flared line NEEDS to be done!
.
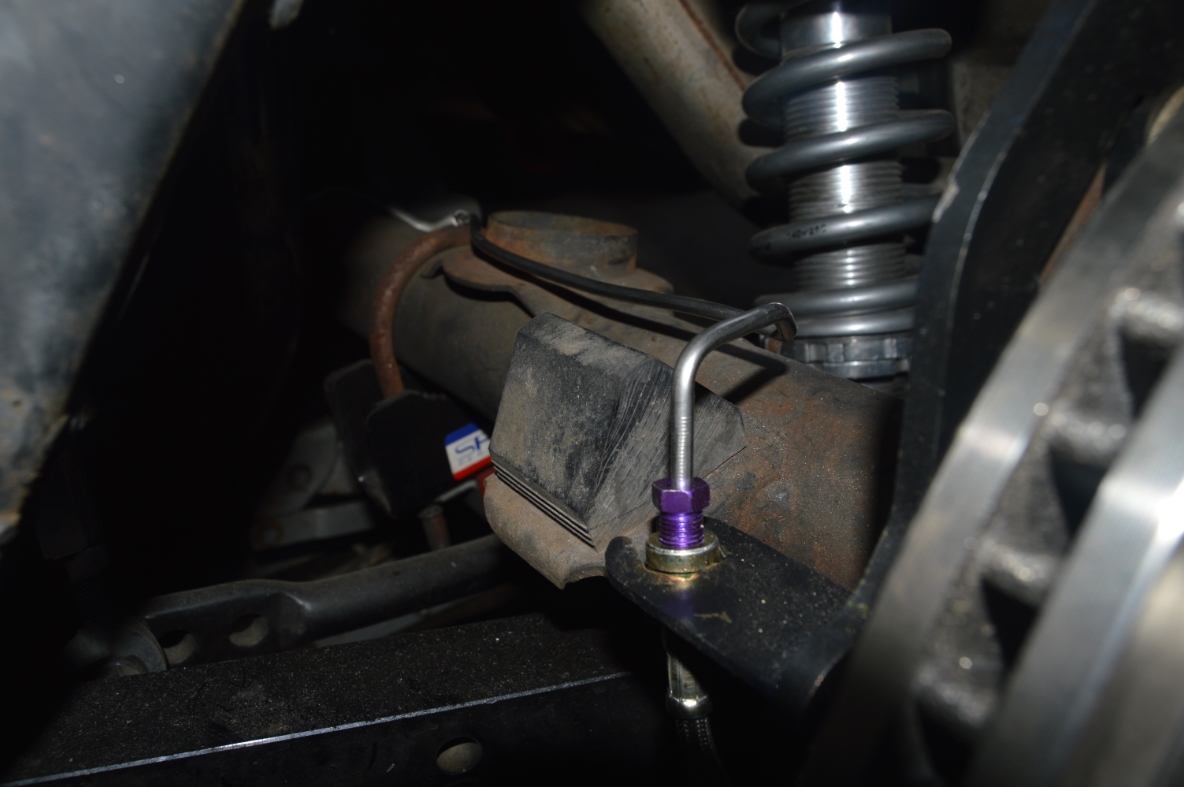
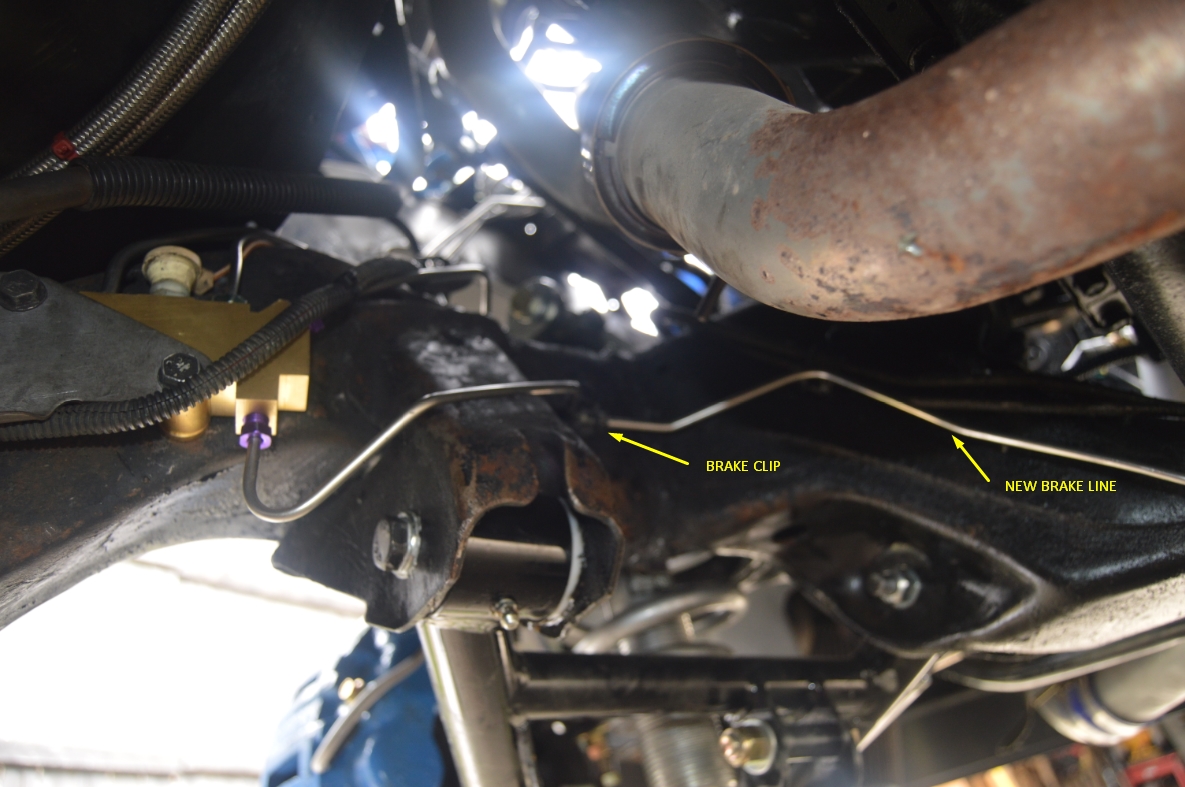
9. attach new rear lines from each rear brake to the TEE (7/16″ on both ends).
(we needed to reroute both these rear brake lines from the rear side of the axle [stock location] to the front side of the axle to accommodate the disc caliper hose positions, located on the tabs on the front side of the axle)
.


.
10. the new long line has a shipping bend in it which you will need to remove. (see video way below)
If you’re working on a car without the frame off, prepare to make some new creative bends (and lose the pretty ones that Inline made) in the long brake line, to be able to maneuver it around the drivers side rear section (near the fuel filter area & a bit back towards the rear of the car).
This is a twist, turn, push, pull, shove technique to get the line in the position it needs to be!
(good luck, this part of it seemed to take us forever to get it jammed in there!)
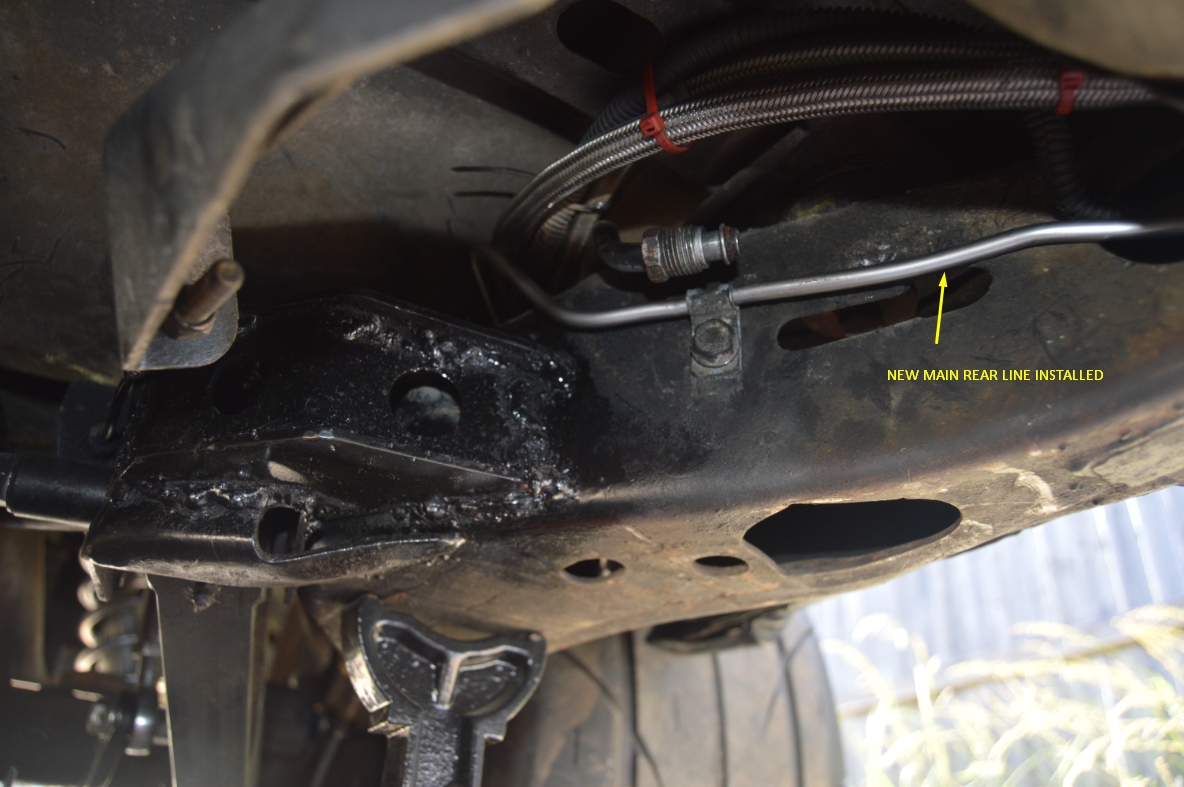
11. attach the new long line, at the TEE hose side (9/16″).
12. wiggle this new line into place (all the way from rear to the prop valve). reattach the 4 frame clips that secure the line to frame.
(we replaced the proportioning valve as well, if you are reusing your old prop valve, skip step 13 & 14)
.
.
13. unbolt & remove the old proportioning valve (2- 13mm bolts)
14. install new prop valve (reattach using original bolts)
The shifter linkage bracket is attached to the prop valve. Temporarily remove it, along with the proportion valve, from the frame. (2- 13mm bolts). Removing both from frame makes it much easier to remove/install new lines on the prop valve.
Also disconnect the brake warning light switch plug (the white one at the top, in the very center of prop valve).
15. attach new long line to the prop valve (9/16″).
16. disconnect & remove the hard brake lines from each front caliper hose (7/16″).
17. attach new brake lines from proportion valve to each front caliper hose (7/16″ on both ends).
(the lower front hole on prop valve goes to passenger side)
(for passenger side: there’s a few tabs along the path where the brake line runs that hold the line in place, be sure to attach the new line in these spots, just as it was originally)
(the upper front hole on prop valve goes to the drivers side)
.
THE BRAKE LINE CLIPS:
There’s 2 clips that hold the passenger line onto the frame (the line runs from the prop valve, stretching under the engine, then onto and over the frame, then over to the caliper hose). The first clip is about 6″ away from the proportion valve. The other clip is on the passenger side framerail (and in a horrible spot for us, as it’s directly behind the right hand exhaust manifold where the crossover pipe meets it! uggg!).
.

.
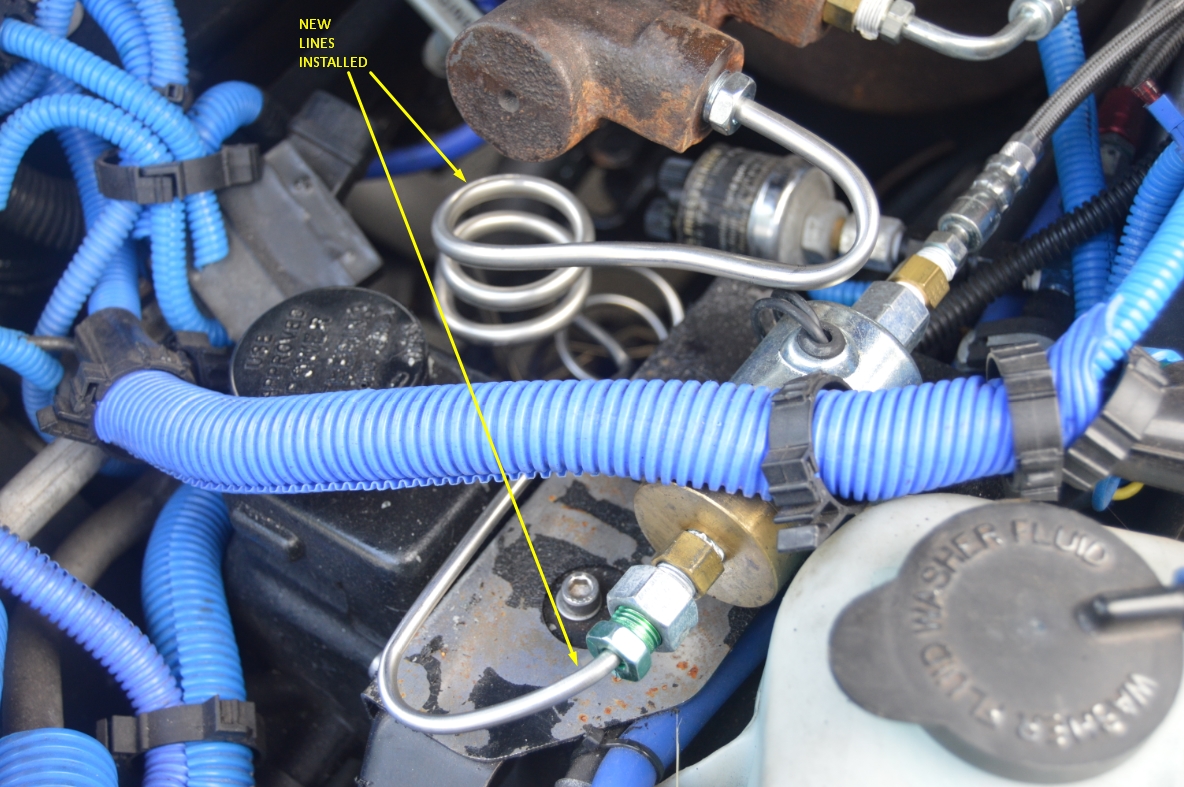
18. disconnect & remove the hard brake lines from the master cylinder (1/2″ & 9/16″).
(our front brake line doesn’t attach to the master cylinder, since we have a line lock installed)
19. attach new brake lines from master cylinder to proportion valve (both are 9/16″ on MC side, prop valve side = 7/16″ & 9/16″).
(front line uses 9/16″ wrench, and goes from rear of MC to front of prop valve on top)
(the bigger line is for the rear brakes. it gets attached to the front hole of the master cylinder. on the prop valve this line goes to the top rear hole, use a 7/16″ wrench)
On the 2 lines, coming from the master cylinder, where the lines go down and meet the frame (on the top side looking down into the engine compartment), there is a clip that holds these 2 lines to the frame. you must unbolt the clip to remove the lines.
Be sure to reinstall this clip on the new lines & secure it back how it was.
Be sure to reconnect the brake warning light switch plug!
.

.
20. fill up the master cylinder with brake fluid.
21. open up the rear bleeder screws, and let the fluid “gravity bleed” first.
Once the fluid starts coming out (on both sides), tighten the screws.
22. open up the front bleeder screws, and let the fluid “gravity bleed.”
Once the fluid starts coming out (on both sides), tighten the screws.
.
When you install a new prop valve, you may need a “Combination/Proportioning Valve Bleeding Tool” to properly bleed the brake system, otherwise you may trigger the warning light (but pushing the button resets it, if it trips).
This tool screws in, in place of the warning light socket.
.
23. bleed the entire brake system.
(when bleeding brakes: you always start at pass rear, then driver rear, then pass front, then driver front)
24. check your brakes CAREFULLY before you drive it! Also check for leaks! Re-bleed the brakes if needed.
.
That should be it! Pat yourself on the back for a job well done!
This was one of the more difficult jobs to do on a Turbo Buick, believe it or not!
.
REMOVING SHIPPING BENDS ON THE LONG LINE (prop valve to TEE hose):
.
.
SEATING A NEW BRAKE LINE PROPERLY:
.
.
.
.
.
The vendor shown above has supplied us with the parts we used in this project, per our request. If you are looking for similar parts, don’t hesitate to inquire with this specific vendor!
.
.


